How to Create a New Project in Hub Planner?
Unlimited Projects can be created in Hub Planner, there is no restriction. Projects can be created in a number of ways using any of the following methods.
Hub Planner interface:
- Sidebar
- Scheduler
- Settings
Alternatives:
- Bulk Upload via CSV
- API
Add from the Sidebar
- From the Hub Planner interface, click ‘Projects’ within the top left hand corner of the Hub Planner sidebar.
- Next, the sidebar drop down menu will appear with multiple options.
- The first tab is ‘Add New’.
- You have options to add a new project, resource as well as creating a project or resource group.
- Select ‘New Project’ from the sidebar.
- A pop up ‘Project Modal’ interface will appear where you will be required to fill out the project details.
Add from the Scheduler
You can quickly add a new project from the Hub Planner Scheduler. You might be in your own ‘My Scheduler’ or perhaps another resources / groups.
- Simply select a cell within the Scheduler.
- Click on the 3 dots of that cell.
- This will open a menu where you can select ‘Add New Project’.
You have the option to simply add the ‘New Project Name’ (required) and come back to edit it at a later stage. Alternatively, you can click ‘add more details’ where the project modal will appear.
Add from Settings
Follow the steps below to add a new project from the Hub Planner Settings Menu.
- Navigate to your “Settings” page in the top right header
- Choose “Manage Projects” from the left Sidebar
- Select to “Add New Projects | Bookings” on the upper right side of the interface
- Choose “Add Single Project”
- A Project Modal (pop-up) appears where you can add New Project information
Add from CSV file
Follow the steps below to add a new project from the Manage Projects Page.
- Navigate to your Settings Page
- Choose “Manage Projects” from the Sidebar
- Select to “Add New Projects | Bookings” from the upper right side of the interface
- Choose “Add Multiple Project”
- An Upload Modal (pop-up) appears where you can add New Project information via csv.
Add a New Project via API
API stands for Application Programming Interface. What does it do? API basically allows softwares to talk to each other. It acts as an intermediary to facilitate the integration of the two softwares.
How do I get Hub Planner to add a new project via API? We will direct you to our API feature page which contains all the information you need to get set up.
What’s a Project Modal?
The Project Modal is where you can store and edit information about the project. The modal is split into 9 different tabs – each containing their relevant section of topics.
How do I access?
You can access the Project Modal by selecting to edit the project. You’ll find the option to edit the project mostly by clicking on the 3 dots which you will find int he following areas:
- From the Sidebar, Projects
- From the Project Dashboard – top left hand side
- And lastly, from a Project Booking within the Scheduler, right click
Alternatively, you can click on Settings and access Manage Projects. From here select your desired project to edit. Lastly, you can also edit via CSV and API. However, we would suggest that you navigate to the feature pages of both CSV and API for further information.
What information can I edit?
Next, let’s take you through the Project Modal and how to edit the details.
Basic Project Information
The first tab on the Project Modal. Endeavour to complete the basic information that will help you to identify your project. Some fields are mandatory which are marked by a red star. Others are optional which you can always come back to at a later stage.
- Project Title: (The name in which you wish to refer as) Note this field is mandatory.
- Project Code or ID: (Helpful should you have a company identifier code setting)
- Select Client: Once you click the field, a list of your clients will appear in a drop down list. You can manage your database of clients from Settings, alternatively you can always set one up right here by clicking the first option from the drop down list.
- Add Tags: Enter as many tags as necessary to help you identify your requirements. Examples can be industry specific to your business.
- Project Manager: Select a Project Manager or indeed a team of PM’s from the drop down list. Again, you can manage these within settings. If you select one by mistake, it’s easy to delete by clicking on the x.
- Set the Status Label: Created within your settings. Examples would include Active, Planned, Floating, Archived. Choose a label for the current status. This can always be changed at any stage. Once added to the system, it will be nested under the status label within the sidebar.
- Custom Color: If you have activated category colors to define your bookings color, this option will not be available to you. However, you can always change this from your settings.
You can select ‘Add New’ which will save your project and add it to your list of projects. Alternatively click onto the next tab to select Resources & Group Management. You can always revert back to editing your project at any stage.
Resource & Groups Management
Here is where you can add Resources and Resource Groups you have set up within your account to a Project.
It’s also an opportunity to add Unassigned Work to the project which is handy should you wish to add in the time but assign the resource at a later stage.
You have 3 options to allocate to the project. Firstly is Add Resources.
Add Resources
You will see ‘No Resources Selected’ within the field. Once you select the field, a drop down list of all the resources within your account database appears. Within the drop down list you have clever intuitive features that allow you to select as many or as little resources as you wish. There is a search filter at the header of the listing which allows your to search quickly through your database for a resource of choice.
Next, there is a ‘Select All’ feature which you might find handy if you have numerous resources to allocate and it’s easier to select all and subsequently deselect those that are not required.
Lastly, you can scroll through the list and tick the resources that you wish to allocate to the project.
Add Unassigned Work
Next, is adding any unassigned work to the project. As mentioned, this is a handy opportunity for you to schedule in the time for the project and add the resources at a later stage.
Working in the same manner as Adding Resources, you have the same three feature options within the drop down listing. You can utilize the Search Field should you have a multitude of Unassigned Work options. Alternatively you can use the Select All function. This can be a work practice that you allocate all unassigned work as standard to a project as a starting point. Allocate the resources and teams at a later stage. Of course, if you wish to allocate just one or indeed a few of the unassigned work options you can scroll through and click as required.
Add Projects to Groups
If you have set up resources to Groups, it’s at this point where you can assign a project to a Group. You can find out more details here on how to set up a Resource Group.
Again, you have the same functions available to you for allocating groups to your project. Search Field, Select All Function and the Click as Required option. This is especially ideal if you have multiple groups set up. For example, you wish to allocate the project to your group of UX designers that are based in New York as they are on the same timezone as your client.
Add New or Continue
Lastly, you can continue to the next tab of project options or alternatively you can finish by clicking ‘Add New’. You can always pop back in to edit the project at any time.
Budgets, Billing & Rates Management
This Hub Planner feature is a very accomplished tool within the platform. This tab allows you to manage the finance for the project with an abundance of intuitive features. You can allocate starter points such as Budget, Hours to that Budget and External rates.
However, if you have the Premium Extension installed, your Hub Planner opens up a superior stream of features that allows you to manage and control your project finance flawlessly. Features include how to customize an External Rate through a Booking, Project or Resource. Also, you can allocate a rate internally which will interact with your project budget. Another fantastic feature is the ability to allocate ‘non billable’ work.
You should take a read through our Billing Rates feature here and also our blog post on the release right here. It will take you through the extensive quality features that surrounds the premium extension.
In the meantime, let’s get you set up on how to allocate your project finance without the Premium Extension.
Budget Hours
By entering the Total Budget Hours you have allocated allows you to keep track of how much time your resources consuming. You might have agreed the amount of hours along with the budget through the project dashboard and reports.
Budget Cash Amount
Firstly, select your desired currency. This is not only handy for your location. But your company might work globally therefore boost your selling point of being able to bill to clients in their currency. Once you have selected your currency, you can now allocate the agreed budget. This figure will be linked to the external rates you have set out in the next step. In turn, the budget amount will reflect within the project dashboard and reports. Of course the budget amount can be altered at any stage.
External Project Hourly Rate
Within the Settings page, you can set up a number of rates in various currencies. Subsequently, when you click on the rate field a drop down list of these rates will appear. Hub Planner will set a default rate and currency. Naturally you can alter this within your Settings page or indeed select another rate suitable to the project.
Premium Extension
As mentioned above, there is a hefty Billing Rates extension that provides you with a superior ability to manage and control your project finance. Try it out for free here or indeed read through the feature page and blog post to see what it can do for you.
Notes & Links
Notes
Every project can have notes associated with it. Notes can be added to the text area and will be available in the notes panel. The notes editor can also be accessed from the scheduler’s right sidebar where you can read, enter, update or delete notes. Notes can be useful for sharing key information about the project. Anyone who is scheduled on the project can add to this which keeps everyone updated.
Links
There are five fields to provide web links. For example, you might include the clients website or to multiple softwares that can link to your project. To the right of the link field is a ‘link’ icon that has preformatted icons that will help you to identify your links quickly. You will see popular icons from social media, integrations like Slack, to payment options such as PayPal.
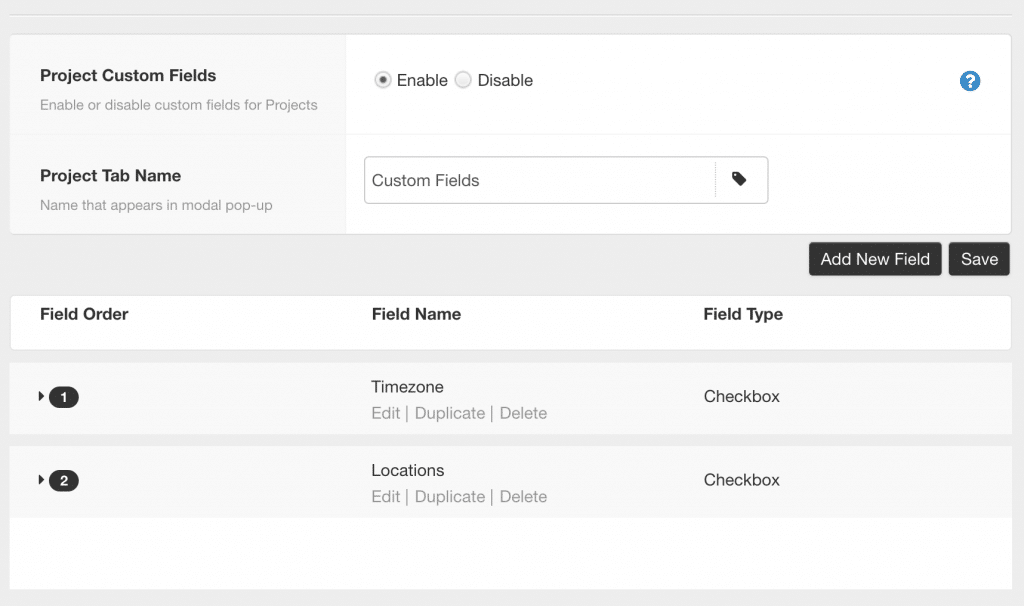
Custom Fields
What are Custom Fields?
Most industries or indeed businesses have some terminology and language that is used on a day to day basis. Such glossary of terms and acronyms are a part of every day language within various departments of design, finance, marketing and sales etc. From a resource planning and project management point of view, custom fields work hand in hand. For example,
Utilize the custom fields to create a data entry that will help identify your key information more efficiently.
How to activate Custom Fields?
By default there are no Custom Fields set up. Custom fields are also a premium extension available for installation. You can activate the Custom Fields feature via Settings by ‘Manage Extensions’ followed by ‘Add or Remove Extensions’.
How to set up a Custom Field?
Navigate to ‘Manage Extensions’ via Settings. Click on ‘Project Custom Fields’ where the Custom Fields modal will appear.
- Add New Field (A new field option will appear)
- Edit
- Enter Field Name
- Enter Field Type (Select from drop down list)
- Add field instructions if required
- Depending on choice chosen from drop down list you can subsequently enter the required details.
- Text – Add placeholder text and character limit.
- Text Area – Add placeholder text and character limit.
- Email – Add placeholder text.
- Drop Down – Add placeholder text, choice options as well as multiple choice ability.
- Check Boxes – Add each option
- Radio Button – Add each option
- Date Picker – Select day week starts on from drop down list
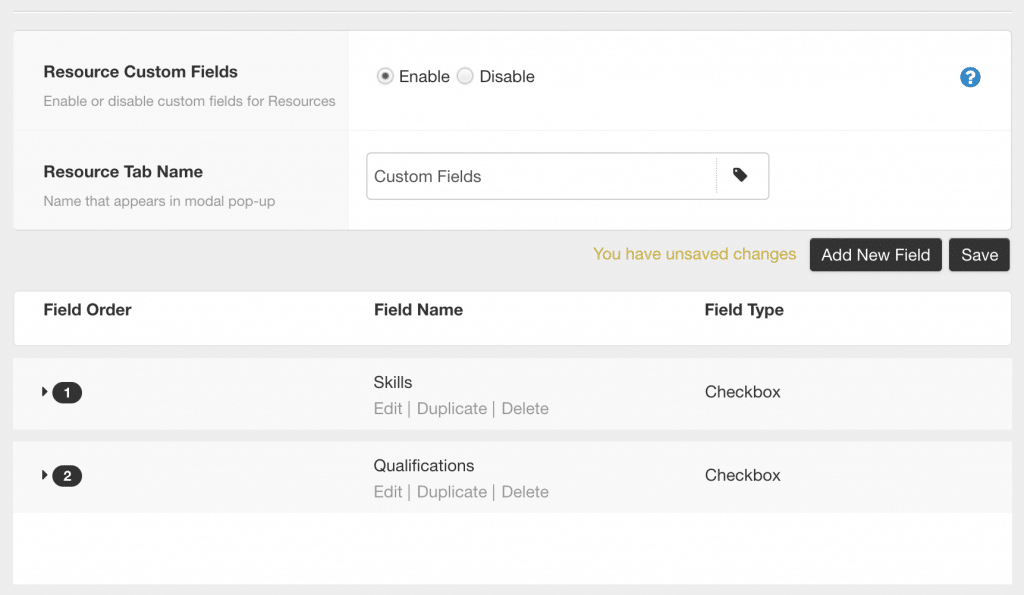
How to set up Custom Field for Resources?
Examples of custom fields for resources might be, resource skills and locations, qualifications, skill level such as Junior, Intern, Senior, Manager, Director etc. So for example, Photoshop, UX, UI, HTML 5,
- Add New Field (A new field option will appear)
- Edit
- Enter Field Name
- Enter Field Type (Select from drop down list)
- Add field instructions if required
- Depending on choice chosen from drop down list you can subsequently enter the required details.
- Text – Add placeholder text and character limit.
- Text Area – Add placeholder text and character limit.
- Email – Add placeholder text.
- Drop Down – Add placeholder text, choice options as well as multiple choice ability.
- Check Boxes – Add each option
- Radio Button – Add each option
- Date Picker – Select day week starts on from drop down list
Where I can I find out more about Custom Fields.
Take a look at the Custom Fields knowledge base.
Milestones
What’s a milestone? In project terms it can be deemed as an important to the life cycle of the overall task. Indeed it could be the starting and end dates. However, we have you covered with this on the next step. The Milestone will be represented on the Scheduler as a Diamond Shape. You have the option to permanently show the title of the milestone within the scheduler. Alternatively, if you hover over the milestone the details will appear. If you need to move or change the milestone, feel free to drag and drop along the scheduler or pop back into the Project Modal to edit the date and details.
Dates
Always a moveable feast. You can enter your project starting date and scheduled end date. Great for keeping track of project progress.
Phases
You can also set phases for your projects. You can do it absolutely the same way as adding ‘Milestones’ and ‘Start and End Dates’ via the General Settings modal. Alternatively, you can right click on a booking or an empty/selection of cells. From the modals given, you then just select ‘Add Phase’.
You will be able to: name the phase, choose start and end dates, pick a repeat function and select a colour for the phase.
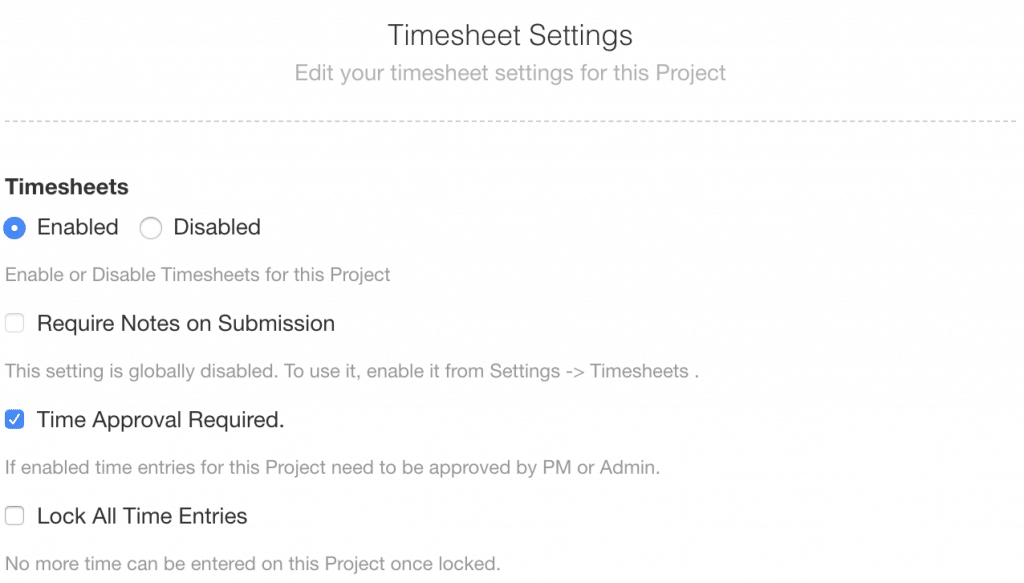
Timesheet Settings
In this tab you have the choices to make Timesheets linked to the project. Click either enable or disable along with the option to add some notes on submission of resources timesheets. Notes can be handy to mentioned anything resource time related in relation to the time entry.
By default all time entries are required to be approved by a project manager or designated approver such as Human Resources Admin Manager. You also have the option to unselect approval required for a particular project.
Lastly you have the option to lock all time entries for the project in questions. This means that no further time can be allocated to this resource on this particular project. Helpful if a resource is at full capacity or is needed elsewhere.
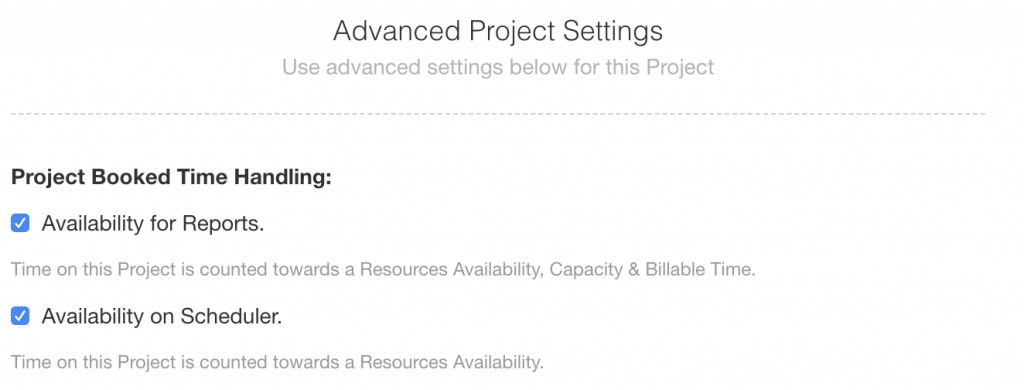
Advanced Settings
Two options you can choose to enable or disable. Defaulted to enabled, the two options relate to time entries and the scheduler. Resource time on the project is available for reporting measures including availability, capacity and billable time.
The second option of ‘Availability on the Scheduler’ ensures project time is shown on the scheduler with calculated availability included.
Was this information helpful to you in setting up your Hub Planner? We welcome your thoughts via this review link.


