Roles: Setting User Scheduling Rights in Hub Planner.
How we go about setting user scheduling rights in Hub Planner. Who has access to schedule resources on projects? Manage the schedule? Can I schedule my own bookings, drag and drop bookings on projects I manage, manage unassigned work categories on my projects. Let’s look at how to set the scheduling rights of Hub Planner users.
There are number of options when setting user scheduling rights at a role level.
- No Access
- Individual Scheduling Access
- Limited Scheduling Access
- Full Scheduling Access
- Full Scheduling on Managed Projects
- Scheduling rights to Unassigned Work
- Scheduling rights to Unassigned Work on Managed Projects
What are the user scheduling rights options?
There are a 7 different options you can assign. Each explained below. It’s good to mention here that when setting user scheduling rights to keep in mind the Permissions access options. In Permissions, we can set user access to resources, projects, events and unassigned work by individual resources or by role type.
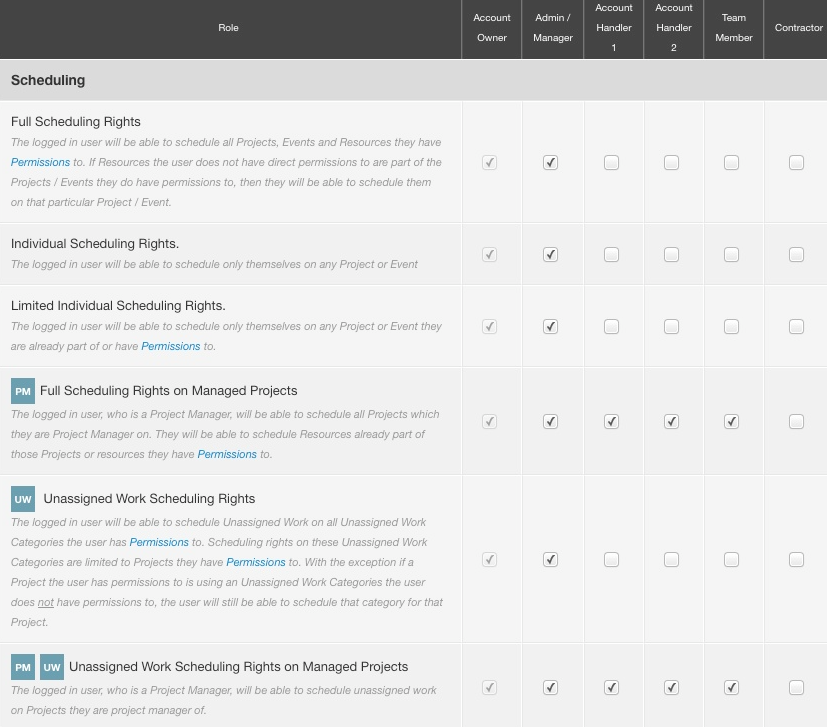
Full Scheduling Rights
The logged in user will be able to schedule all Projects, Events and Resources they have Permissions to as well to schedule Resources on Projects/Events these Resources are already part of.
Individual Scheduling Rights.
The logged in user will be able to schedule only themselves on any Project or Event they have Permissions to.
Limited Individual Scheduling Rights.
The logged in user will be able to schedule only themselves on any Project or Event they are already part of or have Permissions to.
Full Scheduling Rights on Managed Projects
The logged in user, who is a Project Manager, will be able to schedule all Projects which they are Project Manager on. They will be able to schedule Resources already part of those Projects or resources they have Permissions to.
Unassigned Work Scheduling Rights
The logged in user will be able to schedule Unassigned Work on all Unassigned Work Categories the user has Permissions to. Scheduling rights on these Unassigned Work Categories are limited to Projects they have Permissions to. With the exception If a Project the user has permissions to is using an Unassigned Work Categories the user does not have permissions to, the user will still be able to schedule that category for that Project.
Unassigned Work Scheduling Rights on Managed Projects
The logged in user, who is a Project Manager, will be able to schedule unassigned work on Projects they are project manager of and they have Permissions to.
No Access.
No Access – If settings this option. You will not tick any options within any role category.
How to Set Scheduling Rights?
Note, you will need the role access level to set scheduling rights, ie, Role Owner.
- Settings
- System Settings
- Roles
- Scheduling
Here is the full table of options to choose from. Once ticked, the option will save in real time.
Set User Permission Access
User Permission allows you to define access on a role level or an individual resource level. Hub Planner helps you grant or restrict access to single projects, project groups, individual resources, resource groups, unassigned work and events. To view more on how to set user permission access: please navigate to the following areas. Each section can help you set the right roles and permissions for your team.
How to Access Permissions?
- Settings
- System Settings
- Permissions
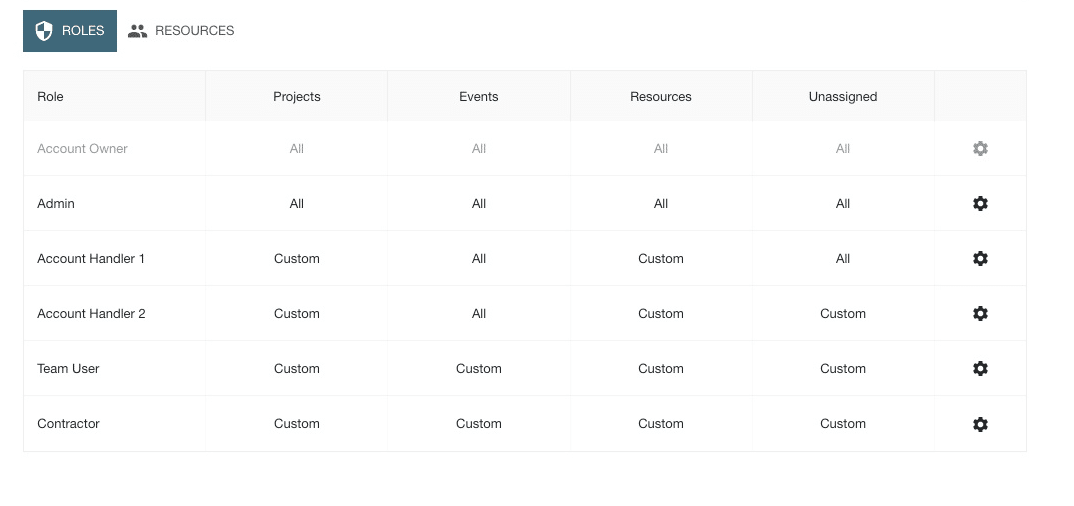
Set Permissions by Role or by Resource
You have the option to set permissions by role or by resource. When setting permissions, you will open the Permissions Builder. Here you will assign permissions to:
- Project Groups
- Individual Projects
- Events
- Resource Groups
- Individual Resources
- Unassigned Work if installed.
Set Permissions by Role
To set permissions by role, simply click the settings cog of the role to open the Permissions Builder. Navigate through each of the tabs to assign permissions at role level. Click save for permissions to set. Note, should you alter permissions from the default setting, the role will now be tagged ‘Custom’ under each tab on the home page of Permissions. Within each tab, there is an option to automatically add the user to all newly created projects or resources of a group.
Set Permissions by Resource
To assign permissions to an individual resource, click the Resources tab on the Permissions home page. Locate the resource by using the filters, or scrolling through the list of resources. You can opt to filter by role type, or resource name/email. Click the settings cog of resource to open the Permissions Builder.
Navigate through each of the tabs (Projects, Events, Resources & Unassigned) to assign permissions at the resource level. Click save for permissions to set. Note, should you alter permissions from the default setting, the resource will now be tagged ‘Custom’ under each tab on the home page of Permissions.

This user has custom permission settings.
If the role type of the resource or the resource has already been assigned customised permissions, there will be an indicator message to inform you of this. If required, you can opt to revert to base permissions. ![]()