Timesheets Approval Workflow Extension
Timesheets Approval Workflow is a Hub Planner Extension for the Hub Planner Timesheets component. The Approval Workflow is suitable for those who require more control over how their timesheets are managed within the team.
Adds sophisticated functions and features to help manage and control the time tracking element of your team, projects, events and consultants. Whether you enable the approval workflow for one or for all projects globally you can choose accordingly. Other options you have are to customize the colors of each time entry status? Either way, it’s easy to do and there are multiple options to choose from within settings.
Timesheet Approval Tab
Activating the Approval Workflow adds an Approval Tab to the sidebar. The Approval tab is where all timesheet entries are submitted to for approval. Here you will manage the timesheet entries one by one or indeed, there are bulk options to quick manage entries too. Like all sidebars within Hub Planner, the Approval Workflow sidebar is consistent with all others. Grouping projects, resources, teams and project groups making it easy for the user to navigate to the right set of time entries to approve. Alongside the regular resource and projects, are other clever options like time entry status and quick filter settings. A new manage tab will allow Admins or Project Managers to Lock, Reject and Approve time.
Timesheet Approval Toolbar
You can also access the Timesheet Approval Toolbar within Timesheets directly. This allows PM’s and Approvers the ability to manage and review time entries from the project or resource timesheet.
Approving Time in Hub Planner Timesheets
Approval Workflow & Locking Time Entries
Further extend the power of timesheets by adding the Approval Workflow extension. By introducing the Approval Workflow to your Timesheets. A new manage tab will allow Admins or PM’s to Lock, Reject and Approve time. The sidebar encapsulates multiple options to manage and view timesheets by status, project, resource, groups and events.
- New Manage Tool available via Timesheets Sidebar
- Approval Workflow Available for entire company
- Turn On/Off Approval Workflow on Project Level
- Quickly Lock Time down on Project Level
- Tools to Approve, Reject, Delete, Lock, Submit time
- View & Manage timesheets by Time Entry Status
- View & Manage timesheets by Project, Resource, Project Group, Team or Event
- Visual Pending State for Approval Flow
- Lock and Unlock Time Entries
- Manage Time Entries down to the day / entry level
- Fully integrated approval statuses into Reports
- Bulk Options for Mass Approval, Locking etc
- Export Management Data to csv & Excel format
- Customise the color schema as you like
Timesheet Approval Process
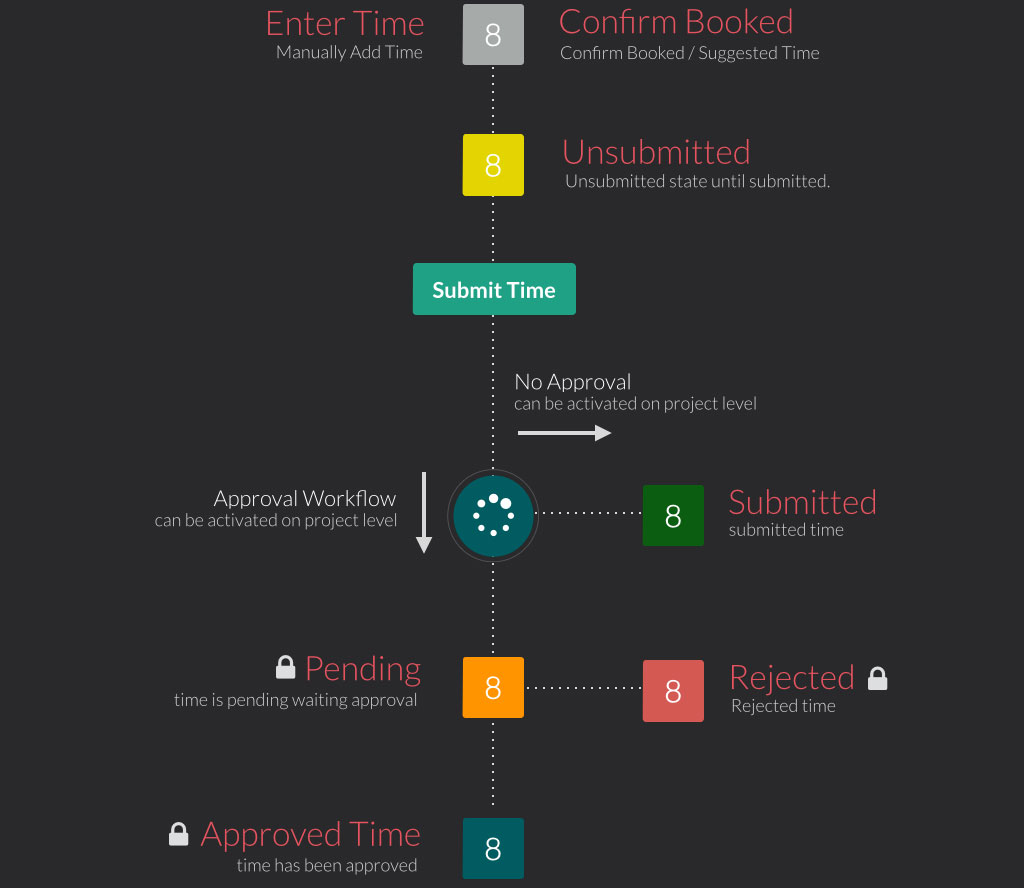
A timesheet approval workflow gives Admins and Project Managers the ability to directly Manage the Project and/or Event time submitted by teams. All data is fully represented in reports giving you a clear idea of what to invoice a client for example. The workflow is built with maximum visibility and flexibility allowing you to determine which Projects are required to go through the approval process or not. The Time Entry status is color coded to help provide the user with immediate feedback of what the timesheets for the week looks like. You can opt to change the colors for each status via settings -> timesheets.
Who can Approve? This depends on the role right and their permissions. for more information scroll up
Timesheet Approval Workflow
The Timesheets approval Workflow allows you to update and edit reported time on the day level. All time can be viewed by an resource with rights or a Project Manager in the Approval timesheets section.
Managers and Approvers can also manage and review time entries via the Timesheet Approval Toolbar within Timesheets.
See the illustration below for an overview of how the timesheets flows from a user standpoint.
Timesheet Approval
The Approval Workflow needs to be activated first before it can be used.
There are a couple of items to check to make sure it is running correctly.
- The Extension Must be Installed
- Approval Must be Enabled
- Approval on Existing Projects
The Approval Workflow Extension must be Installed.
The Approval Workflow Extension is a Hub Planner extension which adds significant features to the Hub Planner Timesheets. To try out the extension or install it do the following.
- Navigate to Settings
- Choose Manage Extensions from the Sidebar
- Find the Manage Workflow Extension and then Try it or Add It.
Approval Must be Enabled
You need to make sure that Approval is enabled on Projects. To do this:
- Navigate to Settings -> Manage Extensions
- Choose Timesheets from the Sidebar
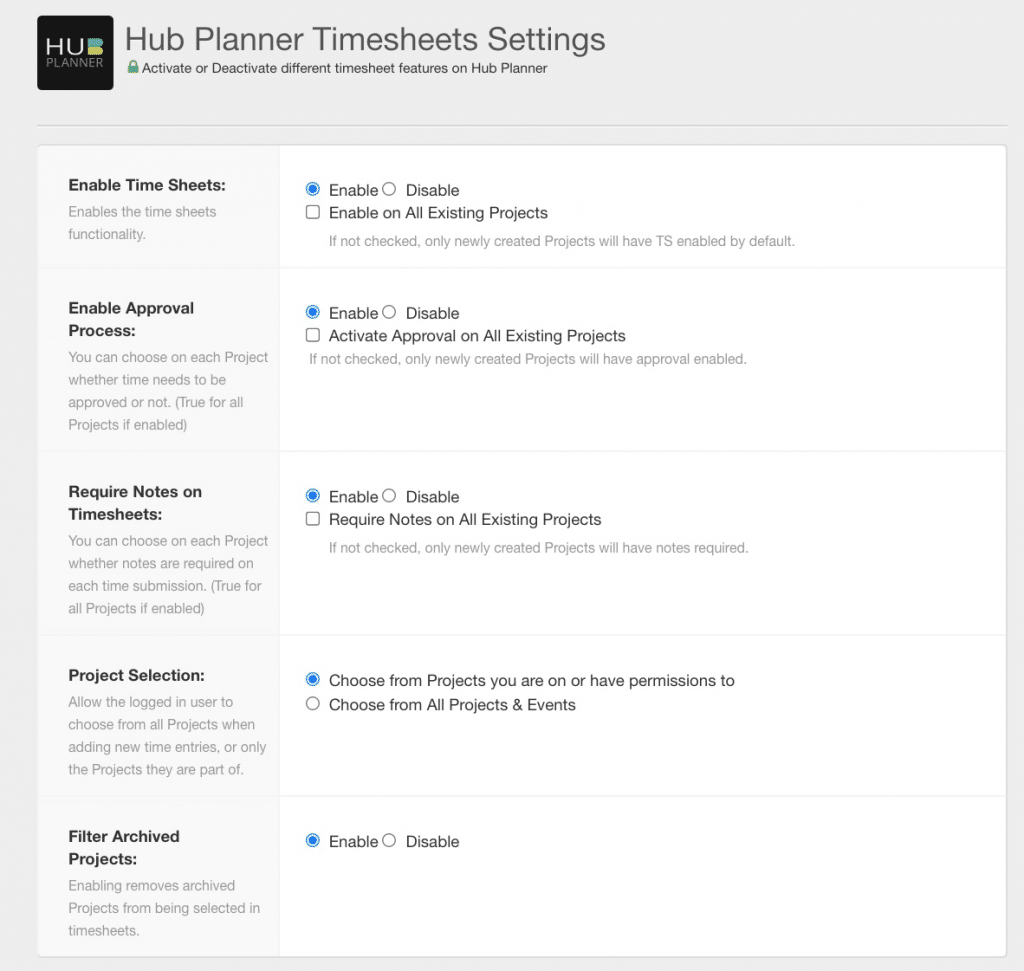
- Make sure the “Enable Approval Process” is checked to “enable”
- Press Save
Approval on Existing Projects
If you enabled the Approval process after time entry has already been submitted, you can activate Approval on existing projects by
- Navigate to Settings
- Choose Timesheets from the Sidebar
- Check the box which says “Activate Approval on All Existing Projects”
- Press Save
This will now activate the approval process on all existing and new projects. This can be turned off on a project level.
Activating / Deactivating Approval on Single Project
You have the option to activate or deactivate time approval on a specific project. To do this
- Edit the Project
- Choose Timesheets from the left menu
- Check or Uncheck the box for “Time Approval Required.”
Workflow Functions
The main actions introduced in this workflow are:
- Lock / Unlock Time
- Approve / Unapprove Time
- Reject Time
- A Visual Pending State for Approval Flow
- Approval Tool available via Timesheets Sidebar
- Approval Workflow Available for entire company
- Turn On/Off Approval Workflow on Project Level
- Quickly Lock Time down on Project Level
- Manage Time Entries down to the day / entry level
- Fully integrated approval statuses into Reports
- Bulk Options for Mass Approval, Locking etc
- Export Management Data to csv & Excel format
- Customise the color schema as you like
User Interface
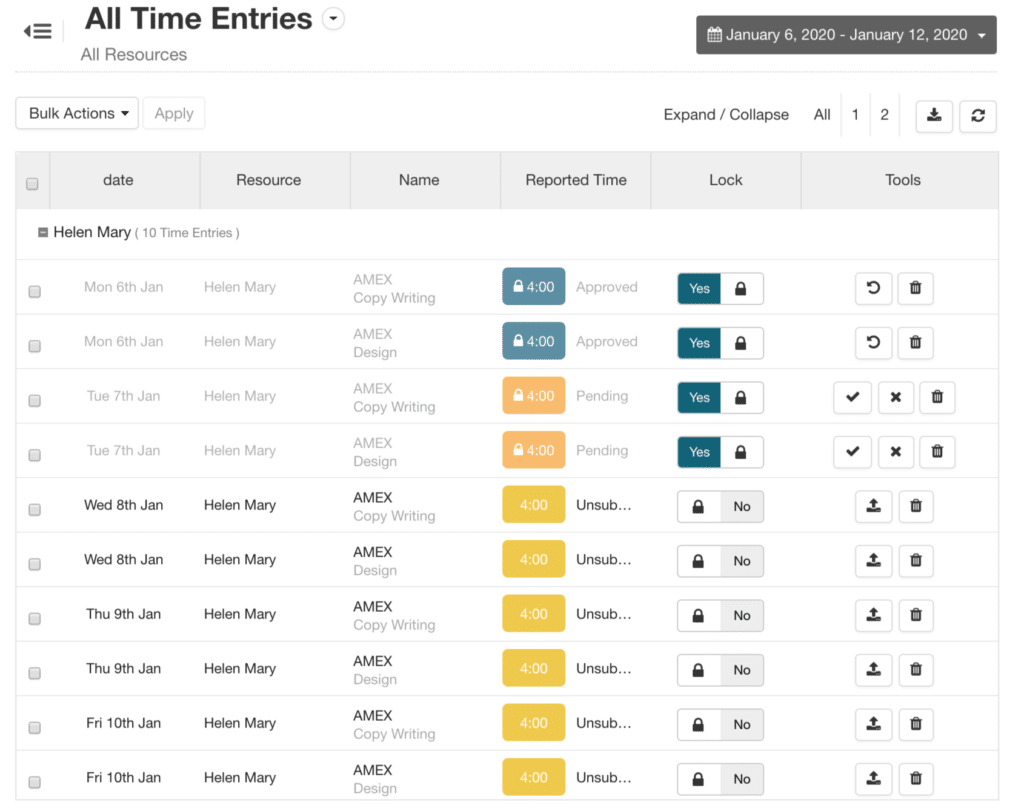
The Approval timesheets is a table based interface with rows which can be expanded and collapsed.
The data appearing in the Approval table is controlled by a date range picker which is the top level grouping. By default the approval table pulls in the current week you are in.
Quick Timesheet Approval Toolbar
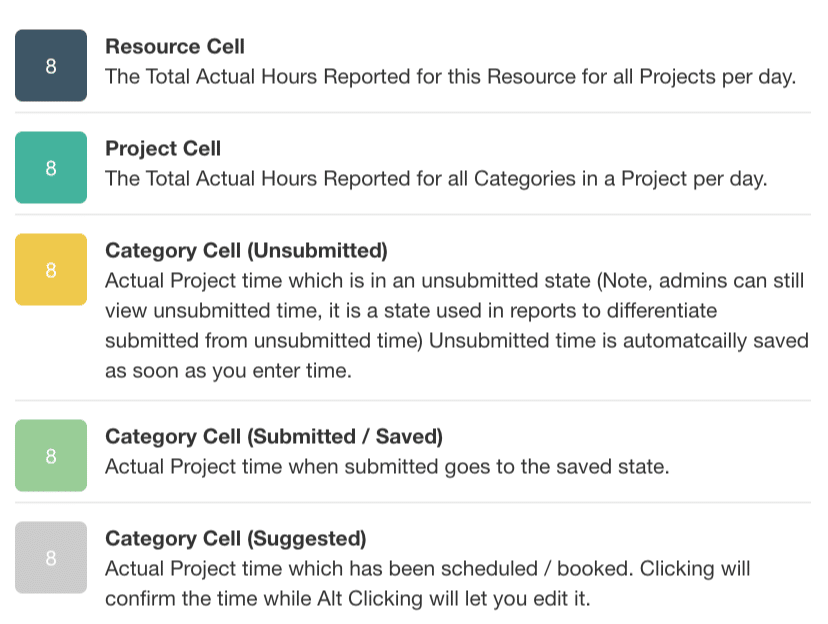
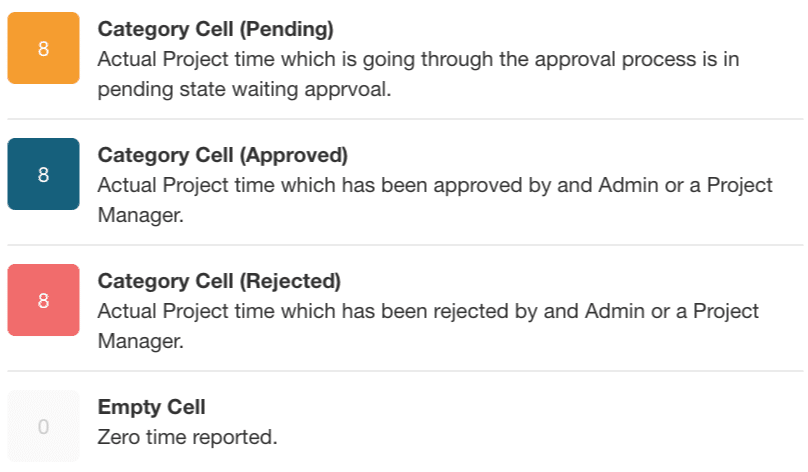
Timesheets Status Colors
A closer look to what each of the colors represent in Hub Planner Timesheets.
Timesheets Approval Table
The approval timesheets table is using a table based accordion layout to help you manage effectively your own time or your teams time. The table is loaded with actual time entries from the team’s timesheets. You can manage everyone’s time down to the day level.
Timesheets Approval – Features detailed
Let’s quickly synopsis the features and functions of the timesheet approval workflow table. Firstly, the features at the top of the page.
- Arrow and 3 vertical lines – will collapse the timesheet sidebar.
- All Time Entries – Dropdown allows you to filter through the time entry status.
- Date Picker – choose a date range either from the pre-formatted options or custom pick a date range. You can also set a default date range too.
- Bulk Actions – Select multiple time entries, and then choose an action from the Bulk Action menu. Such as Approve, Reject, or change the status of the entries.
- Expand / Collapse – Allows you to expand to view all entries of everyone in the category chosen. Alternatively to collapse to group by resource or project for example.
- Download Report – This is an option to download a report of the current page of time sheet entries. These will include all time entries under the headings as seen. Any notes added to time entries will be automatically included in the download.
- Refresh – Pressing refresh, will ensure any updates to time entries are updated.
Table Headers
- Checkbox – Allows you to select the time entry or resource as a whole if collapsed
- Date – This is the date of the actual booking and not the date the entry was submitted.
- Resource – The name of the resource against the project booking.
- Name – Project Name and details the Booking Category assigned to the Booking.
- Reported Time – Details the hours reported as well as showing the status of the time entry in text and color.
- Lock – Indicates whether the time entry is locked or unlocked. Clicking the lock icon will switch the status of the locked state.
- Tools – Available options to action the time entry.
Tools
- Tick = Approve Time Entry – meaning the entry is now at a status of approved.
- X = Reject Time Entry –
- Bin = Delete Time Entry
- Arrow circle = Unsubmit Time Entry – meaning the entry is now at a status of unsubmitted.
- Line/Arrow up = Submit Time Entry – meaning the entry is now at a status of submitted/pending
Timesheet Approval Toolbar
The Approval Timesheet Toolbar allows teams to manage and review time entries directly within a timesheet of a resource or project they have access to. Clicking a time entry allows the approver to quickly review and manage the time entry there and then, instead of navigating to the Timesheet Approvals Tab.
The toolbar consists of 4 icons, each with their own action.
- Approve – will alter the status of the time entry to APPROVED (navy)
- Reject – will alter the status of the time entry to REJECTED (red)
- Delete – will reject the time entry which will revert to a 0:00 in time.
- Unlock – This will allow the time entry to be unlocked and accessed by the resource submitting the time entry to adjust the time.
Approving and Rejecting Time Entries in more detail
Approving and rejecting time entries is part of the Approval Workflow and can easily be accessed in the Approve Timesheets Table.
Approve Pending Time
Pending time always needs to be actioned. Whether that is to be approved, rejected or deleted. To the very right of the Approval manage table is a Tools column where the buttons appear for managing the timesheets approval.
Simply click the approve button to approve the time.
Approving the time will immediately update the state to Approved and depending on your timesheet settings will automatically lock the time entry from being edited further.
Approve Submitted Time
Projects do not have a submitted state when the approval process is activated, but there may be the case where half the project may have been submitted before timesheets approval was activated. Therefore if the project has approval activated, then you can also approve that submitted status using the same method as above.
Reject Time
If you decide to reject the time, just click the X button to reject the time. Rejecting the time will immediately update the state to Rejected and depending on your timesheet settings will automatically lock the time entry from being edited further.
Delete Time Entry
If you delete a time entry what happens? If you delete an entry that was originally scheduled then, by deleting, the entry will still remain in the users timesheet as a status of suggested (grey) but removed from the approval workflow. However, if the original time entry was an added time entry that was not scheduled. Then this entry will be removed from the system completely. The time entry will be deleted from the users timesheet as well as the approval workflow.
Bulk Approve / Reject Time Entries
In the approval table you have the option to bulk edit all time entries. The options are as follows:
- Approve
- Reject
- Submit
- Unsubmit
- Lock
- Unlock
- Delete
The steps to bulk action time entries are as follows:
- Use the checkbox top left to select all or select the time entries you want to edit
- Now click the bulk edit dropdown above the table.
- Choose your action
- Click Apply
- Time Entries are now updated
Auto Lock Time Entry
There are built in defaults which auto-lock time entries based on on changing status. You can set any status to become locked once you change state. This prevents the user from altering the time entry.
For example, when Approving a Pending time entry, it will automatically get locked to prevent the user from further editing it.
These settings are managed from Settings -> Timesheets page.
Lock / Unlock Time Entries
Locking time can be done on an individual time entry basis. This provides you with maximum flexibility to lock down small blocks of time from being edited.
Once a time entry is locked, it can no longer be edited by a user in timesheets. An Admin or Project Manager can unlock it for a user if edits are needed to be made.
In the Approval Table you will see a “Lock” column with a toggle slider button. Clicking this toggles the lock status of the time entry.
Locking an Entire Project
You have the option to lock down time submission on an entire project. To do this
- Edit the Project
- Choose Timesheets from the left menu
- Choose to “Lock All Time Entries”
Once locked, all time entries will be locked on this project. As an Admin or Project Manager you can still unlock individual time entries for a user if edits are needed to be made.
Auto Lock Time Entry
There are built in defaults which auto-lock time entries based on on changing status. You can set any status to become locked once you change state.
For example, when Approving a Pending time entry, it will automatically get locked to prevent the user from further editing it.
These settings are managed from Settings -> Timesheets page.
Locked Time Entries in Reports
Locked time entries can be filtered in reports by
Bulk Lock Time Entries
In the approval table you have the option to bulk edit all time entries.
- Use the checkbox top left to select all or select the time entries you want to edit.
- Now click the bulk edit dropdown above the table.
- Choose to Lock or Unlock your selection
- Click Apply
Filtering Timesheets
By default the approval timesheets table shows all time entry statuses. There are 2 ways in which you can filter the manage timesheets table by status.
- Sidebar
- Time Sheets Header Dropdown (small button located to the right of the header in the timesheets table)
The options are:
- All Time Entries
- Pending Approval
- Unsubmitted Time
- Submitted Time
- Approved Time
- Rejected Time
- Locked Time
- Unlocked Time
Approval Timesheets Sidebar
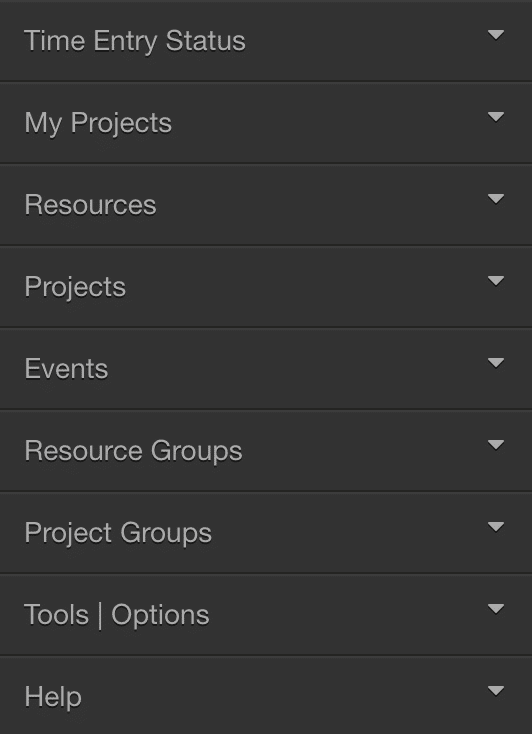
- Time Entry Status
- My Projects
- Resources
- Projects
- Events
- Resource Groups
- Project Groups
- Tools | Options
- Help
Time Entry Status
Time entries group is a filter based group. It is used to filter out the time entries based on status.
My Projects
Displays a list of what projects you are Project Manager on (if any) and all projects you are part of.
Resources
Displays a list of all resources in the system by resource group.
Projects
Displays a list of all projects in the system by project group.
Events
Displays a list of all events.
Resource Groups
Displays a list of Resource Groups
Project Groups
Displays a list of Project Groups
Tools | Options
Option to display week numbers in date.
Help
Timesheets color guide
Workflow Guide
FAQ
What Role Rights & Permissions do I need to Approve Timesheets?
Role Rights and Permissions on Timesheets
There are two role rights for Timesheets in which you can set against a role type or Project Manager. There are 5 Role Types are Admin, Account Handler 1, Account Handler 2, Team and Contractor. The Project Manager role is also relevant for the second role right.
To access role rights, navigate to Settings -> System Settings -> Roles
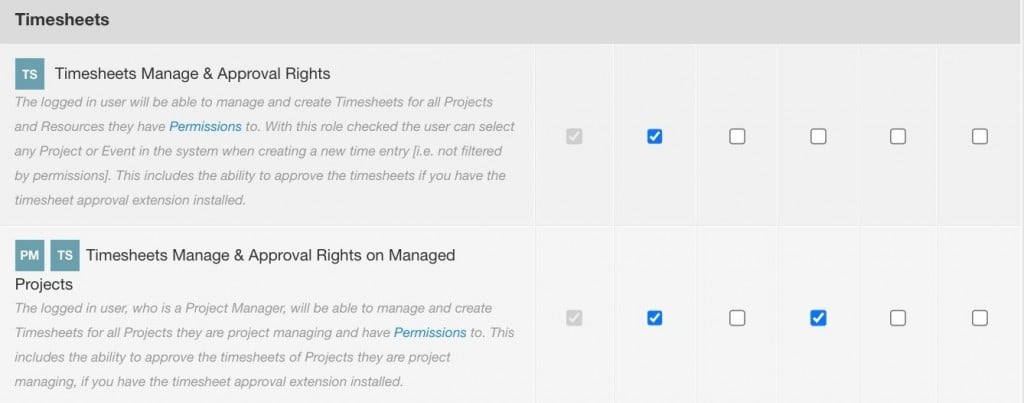
Timesheets Manage & Approval Rights
The logged in user will be able to manage and create Timesheets for all Projects and Resources they have Permissions to. With this role checked the user can select any Project or Event in the system when creating a new time entry [i.e. not filtered by permissions]. This includes the ability to approve the timesheets if you have the timesheet approval extension installed.
Timesheets Manage & Approval Rights on Managed Projects
The logged in user, who is a Project Manager, will be able to manage and create Timesheets for all Projects they are project managing and have Permissions to. This includes the ability to approve the timesheets of Projects they are project managing, if you have the timesheet approval extension installed.
How to set role rights for Timesheets?
The Account Owner can navigate to Settings -> System Settings -> Roles -> Timesheets -> and assign as necessary.
What about Permissions?
Permissions determine what the user can access. What projects or resources, and events they can access. Permissions can be set either via role type or individually. To access permissions, navigate to Settings -> System Settings -> Permissions. For more information on Permissions, please navigate to the Knowledge Base.
What Permissions do I need?
You will need to be assigned permissions to the projects, project groups, resources and teams required. Permissions can be assigned via Role type you are (Admin, Account Handler Team etc) or by individual resource. To access Permissions, please navigate to Settings -> System Settings -> Roles -> Timesheets.
Within Permissions, you can be assigned the following:
- Projects. Project groups or individual projects.
- Events. Sick Leave, Vacation etc.
- Resources. Resource groups, or single resources.
- Unassigned Work (if installed). Pipeline categories.
Do Permissions get me access to the Approval Timesheet Toolbar?
That depends. In order to access the Approval Timesheet Toolbar, you need to role rights as explained above. You also need the permissions to the projects and/or resources.
Timesheet Settings
Some further helpful settings for Hub Planner Timesheets. Options include the ability to activate timesheets and the approval workflow on projects. To request notes on timesheet entries as well as the settings for project selection. Account Owners and those with the specific role rights will have access to these settings. Any changes you make will require you to confirm changes by clicking save at the bottom of the page.
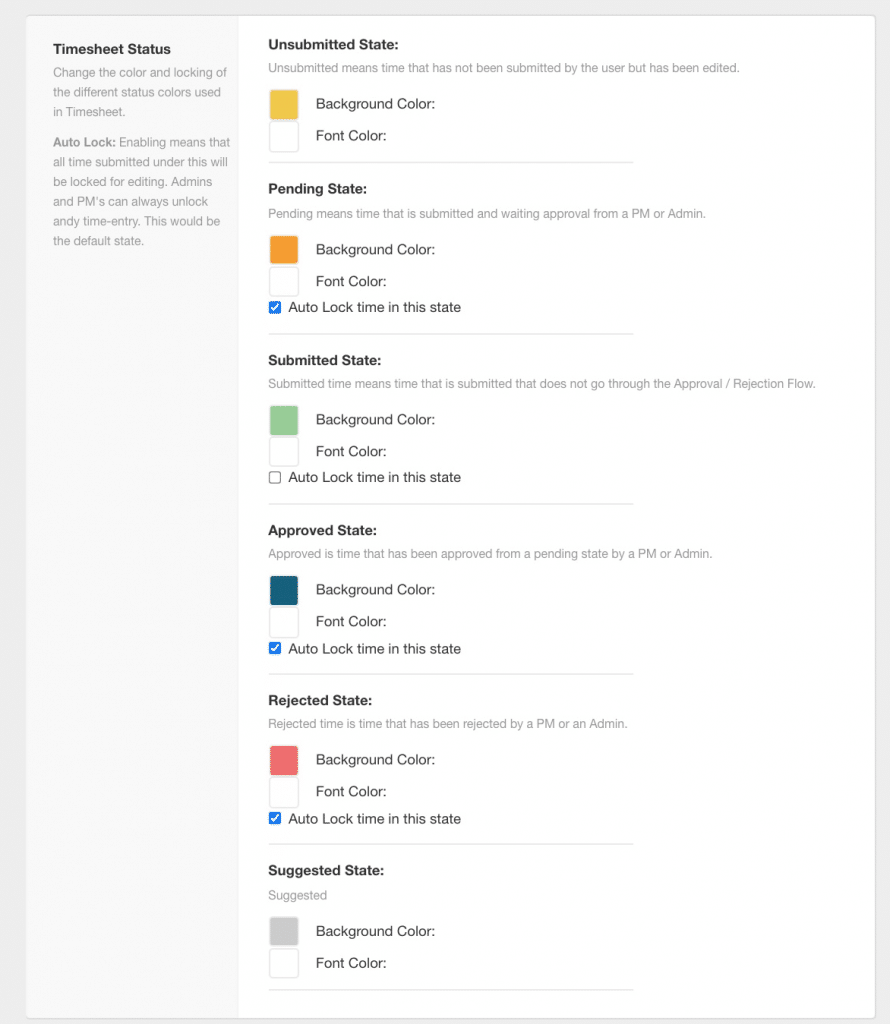
Timesheet Status.
The ability to change the color of a time entry status as well as set the option to auto lock time entries. Don’t forget to save changes at the end of the page!
FAQ’s on Timesheet Approval
A few frequently asked questions about timesheet approval toolbar and approval workflow in general.
What happens if I Approve the entry?
Once Approved, the time entry will turn navy blue and a status of APPROVED.
What happens if I reject a time entry?
This means that the Approver has declined or rejected the time entry and it will navigate back to the resources timesheet with a status of REJECTED displayed in RED. The resource submitting the timesheet can adjust the time entry and resubmit if required.
What happens if I delete the entry?
The time entry will default back to 0:00 entered time.
What happens if I Unlock the time entry?
Should you click UNLOCK, this means that the resource submitting the timesheet may need to adjust the entry. By project and by default, it’s possible to activate a LOCK on each time entry once submitted. Should the resource need to adjust the time entry or the Approver sees an issue, they can click UNLOCK to allow for the time entry to be readjusted. Note, the resource will need to resubmit the time entry again. Also note, the Approver can adjust the time entry there and then either. Sometimes this can be handy and save the resource time to adjust and resubmit when the Approver can action on your behalf.
If I use the Approval Toolbar, can I still access and approve time from the sidebar?
Yes, you can still access the approval tab from the sidebar to approve time.
I don’t have the Approval Process activated for some projects, what will happen?
That’s ok. You can still click the APPROVED time entry (Green) and the regular Timesheets toolbar will appear.
Options include:
NOTES (add notes to the time entry)
BILLING (activate billable / non-billable)
ADD (bulk add time from the pods)
SUBMIT(click to submit the individual time entry)
What is the Timesheet Approval Toolbar?
The Approval Timesheet Toolbar allows teams to manage and review time entries directly within a timesheet of a resource or project they have access to. Clicking a time entry allows the approver to quickly review and manage the time entry there and then, instead of navigating to the Timesheet Approvals Tab.
The toolbar consists of 4 icons, each with their own action.
Approve – will alter the status of the time entry to APPROVED (navy)
Reject – will alter the status of the time entry to REJECTED (red)
Delete – will reject the time entry which will revert to a 0:00 in time.
Unlock – This will allow the time entry to be unlocked and accessed by the resource submitting the time entry to adjust the time.
How to activate the Timesheet Approval Toolbar?
Once the Time Entry has been SUBMITTED/PENDING. As an Approver, you can then activate the Approval Timesheets Toolbar by simply clicking on a time entry. You must enter the time entry before the approval timesheets toolbar is activated.
Click on the time entry to activate the toolbar.
How come I can’t activate the Approval Timesheet Toolbar?
There may be a couple of different reasons. One, you may not be an Approver, therefore you cannot access such data. You need specific Role Rights to activate the toolbar. Two, you are an Approver, but you might not have the permissions to any Projects or Resources. You need to have the proper role rights and permissions in order to activate the Timesheet Approval Toolbar. Resources with Timesheet Approver Role Rights and assigned Permissions will see this option. The Account Owner of Hub Planner will also be able to access all Timesheets and Approval options.
Further Reading
Online Reviews of Hub Planner Resource Management Software


