Legal Secretary User Permissions & Role Rights
How to set up permissions for the Legal Secretary users in Hub Planner account. In just a few short steps you will have set up the default user access permissions by role type. As above, we will assign Legal Secretary users with the role of Account Handler 1. Here we will show you how to set permissions for an Account Handler 1. Follow suit for the same method for all Hub Planner account role types.
We will also show you how to go that one step further and individually assign specific permissions and rights to an individual Legal Secretary. For example, Each Barrister is assigned a Legal Secretary. We want that LS to have sight of the Barristers schedule, but also the Legal Support Team under the Legal Secretary. We will ensure the LS has the correct rights that will assist them with managing the schedule of a case. Some of which will include:
- Tracking Billable and Non Billable Time
- Adding important dates, milestones and phases to the schedule.
- Managing Case Budgets and Hours
- Ensuring the Legal Support Team are efficiently optimized.
- Forecasting and planning for projected case work.
- Producing real time reports for Clients
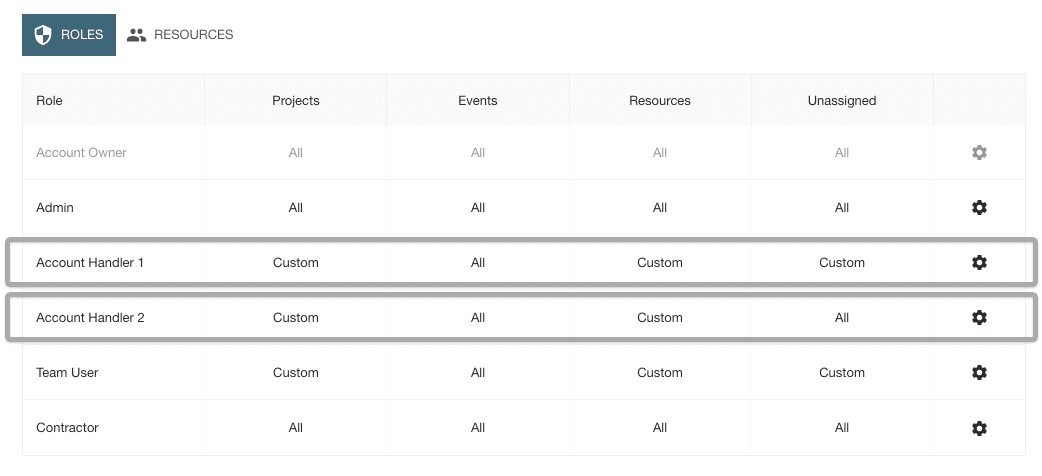
Hub Planner Roles & Permissions
There are 6 role types:
- Account Owner (not editable)
- Admin
- Acc Handler 1
- Acc Handler 2
- Team
- Contractor
There are 4 permissions categories:
- Projects
- Events
- Resources
- Unassigned (if installed)
You can edit and select permissions for each role, under each category.
Let’s show you how to.
Set Permissions for the Account Handler/Legal Secretary
There are two role types for Account Handlers. Hub Planner simply set them to Acc Handler 1 and Acc Handler 2. The type of Legal Secretary an account handler will be might be similar to a project manager or resource manager. Fully customizable to your own Hub Planner account. You have the freedom to set what permissions and rights an Account Handler / Legal Secretary will have. Split the Account Handlers into levels of seniority or type like a PM or RM.
From the Permissions page, on the Account Handler 1 row, we will select ‘Edit’ to open the Permissions Builder. Here, we will assign access under each of the 4 categories. Projects, events, resources and unassigned work if installed. The level of user permissions by role will be set inline with the rights of an Account Handler 1 role – Legal Secretary.
Later on and additionally, we can set individual access permissions by resource.
Set Legal Secretary / Account Handler Role Permissions to Projects
We can set Account Handler Role Permissions to individual Projects and Project Groups. We can exclude and include access for the Legal Secretary user.
Project Groups – Shows available Project Groups that the Legal Secretary User doesn’t have access to. Add Project Groups as required.
Selected Data Column will show the Project Groups the Legal Secretary User has access to.
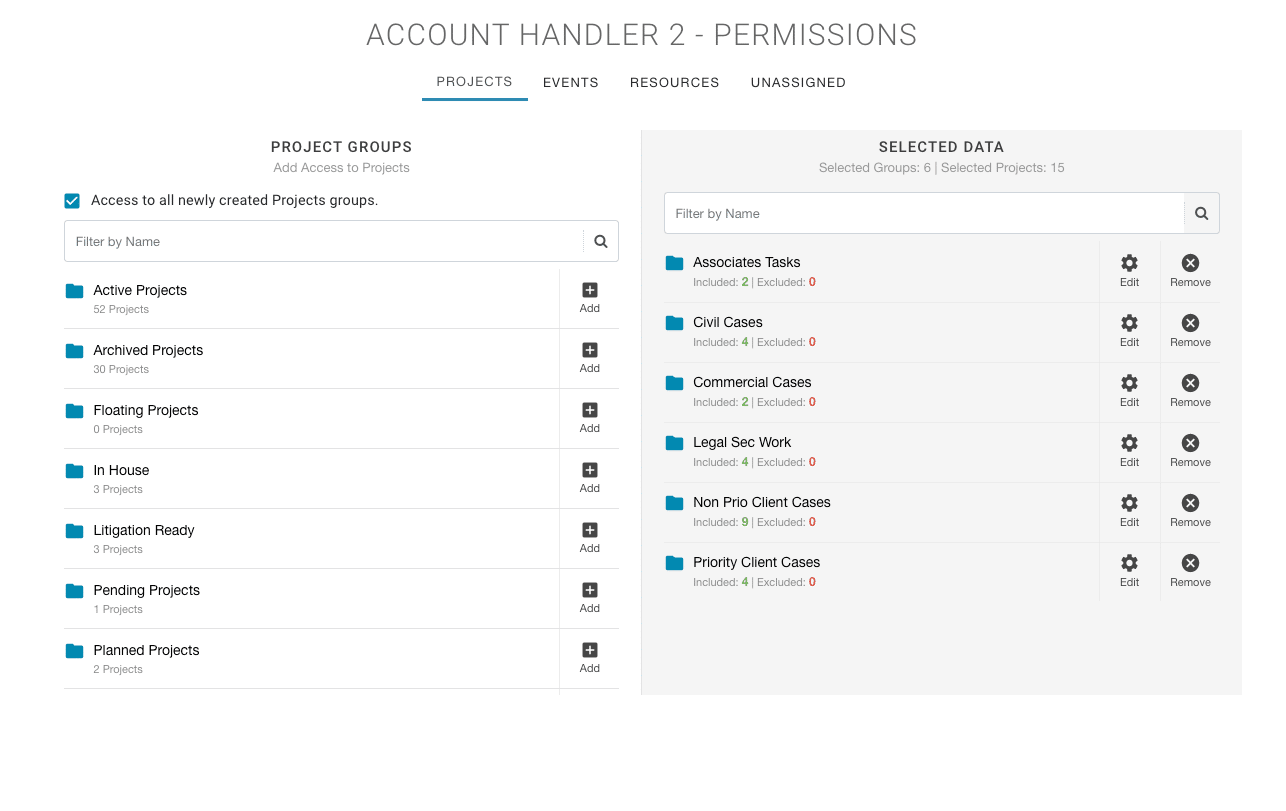
Individual Project Access for Legal Secretary User
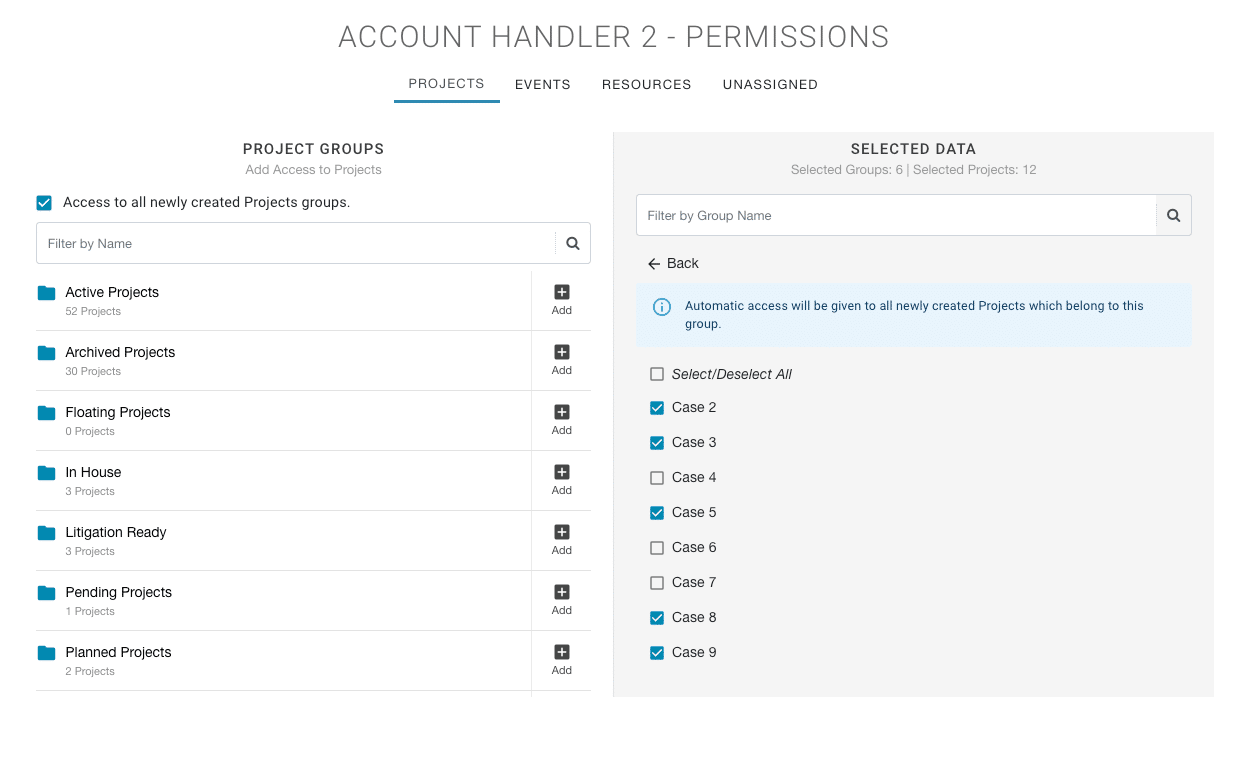
For each Legal Secretary user, you may want to include or exclude access to individual case projects from a project group. You can do so by clicking the Edit button of the relevant project group. To do so is very easy, like 1, 2, 3:
- Click Edit of the relevant Project Group. This will list out the projects within that group.
- You can select or unselect all. Alternatively, you can scroll through the list and individually select which project Legal Secretary users can and cannot access. Click or Un-click as required.
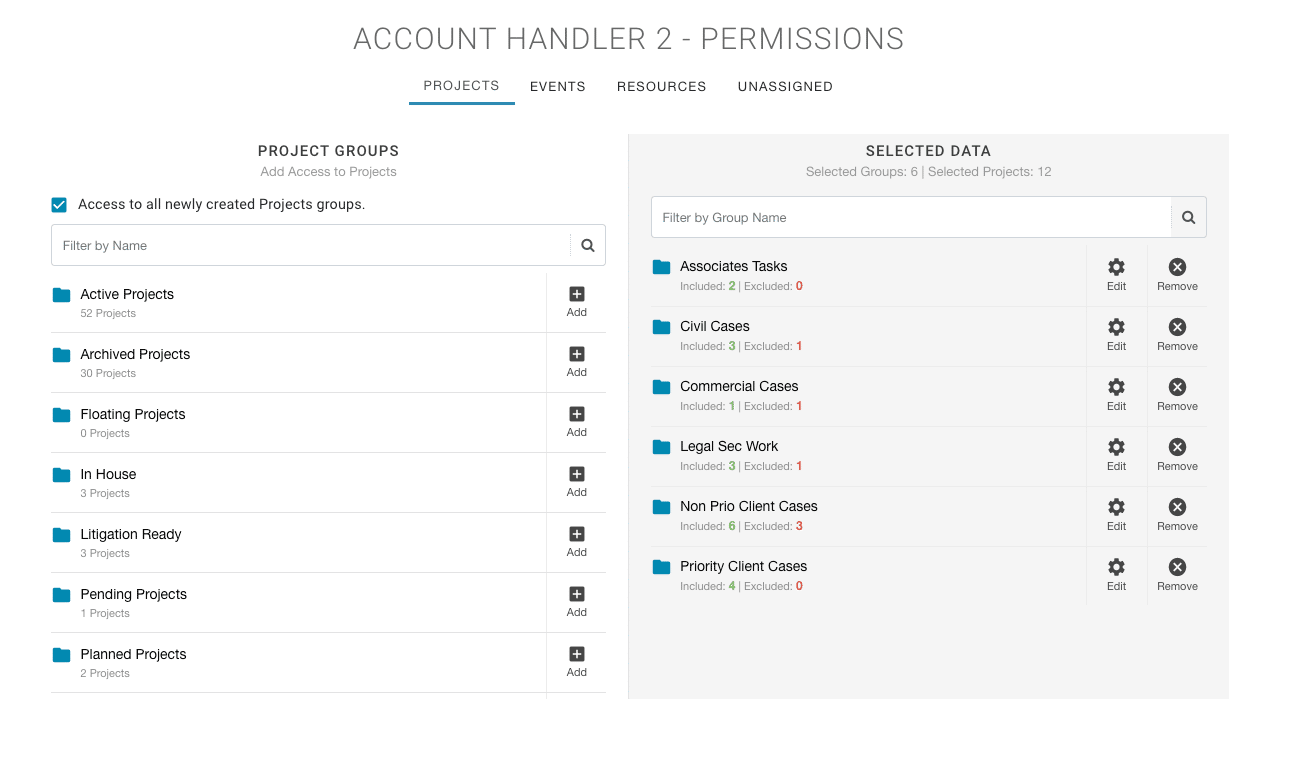
- Save or Click ‘Back’ will navigate you back to the Selected Data Project Groups. The Project group will show the count of Included and Excluded Projects from the Project Group. Included count of projects are highlighted in Green and the excluded count of projects are highlighted by the color red.
Click Remove to remove the entire project group from the Legal Secretary Users permissions. This will then show in the Available Project Groups column. You can add again if required.
Account Handler User Project Individual Access Count of Included and Excluded projects.
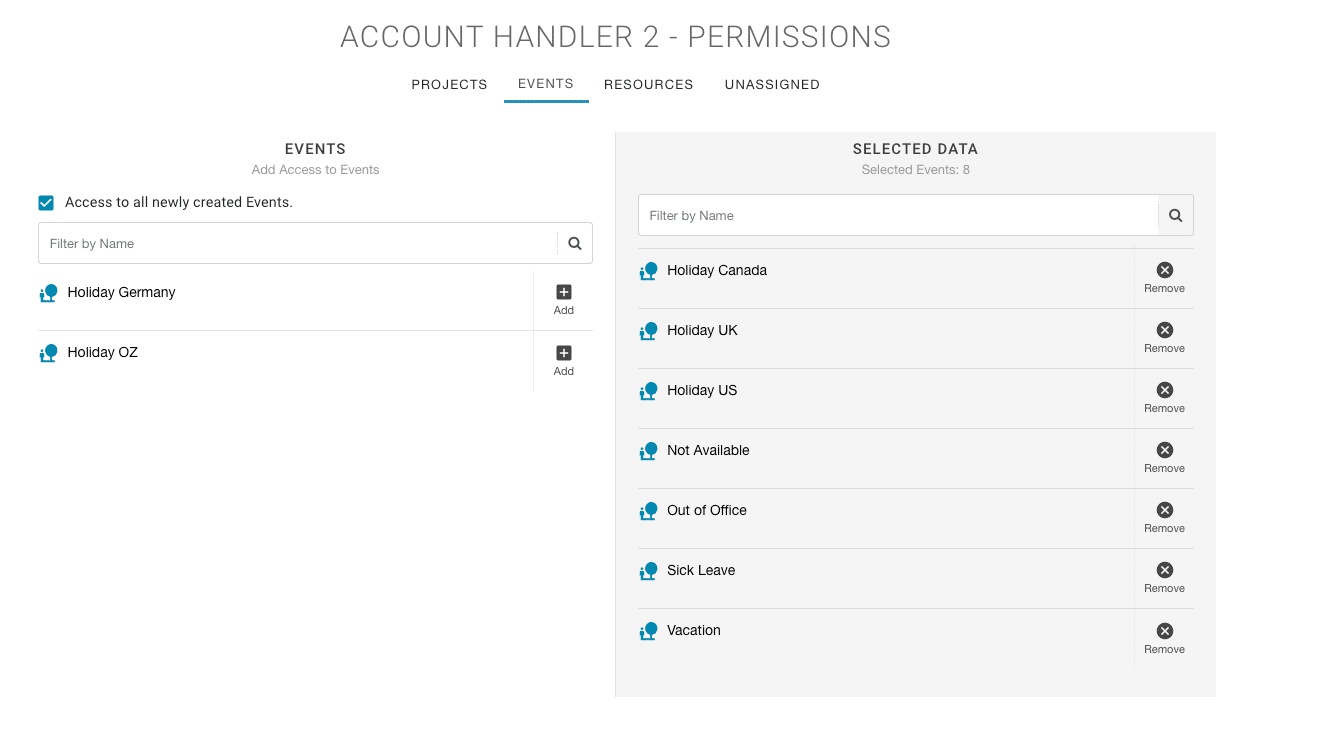
Set Legal Secretary User access permissions to Events
Next is Events. This is a list of Events that you have set for your Hub Planner account. Event types are useful for Sick Leave, Meetings, Not Available, Public Holidays etc. Here you can set what events all Legal Secretary Users has access permissions to.
Options here are not as detailed as Projects and Resources. All you need to do here is Add or Remove. It’s very straightforward and easy to set. The left hand column will display Events the Legal Secretary user does not have access to. The right hand column, ‘Selected Data’ will show the list of events the Legal Secretary user has access to on the scheduler.
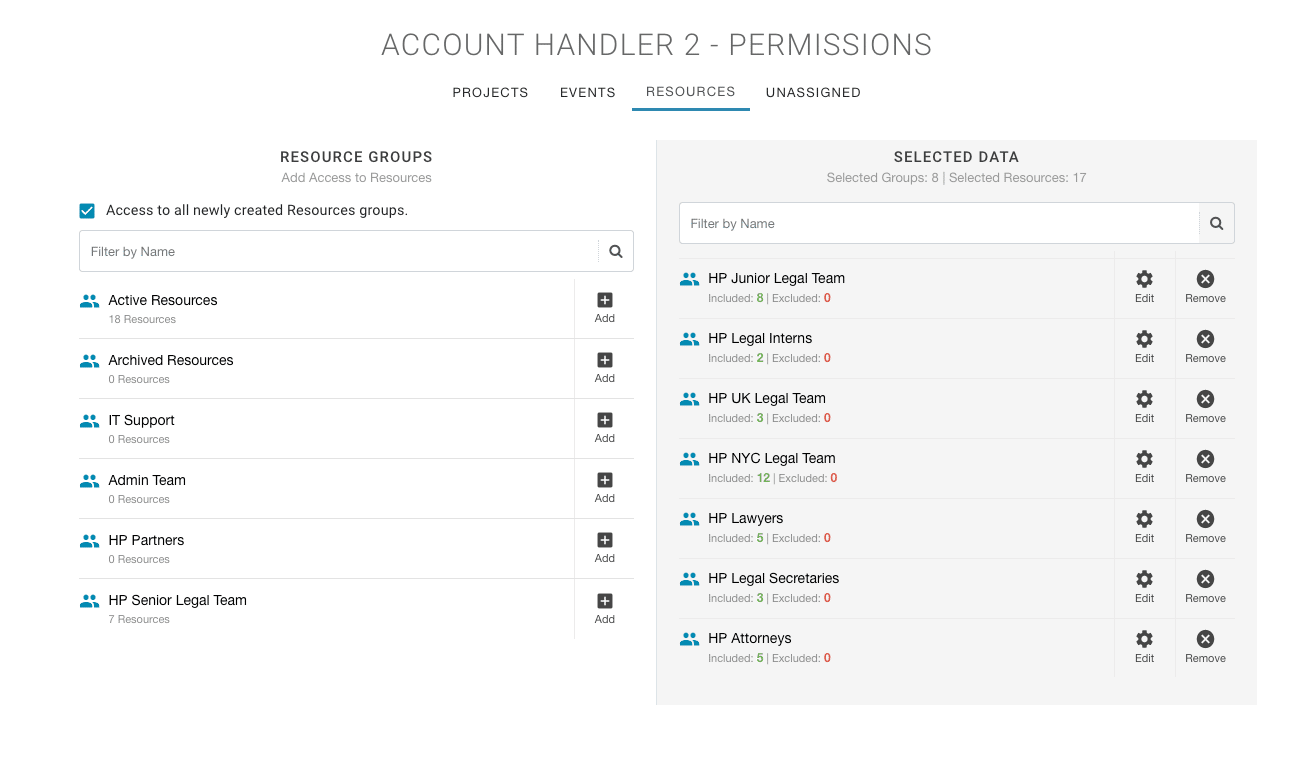
Set Legal Secretary User access Permissions to Resources
Working the same way as assigning permissions to Projects. Assigning Legal Secretary Users access to Resource groups or individual resources can be set here.
We can set Account Handler Role Permissions to individual Resources and Resource Groups. We can exclude and include access.
Resource Groups – Shows available Resource Groups that the Legal Secretary User doesn’t have access to. Simply add Resource Groups as required.
The Selected Data Column will show the Resource Groups the Legal Secretary User has access to.
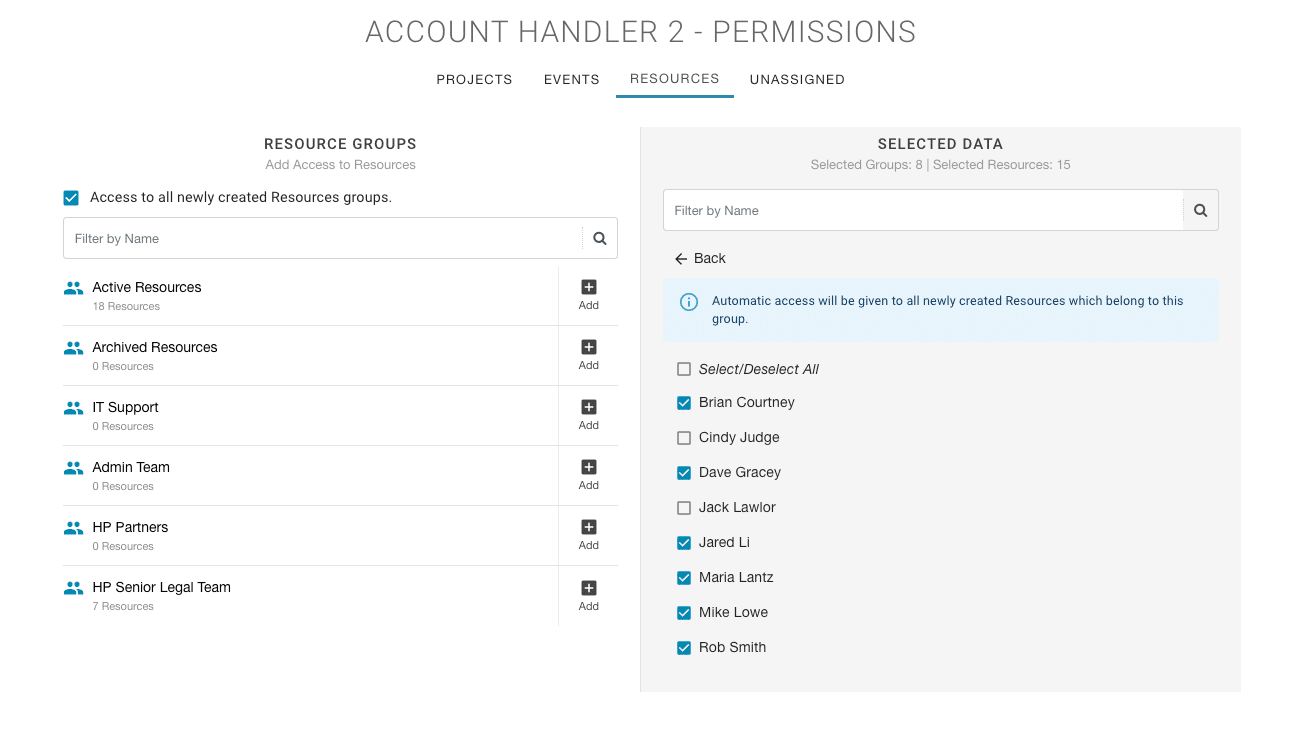
Individual Resource Access for Legal Secretary Users
For each Legal Secretary user, you may want to include or exclude access to individual resources from a resource group. You can do so by clicking the Edit button of the relevant resource group. To do so is very easy, like 1, 2, 3:
- Click Edit of the relevant Resource Group. This will list out the resources within that group.
- You can select or unselect all. Alternatively, you can scroll through the list and individually select which resources Legal Secretary users can and cannot access. Click or Un-click as required.
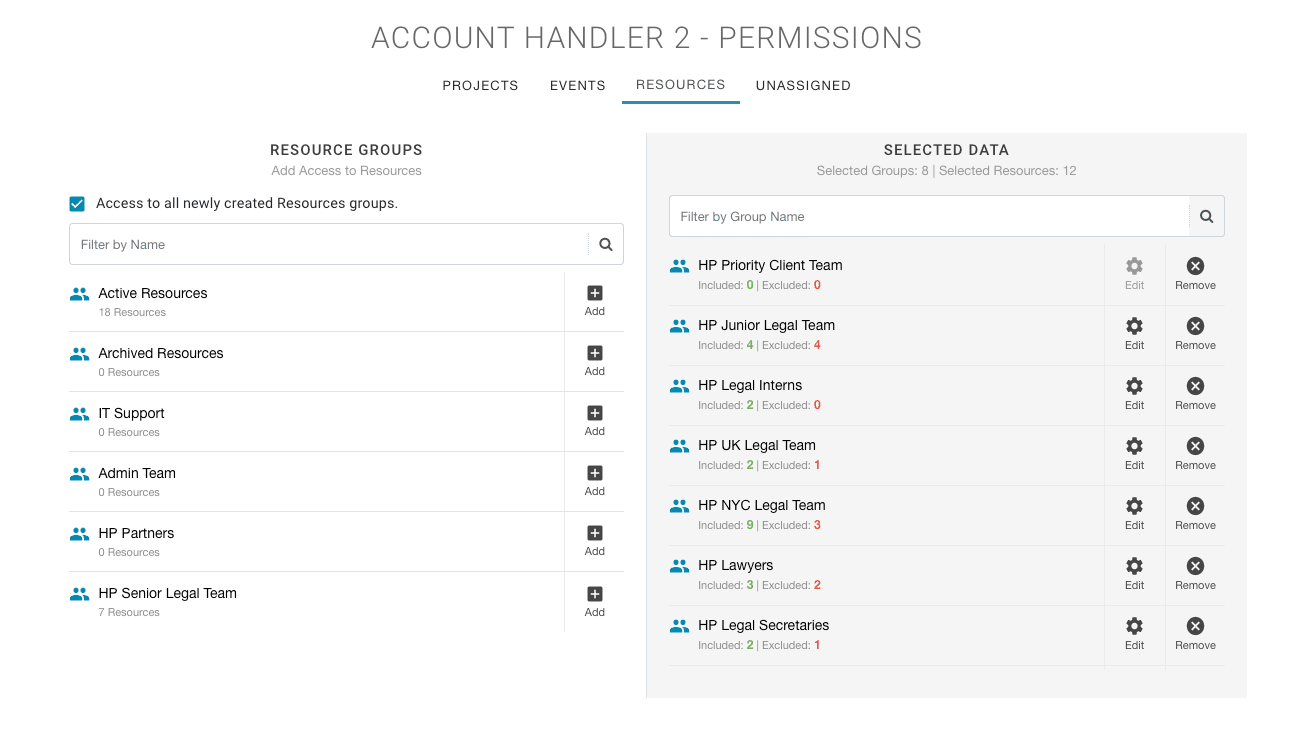
- Save or Click ‘Back’ will navigate you back to the Selected Data Resource Groups. The resource group will show the count of Included and Excluded resources from the resource group. Included count of projects are highlighted in Green and the excluded count of resources are highlighted by the color red.
Click Remove to remove the entire resource group from the Legal Secretary Users permissions. This will then show in the Available Resource Groups column. You can add again if required.
Account Handler User Project Individual Access Count of Included and Excluded projects.
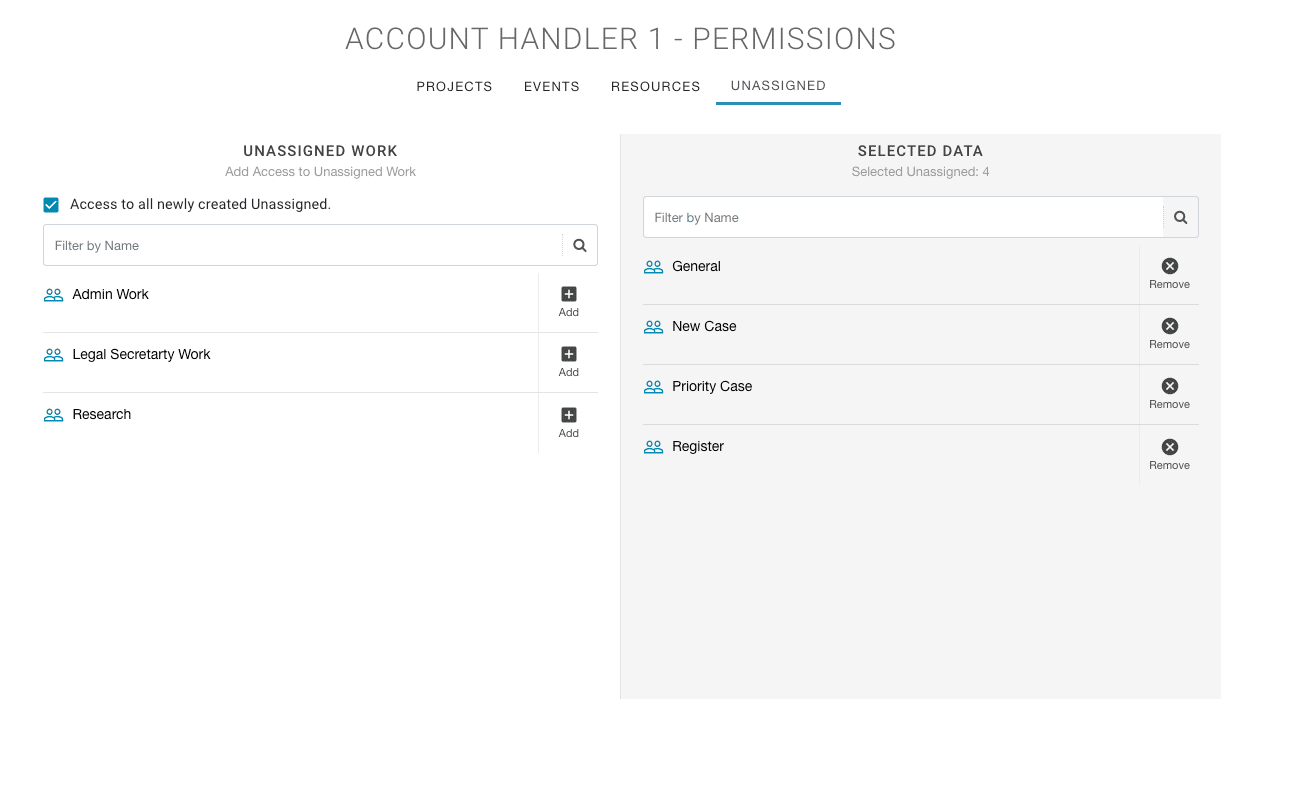
Set Legal Secretary User access permissions to Unassigned Work
Lastly, is Unassigned Work. This is a list of Unassigned Work categories that you have set for your Hub Planner account. Unassigned Work Categories types are useful for forecasting and planning work along the pipeline and schedule. Customized to your own Hub Planner account, some examples might include: Priority Work, Admin Work, Development Work, Design Work etc. Here you can set what unassigned work categories all Legal Secretary Users has access permissions to view on the scheduler.
Like events, options here are not as detailed as Projects and Resources. All you need to do here is Add or Remove. It’s very straightforward and easy to set. The left hand column will display Unassigned Work categories the Account Handler user does not have access to. The right hand column, ‘Selected Data’ will show the list of unassigned work categories the Legal Secretary user has access to on the scheduler.
Once ready, click SAVE!
Legal Secretary User Access at Role Type
Once you have saved your settings, you can navigate back to the Permissions page. Next set permissions for another role type or set permissions for an individual resource by clicking the ‘Resources’ tab.
Individual Legal Secretary User Access Permissions
Here is where will can individually set user access permissions to a sole resource. Set permissions for a single Legal Secretary. This works great for Legal Firms so that different Legal Secretaries can be assigned to set Lawyers, Attorneys, Barristers, and Counsel etc. Above, we were setting permissions at the role level (Account Handler). Now we will show you how to set permissions to an individual resource level/ Legal Secretary.
Custom Resource User Access Permissions
Name: Zoe Smith
Job Title: Legal Secretary
Role Type: Account Handler 1
Permission Access: Custom
Steps to Set Permissions at Resource Level
- Settings
- System Settings
- Permissions
- Resource Tab
- Locate Resource (Zoe Smith)
- Click EDIT to open the Permission Builder
Set Project Permissions at Resource Level
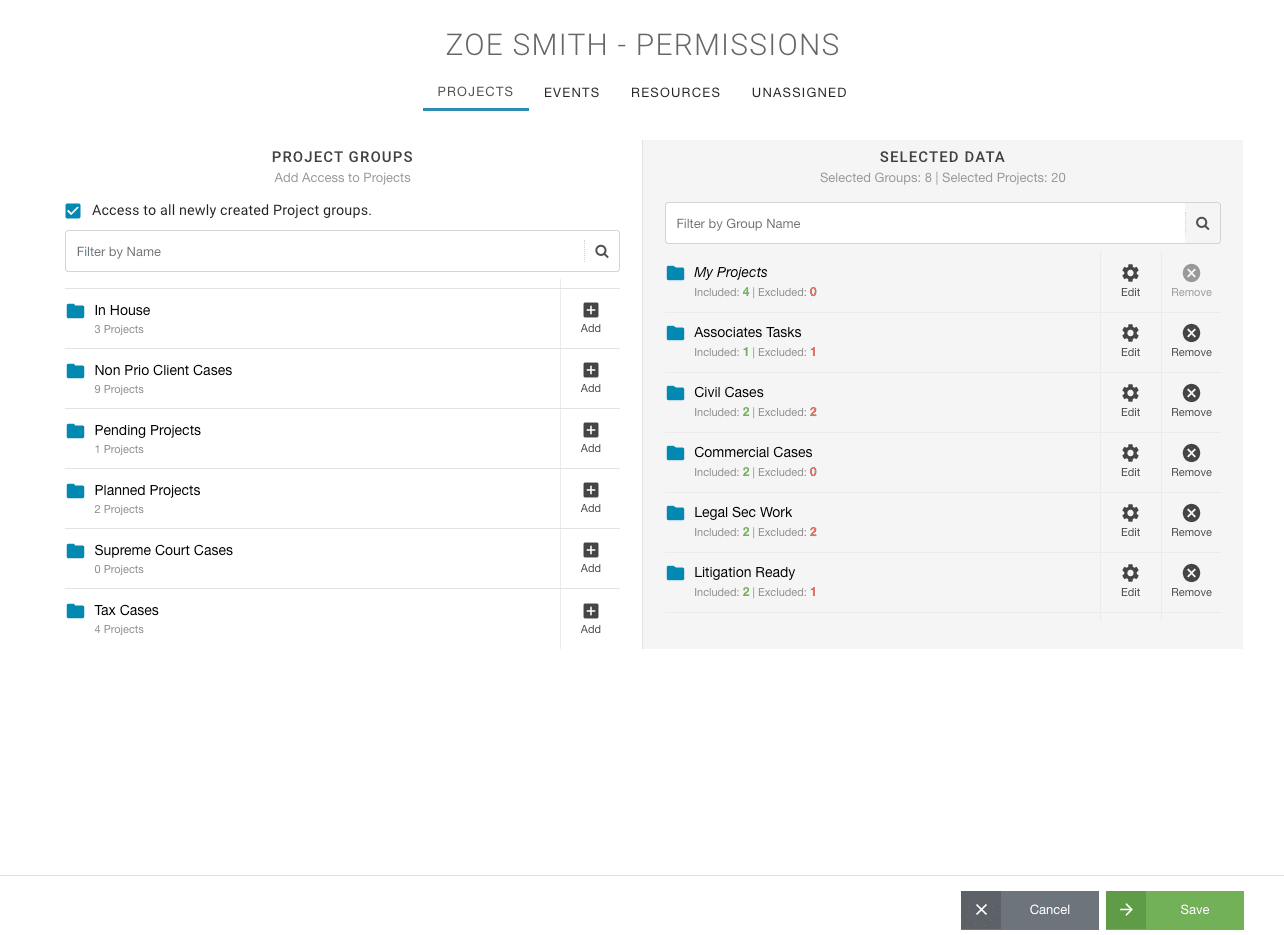
After locating Zoe, we will now individually adjust access to Project Groups and Individual Projects we want Zoe to have access to. Again, to explain the reasoning. Zoe is a Legal Secretary. Zoe might be assigned to specific Lawyers, specific clients, and teams etc. Therefore, we don’t want a one size fits all. We want to be able to customize what Zoe can and cannot see.
As Zoe is an Account Handler 1. The permissions of that role will follow through by default. It’s up to us whether we adjust these or not.
Following the same steps as settings permissions by role user. We can add Project Groups from the left hand column. On the right hand column entitled ‘Selected Data’ are the project groups that Zoe has access to view. Remove Project Groups you don’t want Zoe to have access to. Don’t worry, all other Legal Secretary users will still have access to the removed groups. Or indeed the other way around. If we added a Project Group to Zoe’s Permissions profile, it doesn’t override all Legal Secretary users, just Zoe’s.
Note, ‘My Projects’, Zoe cannot remove. Why? Zoe is part of these projects so will need to see the schedules of her own projects. She can individually edit them.

Set Individual Project Permissions at Resource Level
Within the Selected Data column, for each Project Group we have the option to edit the permissions access. That means that we can include or exclude Zoe’s access to specific projects from that group. Click EDIT to navigate to the Project Group. This will open the list count of individual projects. Scroll to include or exclude projects from Zoe’s permissions profile.
Now we have set what projects we want Zoe to have access to:
Important Note for Including and Excluding Individual Projects and Resources
If you include/exclude an individual projects/resources from user permissions. They will also be automatically included/excluded from all other project/resource groups the user has access to.
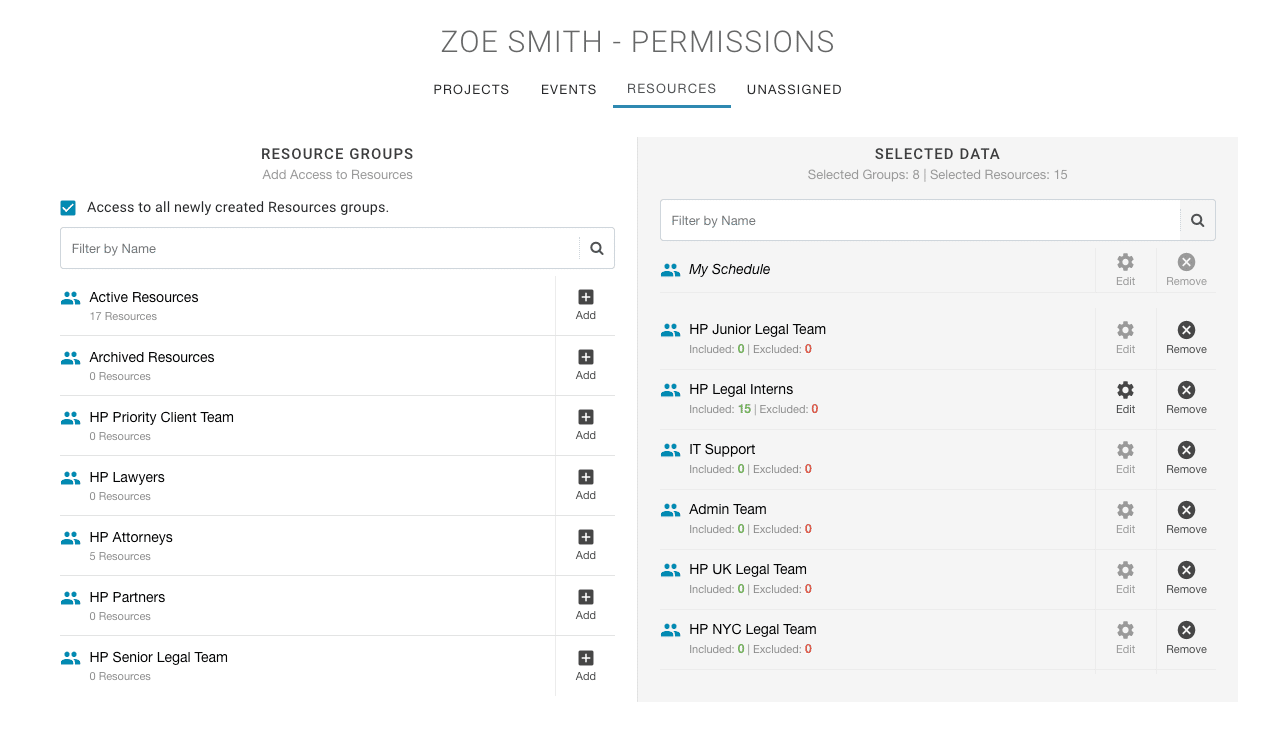
Set Resource Permissions at Resource Level
Next, we will now individually adjust access to Resource Groups and Individual Resources we want Zoe to have access to. An example here might be that we want Zoe to have access to individual Attorneys she is assigned to. Zoe doesn’t need access to all Attorney schedules. Therefore, we don’t want a one size fits all. We want to be able to customize what Zoe can and cannot see.
As Zoe is an Account Handler 1. The permissions of that role will follow through by default. It’s up to us whether we adjust these or not.
Following the same steps as settings permissions by role user. We can add Resource Groups from the left hand column. On the right hand column entitled ‘Selected Data’ are the resource groups that Zoe has access to view. Remove Resource Groups you don’t want Zoe to have access to. Again, don’t worry, all other Legal Secretary users will still have access to the removed groups. And indeed for the other way around. If we added a Resource Group to Zoe’s Permissions profile, it doesn’t override all Legal Secretary users, just Zoe’s.
Set Individual Project Permissions at Resource Level
Likewise with setting access to individual projects, we can do the same with resources. Within the Selected Data column, for each Resource Group we have the option to edit the permissions access. That means that we can include or exclude Zoe’s access to specific resources from that group. Click EDIT to navigate to the Resource Group. This will open the list count of individual resources. Scroll to include or exclude resources from Zoe’s permissions profile.
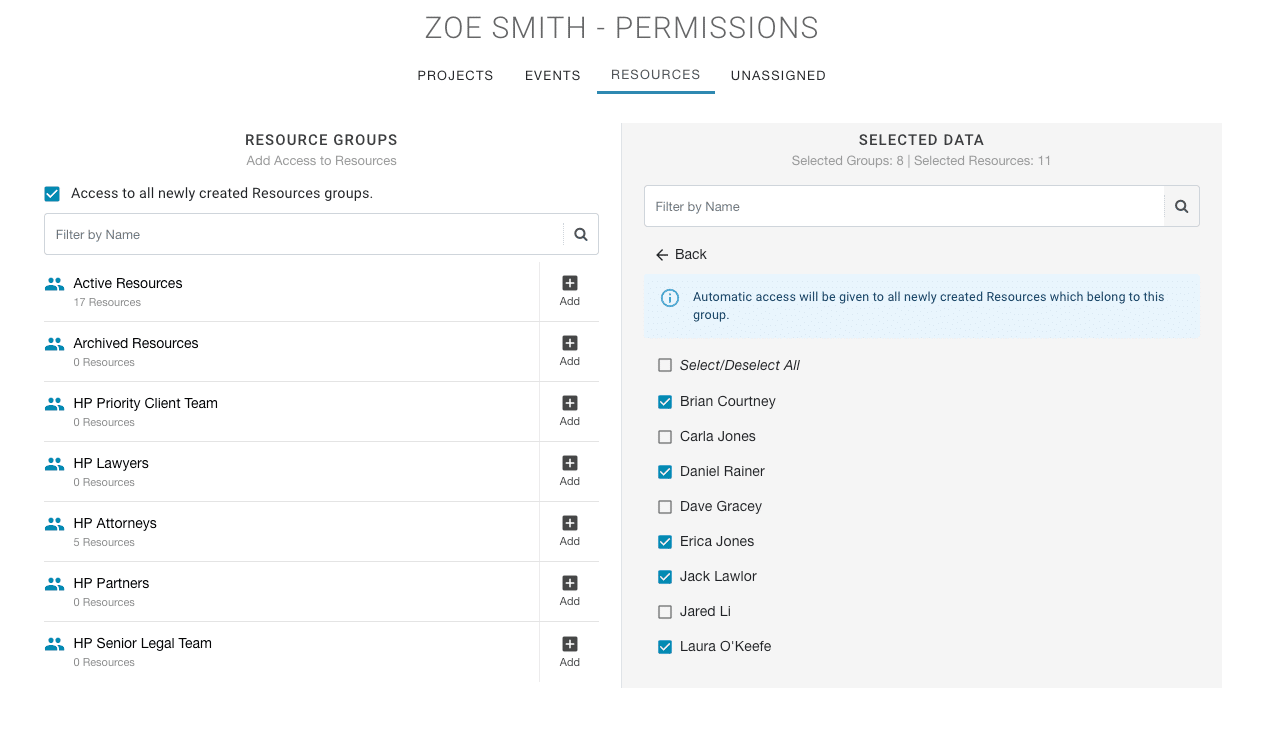
Looking at the below example of Legal Interns. Now you can see what the count of included and excluded resources from Zoe’s profile. What was all Legal Interns included, we now have removed access of 4 Interns from Zoe’s permissions profile. Those excluded, Zoe will not be able to see on the scheduler.

Again, important to note that if any individual resources are included / excluded from a users’ permissions. Regardless of the Resource Group, they will follow suit in all Resource groups they are a part of. The 4 Resources that are excluded from HP Legal Interns Group. If those 4 resources are part of any other resource group Zoe has access to, the 4 will also be excluded from Zoe’s permission access.
Automatic Access to New Resources in Group
When a user has access to a Resource Group. Regardless if they have excluded some resources from the users access. It’s important to note that all newly created resources within this group, the user will have automatic access to. To remove access, you will need to manually update the permissions of the role or the individual resource.

Add Access to all newly created Resources Groups?
Do you want to add for the user to access to all newly created Resource Groups? By default, this button will be click to provide access to all. new resource groups. Un-click to remove access to all newly created resource groups.
