Create a Team Resource Manager
The task being to create a Team Resource Manager for a Resource Group and access to see the Project Group. We will set non Project Manager role that can have further functionality / access to their teams data, projects, approve timesheets, vacation and view and manage schedules etc.
This will allow the team resource manager to streamline schedules, dashboards, reports etc. without having to manually create or manipulate system data. We’re going to configure the role rights and permissions of the resource so that they can view and manage resources on their team. Once ready, we will create a resource group the resource will manage. Next, we will assign a number of resources to the newly created resource group. Add Unassigned Work categories to the resource group schedule if necessary.
Names of Team Resource Managers?
There are many names for this situation. Whether your team is agile, lean, etc. This role equates to having access to manage a team.
- Team Lead
- Resource Lead
- Scrum Master
- Team Manager
- Resource Manager
Create a Team Manager of Resources with Full Scheduling Rights / Manage Timesheets
For the purpose of this scenario, we are going to use the Design Team as an example. We are going to set a resource the ability to view the schedule of all resources of the Design Team. Be able to schedule project bookings solely for that team.
What do we want them to be able to have the right to do?
- Schedule resources of Design Team on all projects they are a part of.
- Manage Design Team Timesheets
- View Group Schedule of Design Team
- View Individual schedule of Resource from Design Team
- Rights to Manage Resource Requests from the Design Team
- Manage Vacation Requests
- Assign bookings in Unassigned Work categories to Design Team
To break it down into just 3 short steps:
- Determine the role type of the Resource Manager
- Set the Role Functions
- Apply the user access permissions to the team and projects
Step 1 – Determine the Role Type
We need to assign a role type to the Resource who will manage and overview the team. Select either Contractor, Team user, Acc Handler 1, Acc Hander 2 or Admin Manager? All have a varying default set of rights and permissions. Assign the right role type to the resource manager. For the Resource Manager to have full scheduling rights and be the approver of their timesheets etc., you need to look at these sections within Roles.


![]()
![]()
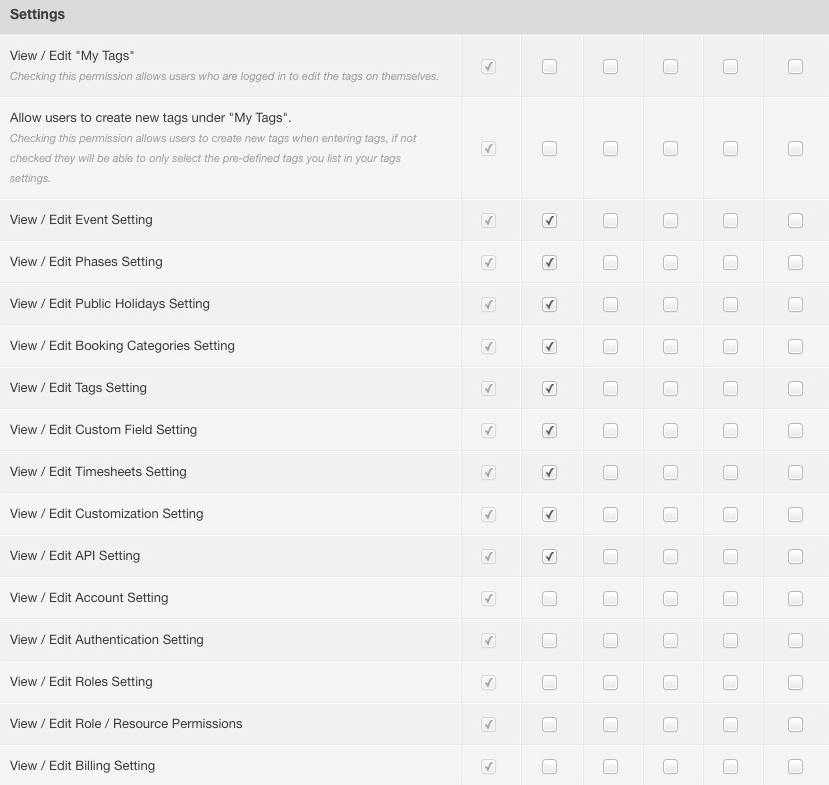
Step 2 – Set Role Functions
Once they have access to their team of resources. What do we want the Resource Manager to be able to do? As set above. We want them to be able to schedule their resources on projects, view activity and set tasks. We will also set the ability to approve timesheets, vacations and resource requesting too. There are a couple of sections within Roles that are sensitive and advanced that we will leave out. What’s important to note here is that we are providing these rights for the Resource Manager of the resources they have permission to only. Not every resource or project. Just the ones that they have access to.
To access Roles:
- Settings
- System Settings
- Roles
Now, navigate along the role settings and tick the relevant boxes to allow the resource role to be able to
Scheduling – Full Scheduling Rights.
The logged in user will be able to schedule all Projects, Events and Resources they have Permissions to. if Resources the user does not have direct permissions to are part of the Projects / Events they do have permissions to, then they will be able to schedule them on that particular Project / Event.
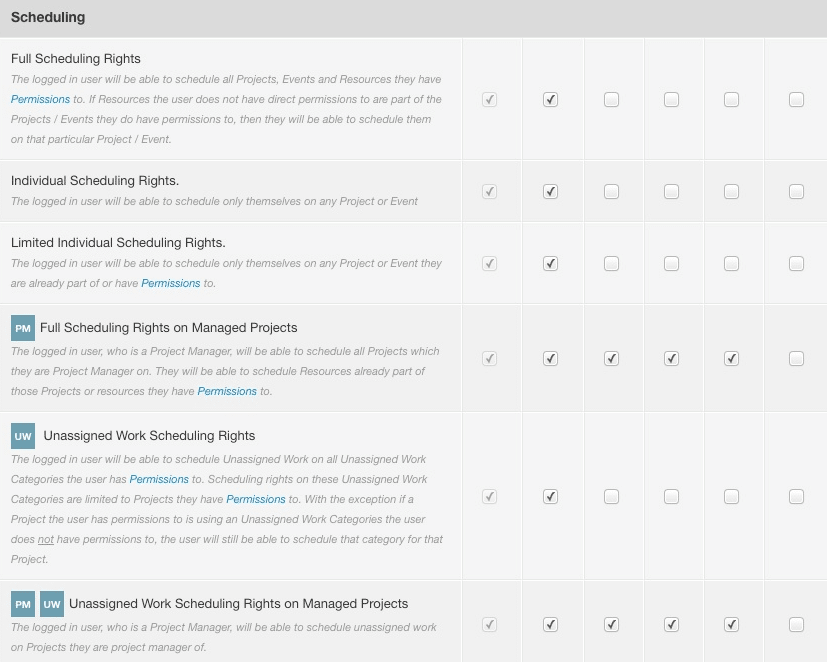
Scheduling – Unassigned Work
The logged in user will be able to schedule Unassigned Work on all Unassigned Work Categories the user has Permissions to. Scheduling rights on these Unassigned Work Categories are limited to Projects they have Permissions to. With the exception If a Project the user has permissions to is using an Unassigned Work Categories the user does not have permissions to, the user will still be able to schedule that category for that Project.
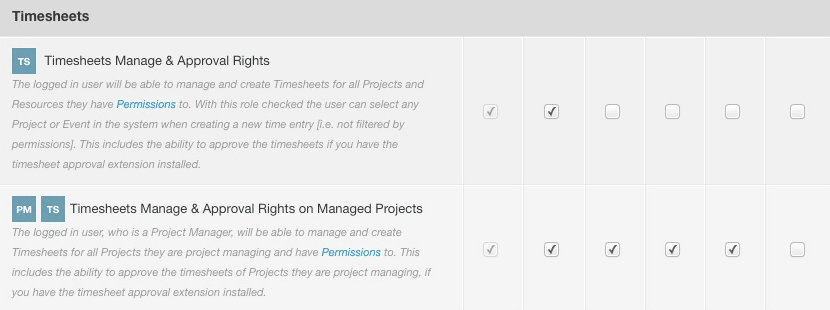
Timesheet – Manage & Approval Rights
The logged in user will be able to manage and create Timesheets for all Projects and Resources they have Permissions to. With this role checked the user can select any Project or Event in the system when creating a new time entry [i.e. not filtered by permissions]. This includes the ability to approve the timesheets if you have the timesheet approval extension installed. Note, to approve timesheets, the user must be a Project Manger of the Project. Alternatively, they will need to have the first row ticked.
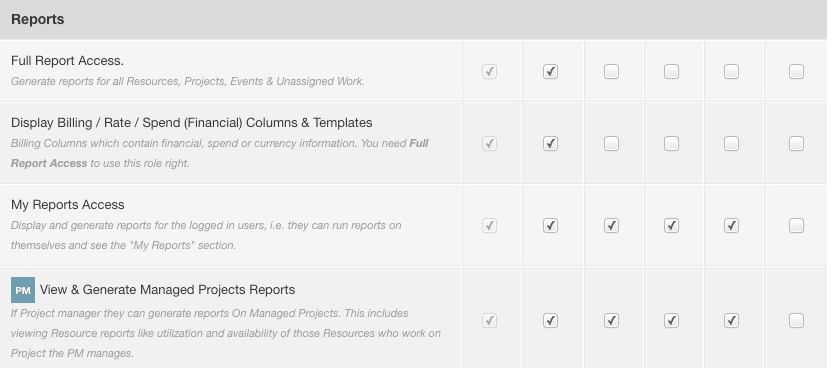
Reports
Hub Planner reports hold such valuable information. The analytics produced are endless. For a Team manager reports like forecasted utilization, resource burn rate and resource availability of resources are super helpful in planning and managing a schedule. Hub Planner reports are so in-depth, that a lot of information can be quite sensitive too. So, with that in mind, the reports access has been split into different levels of access.
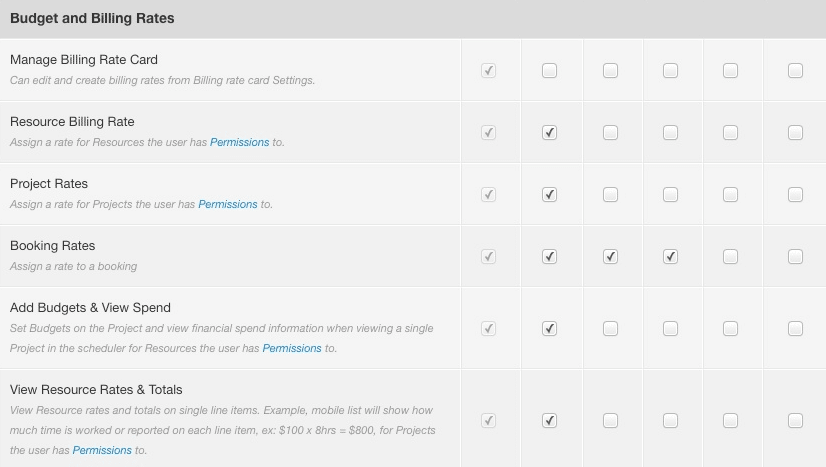
Billing & Budget Rates
This is a role setting that hold quite sensitive information. Therefore you need to be mindful who has access to this settings. For this scenario we are not adding any rights to Billing & Budget Rates. However, for information purposes there are multiple permission and role settings for this section. Separated quite well so that you can assign some aspects of the financial roles.
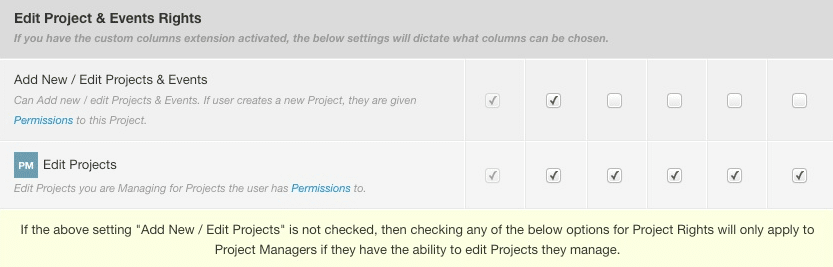
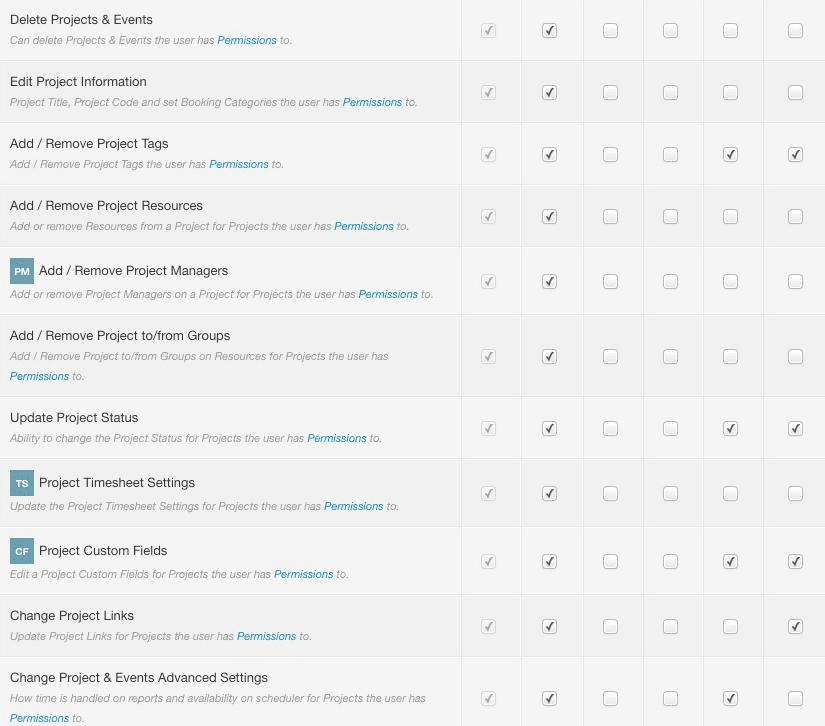
Edit Project & Event Rights
Similar to the Billing & Rates section, this part of role access should be limited. Again, for this scenario we don’t need to select anything from this section. For information purposes, as the name suggests. This section of Roles allows you to assign role access for the ability to managing the following :
- Add / Remove Resources
- Edit Resource Information
- Add / Remove Resources from Resource groups.
- Change and resource settings, status, custom fields etc.
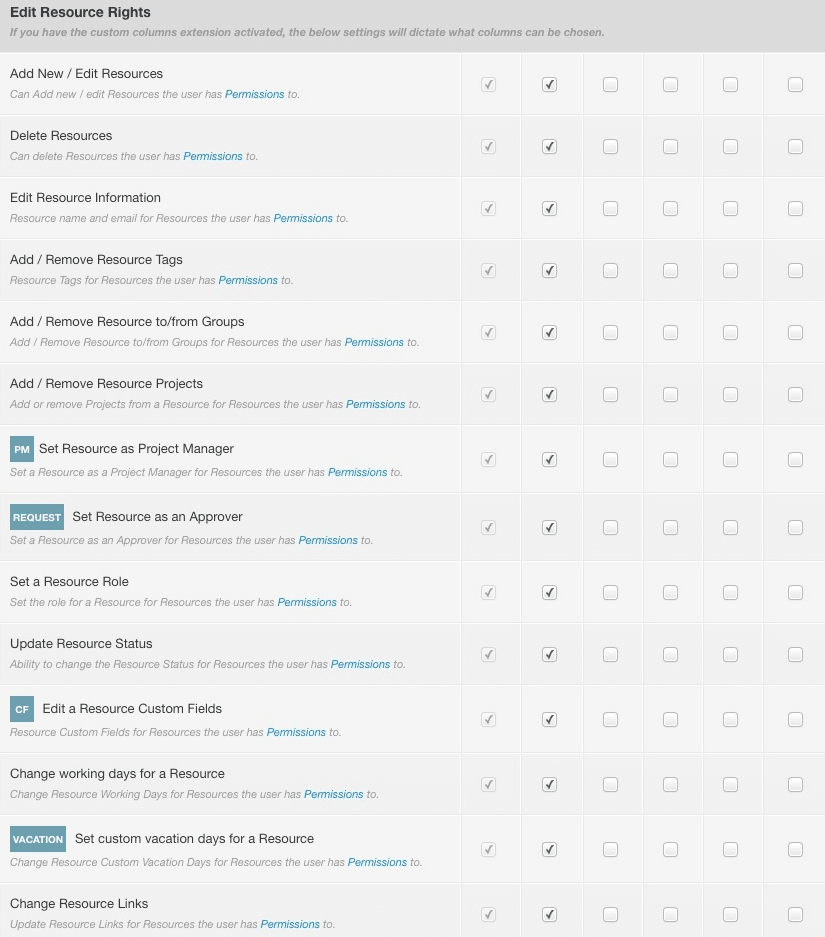
Edit Resource & Unassigned Work Rights
Similar to the Billing & Rates section, this part of role access should be limited. However there may be one or two that we can set for the Resource Manager. All others are more advanced level for this scenario. For information purposes, this section will assist with settings for creating new resources, editing resource information settings and custom fields etc. We will add:
- Request & Approval Workflow – Set a Resource as an Approver for Resources the user has Permissions to.
- Vacation – Change Resource Custom Vacation Days for Resources the user has Permissions to.
Vacations – Manage Resource Vacations
Can manage all vacations for Resources the user has Permissions to, which includes access to vacation & sick settings.
Vacations – View Vacation Requests on Scheduler
A user will be able to see vacation requests in their schedule for Resources the user has Permissions to.
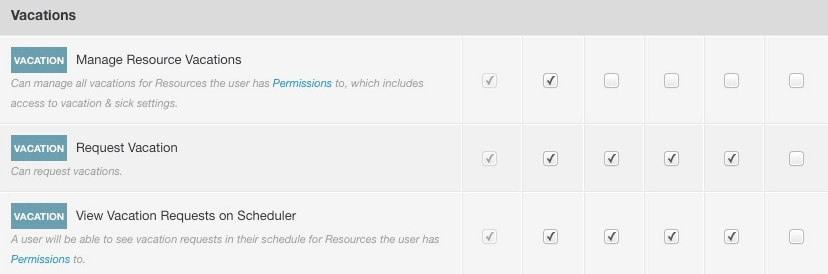
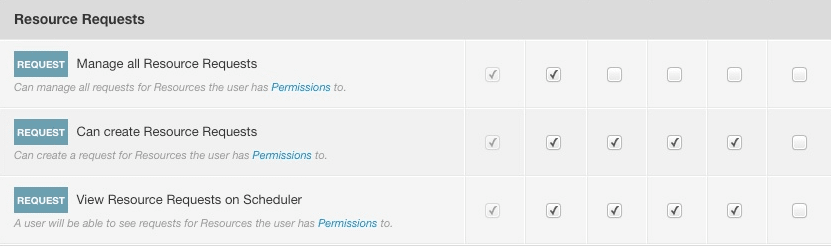
Resource Requests – Manage all Resource Requests
Can manage all requests for Resources the user has Permissions to.
Resource Requests – Can create Resource Requests
Can create a request for Resources the user has Permissions to.
Resource Requests – View Resource Requests on Scheduler
A user will be able to see requests for Resources the user has Permissions to.
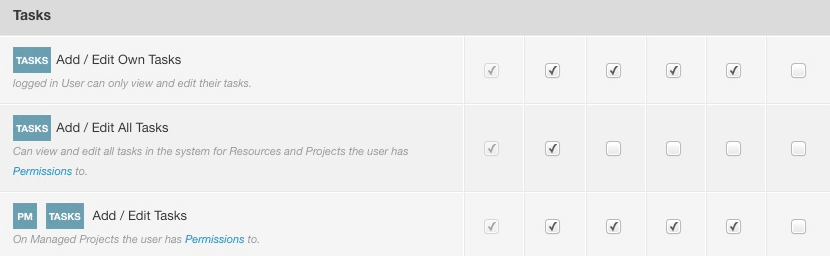
Tasks – Add / Edit All Tasks
Can view and edit all tasks in the system for Resources and Projects the user has Permissions to.
Further Role Settings
There are further role rights that can be assigned based on what the user will have permissions to. These are:
- Project Phases
- Milestones
- Project Start and End Dates
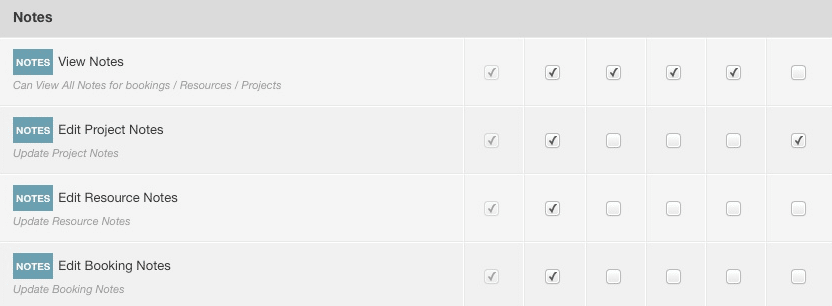
- Notes


What if I want to limited the above rights or add some more permissions?
That’s totally fine. Perhaps you want the resource manager to be able to view but not schedule? Or grant the access to full scheduling rights. All you need to do is alter the permissions and rights of the resource manager that you want them to have access to.
Step 3 – Give Permissions to Team Resource Manager
Here is where we will grant access to the Design Team and Design Projects to the Resource Manger.
Permissions Modal / Builder
- Projects – Assign individual projects or project groups to a resource.
- Events – List of Events available to assign to a resource
- Resources – Select individual Resources or Resource Groups to access.
- Unassigned Work – If installed, allow for resources to view data within selected unassigned work categories.

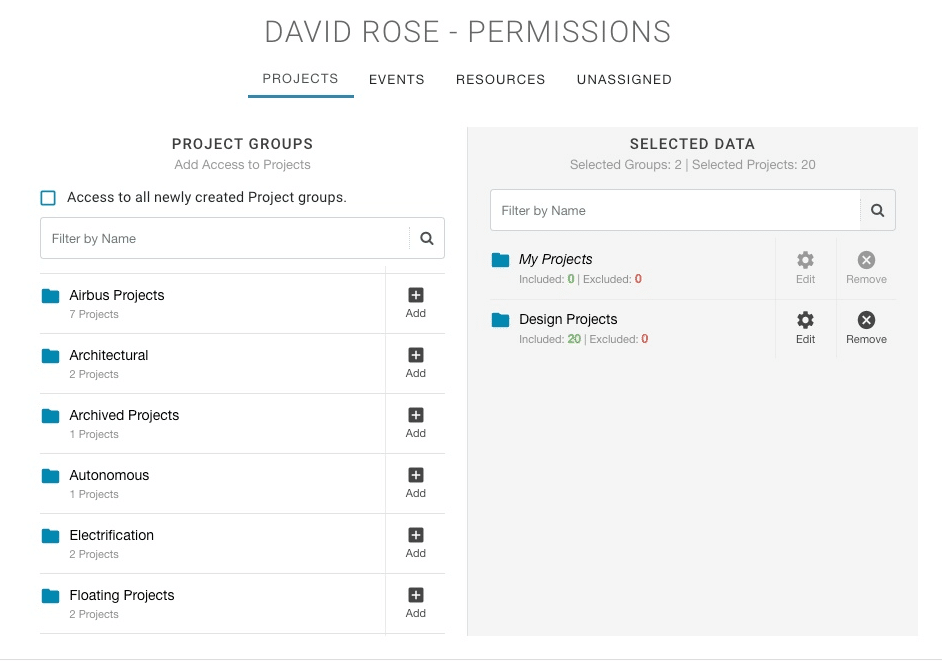
Give access to a Project Group
I want to give a team manager access to a Project Group. What do I do?
- Settings
- System Settings
- Permissions
- Resources tab
- Locate resource you want to give access to
- Click the settings cog of the resource you want to give access to (this will open the permissions modal of the resource)
- Click the ‘Projects’ tab
- Project Groups – select to add the project group available to the team manager.
- Finish by clicking Save.
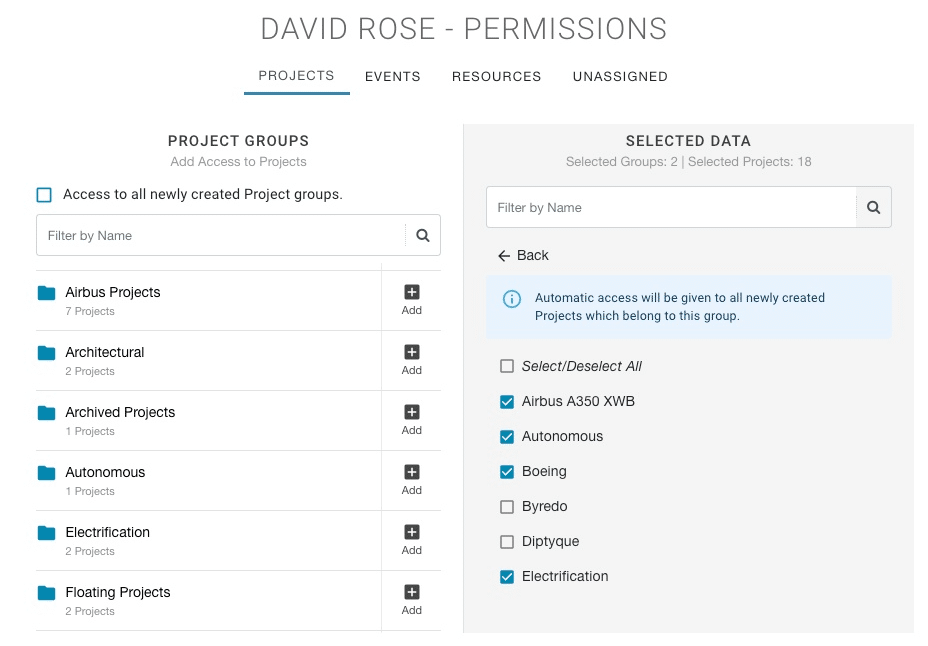
Select Individual Projects from a Group
Should you wish to provide access to specific projects within the project group and not provide access to the entire project group. You can individually select the projects from a project group to provide access to.

Following on from point 7 of the above: Projects tab.
- Click the ‘Projects’ tab
- Project Groups – select to add the project group available to the team manager.
- Click the Edit button of the added Project Group to open the list of projects within the group.
- Individually tick the projects you want the team manager to have access to. The default will have all projects ticked. Ensure to untick projects you do not want the resource to have permission to access
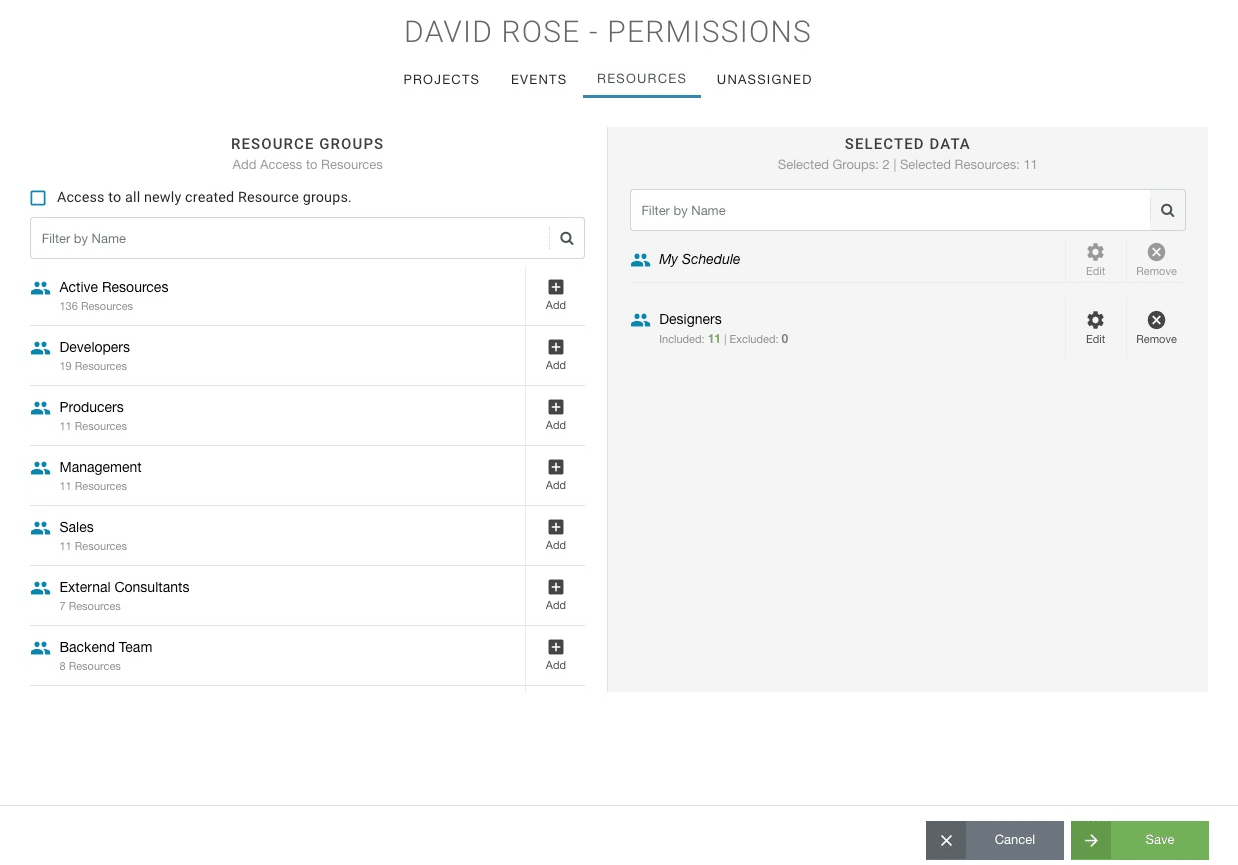
Give access to a Resource Group
I want to give a team manager access to a Resource Group. What do I do?
- Settings
- System Settings
- Permissions
- Resources tab
- Locate resource you want to give access to
- Click the settings cog of the resource you want to give access to (this will open the permissions modal of the resource)
- Click the ‘Resources’ tab
- Resource Groups – select to add the resource group available to the team manager.
- Finish by clicking Save.
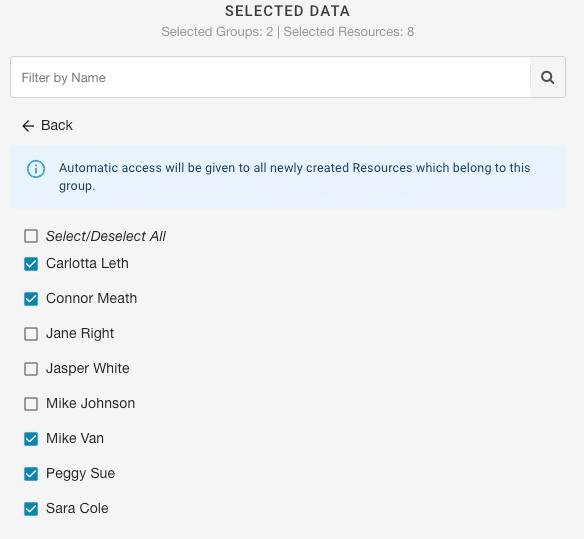
Select Individual Resources from a Group
Should the resources not be part of a resource group you want to add or you don’t want to add the entire resource group. You can individually select the resources from a resource group to provide access to the Team Resource Manager.
Following on from point 7 of the above: Resources tab.
- Click the ‘Resources’ tab
- Resource Groups – select to add the resource group available to the team manager.
- Click the Edit button of the added Resource Group to open the list of resources within the group.
- Individually tick the resources you want the team manager to have access to. The default will have all resources ticked. Ensure to untick resources you do not want the resource to have permission to access
Events & Unassigned Work
Add Events or Unassigned Work categories relative to the Resource Group or Project Group?
It’s very straightforward to add access to events and unassigned work categories. Working the same way as providing permissions to Projects and Resources. You will navigate to the Events tab or Unassigned Work tab and select what you will grant permissions to.
What will the Permission give me access to?
Whatever the role settings grants you rights to the Team Resource Manager. Should you be given access to a resource, resource group or project etc. You will be able to have access and have rights to based on the role settings. This could be scheduling rights, access to reports, billing and budgets etc.
Within Role Settings, you can subsequently determine what that role can have the rights to. For example below Scheduling settings for roles. Here we can determine what scheduling rights a role can have. So, say as a Team member, even if I have access to a Resource Group. I won’t have the ability to schedule time on a resource or project as the role settings for Team is not ticked.
I can tick the Team member right for ‘Limited individual Scheduling Rights’. This will allow me to schedule the team member on any projects or events that they are a part of AND that they have permission to access.

Do I have to have a specific role set for access?
Everyone is assigned a role. That depends. You will need to check the level of access within the Roles section of settings and also Permissions. What ever settings you have within the Role settings will transcribe to the Role Permissions. You can subsequently override the permissions of roles.
If I give access to a Project Group, does that make them a Project Manager?
No. Not necessarily. What ever role the resource is assigned will determine what permissions they have access to. The role rights are assigned in settings. Subsequently, we will set what level of permissions the roles or individual resources will have permissions to access.
Contractor role with permission to Resource Group ‘Designers in London’. What can they do?
Whatever Contractors have the rights to do set in Role Settings. After assigning the permission levels to the Contractor. You will now navigate to Role settings to view what rights they have within Hub Planner.
- Settings
- System Settings
- Roles
Each role is split into columns along the top of the page. A subsequent list of role rights are listed. If the role has access to this role right, the box under the role column needs to be ticked.
You can assign scheduling rights, ability