Who is the Resource Manager in Hub Planner?
Typically, a resource manager is someone who will be able to manage the schedule, view team bookings. Monitor the utilization, the overtime, approve vacation requests etc. Customize what they can do. Customize what they can see. All at an individual user level. This never existed in Hub Planner. Access permissions and role rights we are based on what role they had. Were they a Contractor, a Team Member, an Admin etc. These were all set in stone and a one size fits all. Now, you can create individual settings for every user. Also, to point out that you can also set permissions at a role level too. We can take you through that later on. Furthermore, everyone will have the same default role type settings and also a base level of access permissions until personalized.
Why lock/grant permission access?
This can be to lock down a project that’s sensitive. To providing access to certain project group. This works the same way when accessing resource schedules. Who has access to view schedules of your team. Create a resource manager instead of a project manager. Create access to a group of resource schedules Hub Planner Permissions, allows you to customize and create permission to access individual or group schedules for the Resource Manager.
How Hub Planner helps a Resource Manager?
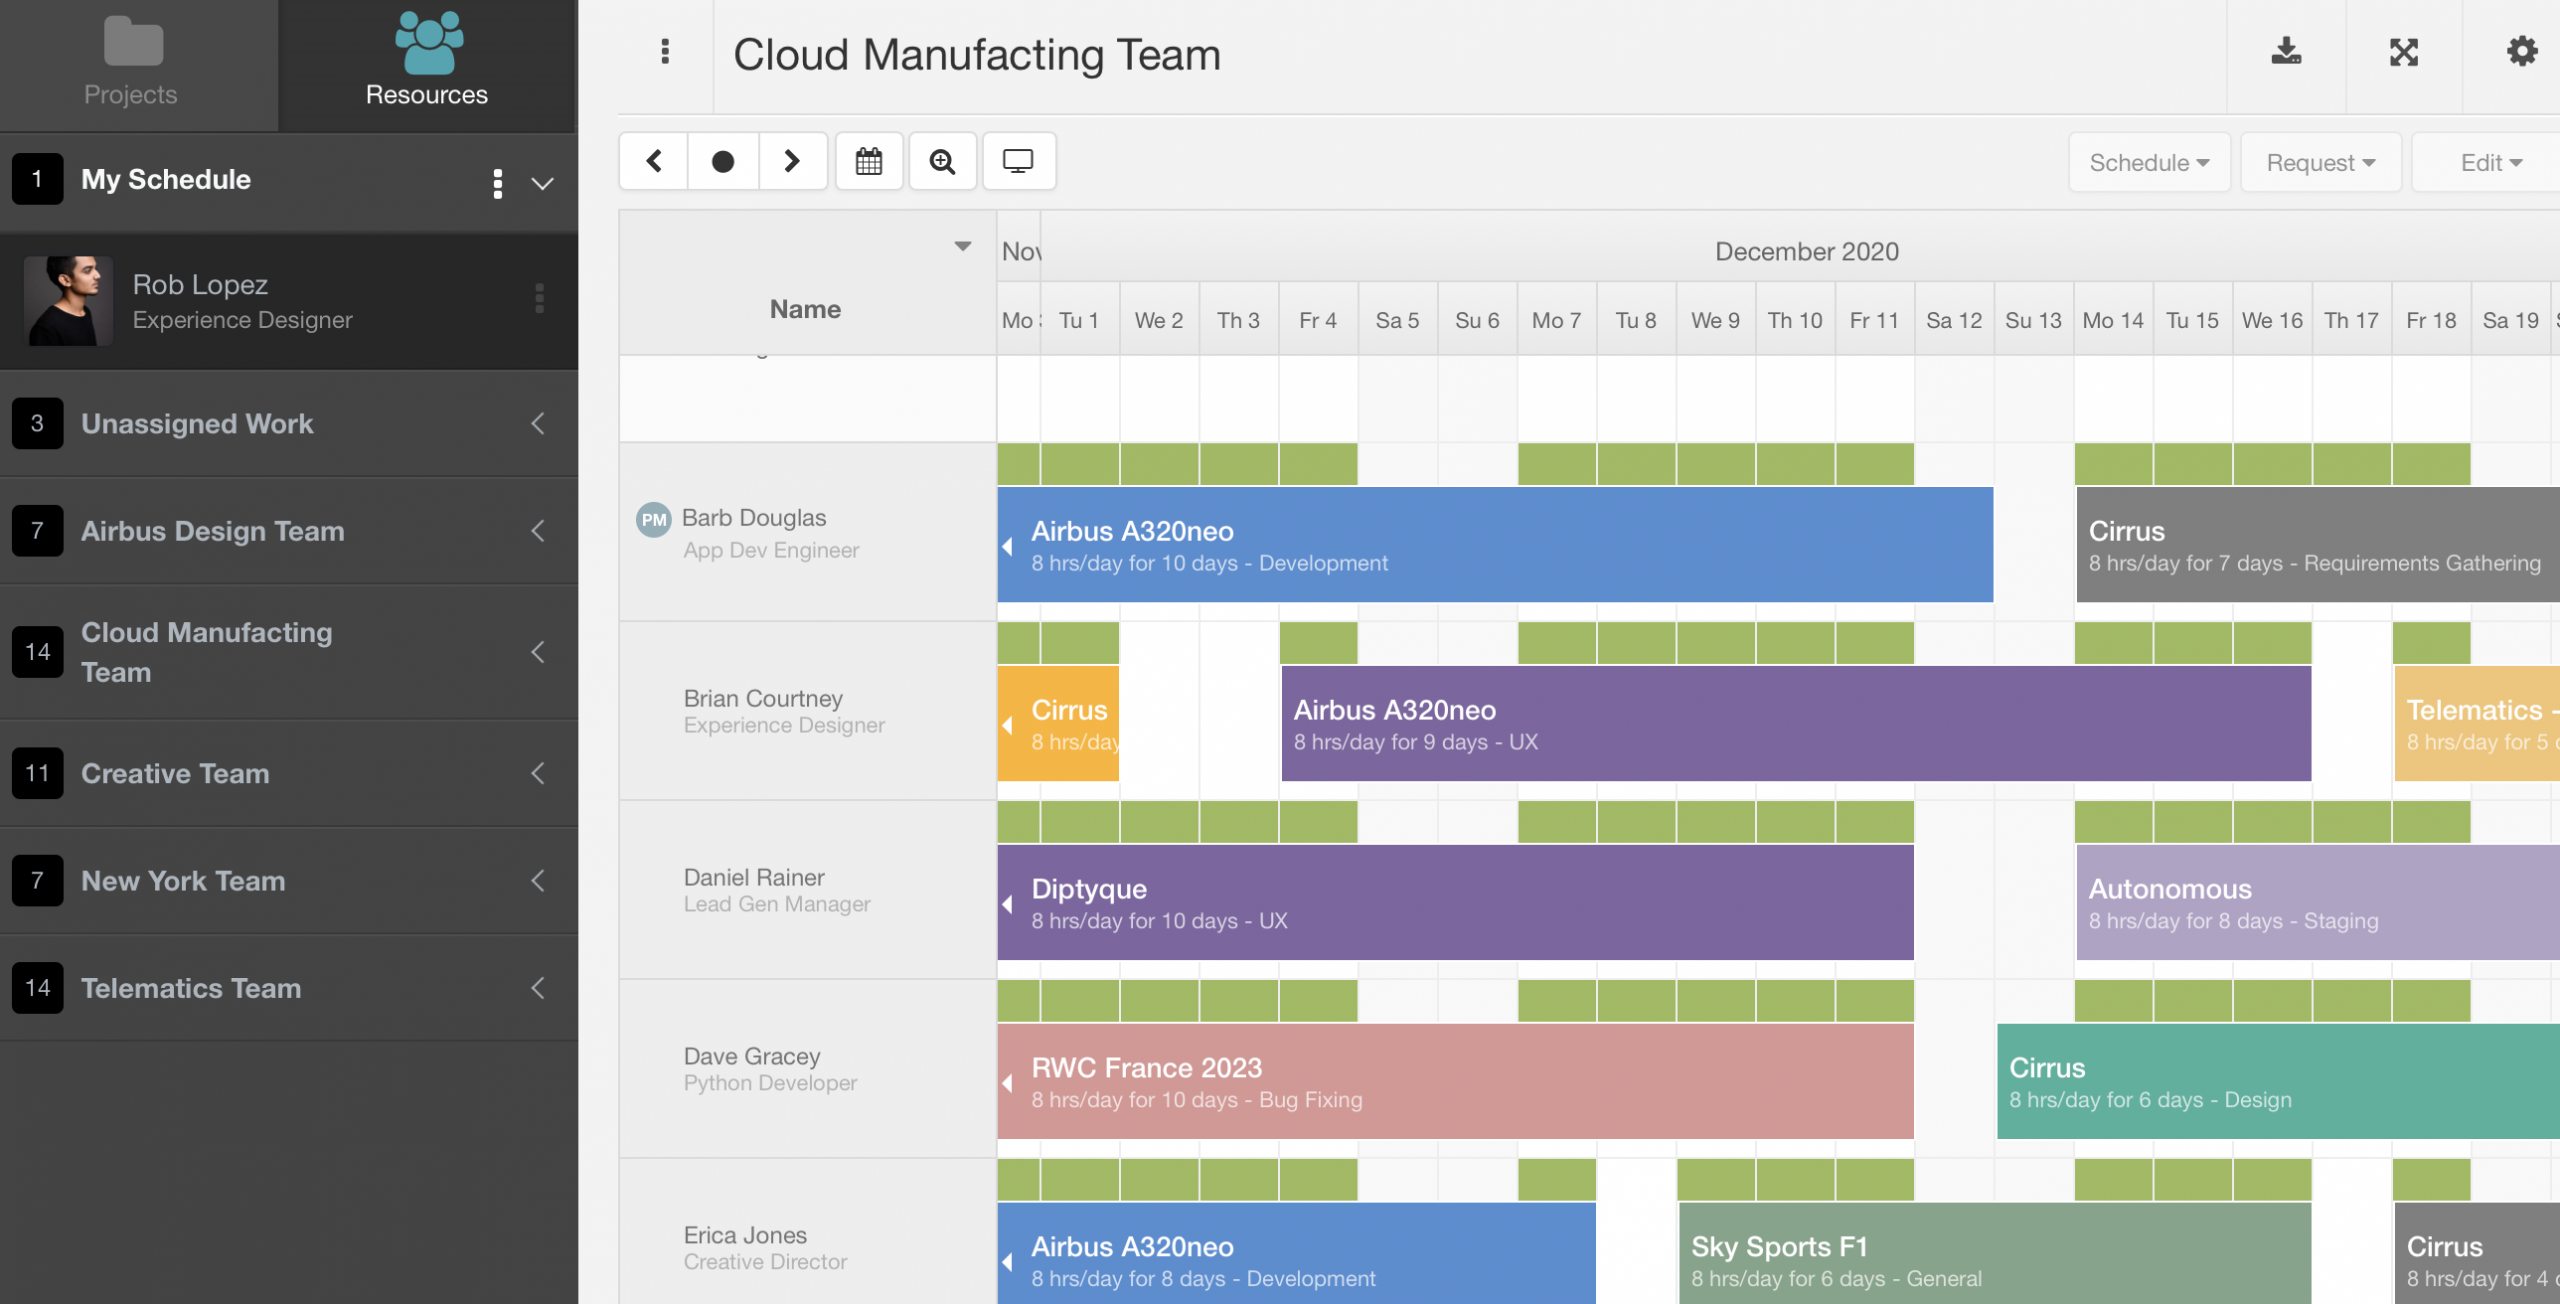
Hub Planner is a Resource Management software, the scheduler is the home to transparent views of resource and project bookings. that of resource allocation and utilization. Locate any pain pain points and scheduling conflicts. As a resource manager, using Hub Planner helps you to optimize resource utilization, manage resource allocation, identify and dealing with scheduling conflicts or resource booked over capacity. All of which leads to efficient team scheduling and project planning.
Set up a Resource Manager in Hub Planner
Let’s look at how to set up a Resource Manager type of role in Hub Planner. Remember it’s not one size fits all. Each user is 100% customizable. Grant and restrict access permissions and role rights as you need to. First things first, let’s figure out what you want the Resource Manger to be able to do in Hub Planner? Then we will show you how easy it is to set that up.
What do you want a Resource Manager to do?
Here’s some examples of what we can have a Hub Planner Resource Manager do.
- Scheduling available resources to projects with the right skill sets and experience.
- Monitor resource allocation, utilization, workload and overtime, etc.
- Identify and manage scheduling conflicts
- Updating resource modals
- The ongoing of adding new contractors or resources in accordance with project budgets.
- Collaborating on resource management with internal departments. Sharing analytics, producing reports showing the scheduled versus actuals.
- Setting notifications for schedule summaries and timesheet reminders to team members.
- Assigning Resource Billing Rates on an external and internal basis.
- Scheduling Coordinator
The above are just some examples of what a typical resource manager might do in Hub Planner. What a resource manager in your organisation does might be completely different. But, we will show you how easy it is to set up a Resource Manager regardless of what they need access to.
Customizing Role Levels
Whilst you can assign an overarching level of access for the Resource Manager under roles settings. This new update by Hub Planner allows you to go one step further and customize exactly what each resource manager and/or resource group can and cannot access. When creating the Resource Manager permissions in Hub Planner. For example, Bob is assigned Contractor level. For Project A, I want Bob to have a superior level of access. But not for all other projects right, just Project A? Bob will resource manage those who are a part of Project A.
This feature is super handy when it comes to customizing and detailing overall what resources can have access to.
How to set up a Resource Manager in Hub Planner?
Having laid out the functions and who they will manage, we will now apply the role rights and permissions to the Resource Manager
If you haven’t already set up a resource, please follow the steps laid out right here.
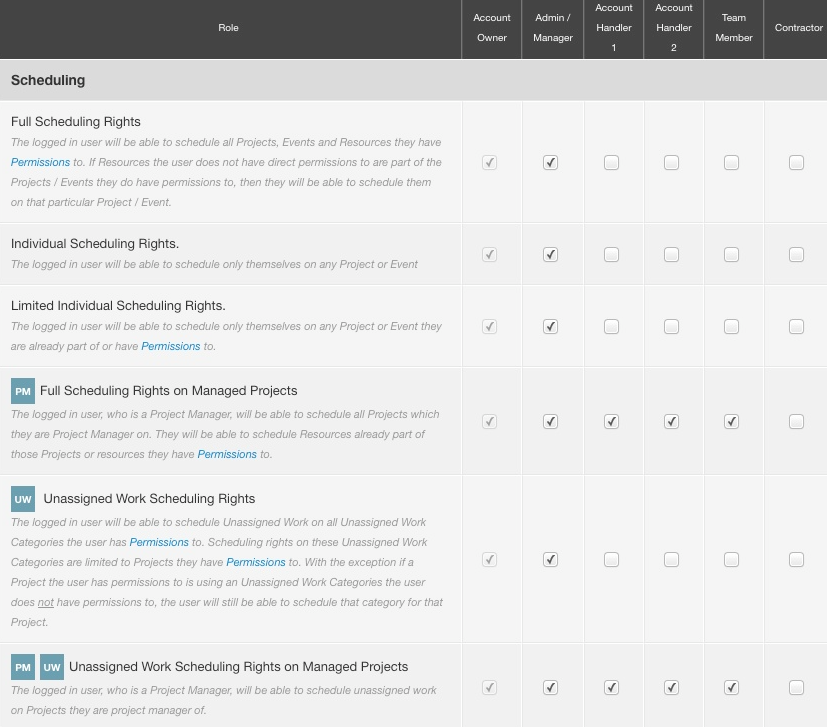
Step 1 – Set the Role Type.
Based on the above resource manager functions. You will need to tick the boxes of each function or role right. Don’t forget, you are not setting these functions for everyone who is that role type. You are only setting those functions for those who that user has permission to access. Which we will go onto the next step.
Role Levels
There are 5 main role levels (outside of the Account Owner) within Hub Planner. The idea being that you can separate the levels of access that each role has.
- Contractor
- Team
- Account Handler 1
- Account Handler 2
- Admin
When setting the role type. The below examples and corresponding rights will help you determine what rights to tick for the Resource Manger and what Hub Planner role type they best fit to.
- Scheduling available resources to projects with the right skill sets and experience.
- Custom Fields
- Scheduling Rights
- Search Filter
- Monitor resource allocation, utilization, workload and overtime, etc.
- Timesheets Approval
- Identify and manage scheduling conflicts
- Scheduling rights
- Reports ‘Who is over scheduled’
- Updating Resource Group, Resource Modal
- Edit Resource
- The ongoing of adding new contractors or resources in accordance with project budgets.
- Edit Resource
- Add New?
- Collaborating on resource management with internal departments. Sharing analytics, producing reports showing the scheduled versus actuals.
- Reports Access
- Internal Reports
- Setting notifications for schedule summaries and timesheet reminders to team members.
- Settings
- Notifications
- Assigning Resource Billing Rates on an external and internal basis.
- Billing Rates
- Edit Resource
- Scheduling Coordinator
Step 2 – Set a Resource Manager Permissions
There are a two options available to you when setting permissions for a Resource Manager in Hub Planner.
- Setting Permissions by Individual Resource
- Setting Permissions by Role Type
Following that, we will subsequently chose what they have permissions to:
- Resource Groups
- Individual Resources of Resource Groups
We can also set permissions to:
- Project Groups
- Individual Projects
- Events
- Unassigned Work (if installed)
Let’s provide you with the steps of each of these options.
Resource Manager: access to a Resource Group in Hub Planner?
- Settings
- System Settings
- Permissions
- Click Resource Tab
- Click EDIT of the Resources Name Row
- Navigate to Resource Tab
- From Available Resource Groups, Add required Group.
- Added Resource Group will appear in Resource Selected Data column.
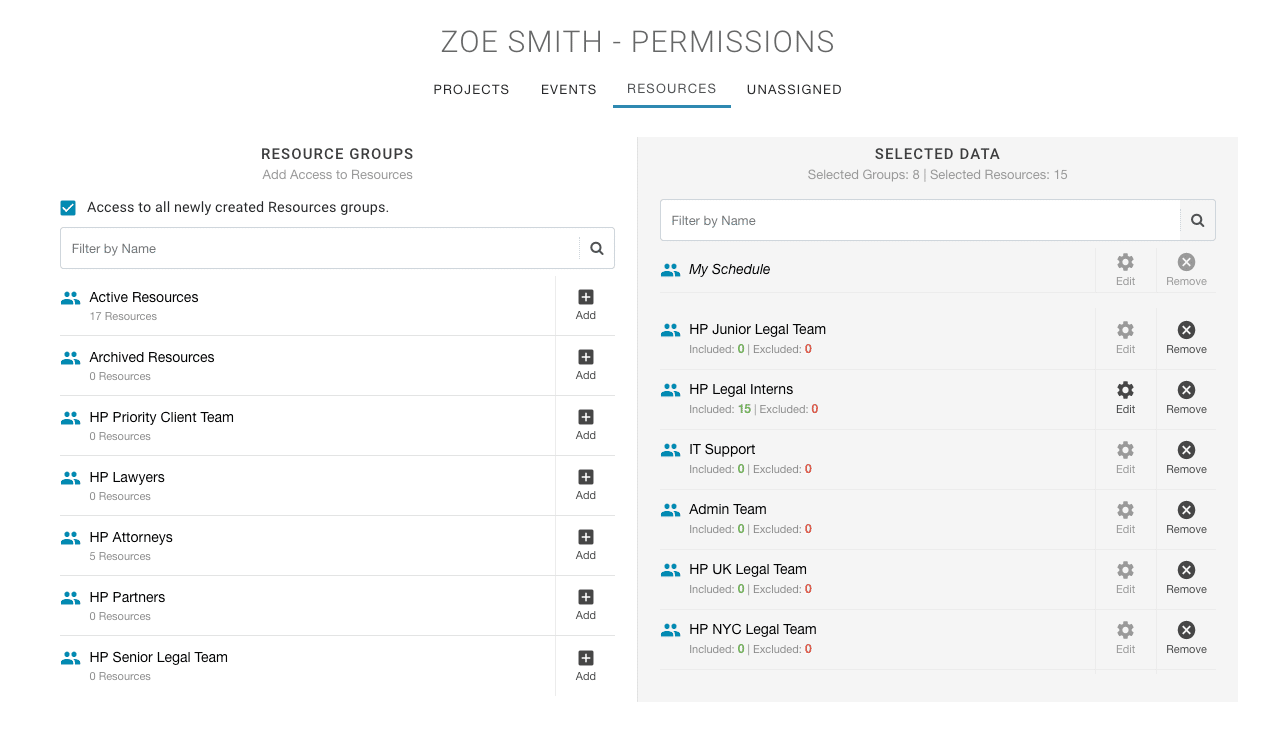
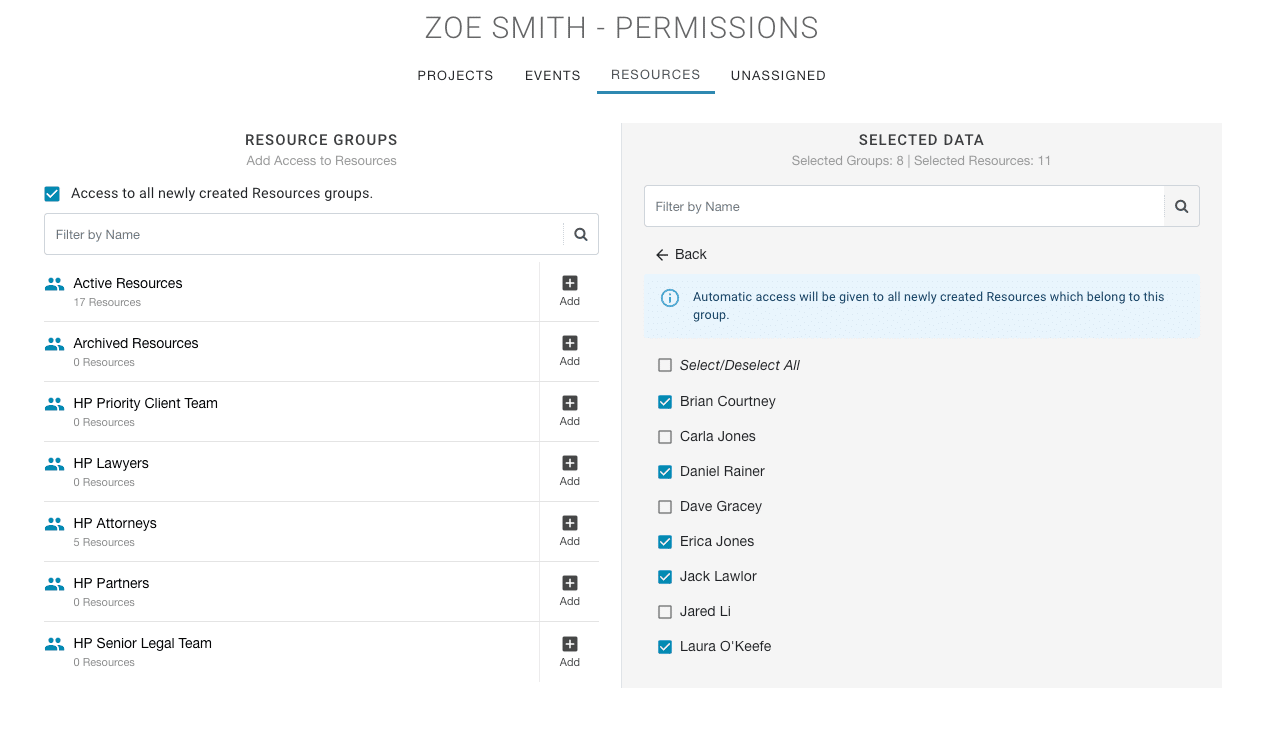
Resource Manager: access to a certain Resources from a Resource Group in Hub Planner?
- Settings
- System Settings
- Permissions
- Click Resource Tab
- Click EDIT of the Resources Name Row
- Navigate to Resource Tab
- From Available Resource Groups, Add required Group.
- Added Resource Group will appear in Resource Selected Data column.
- Click ‘EDIT’ of the added Resource Group to open the list of the resource names of the group.
- Select/Deselect the resources to be added to the users permissions.
- Click Back or Save
- Click Save for changes to take effect.
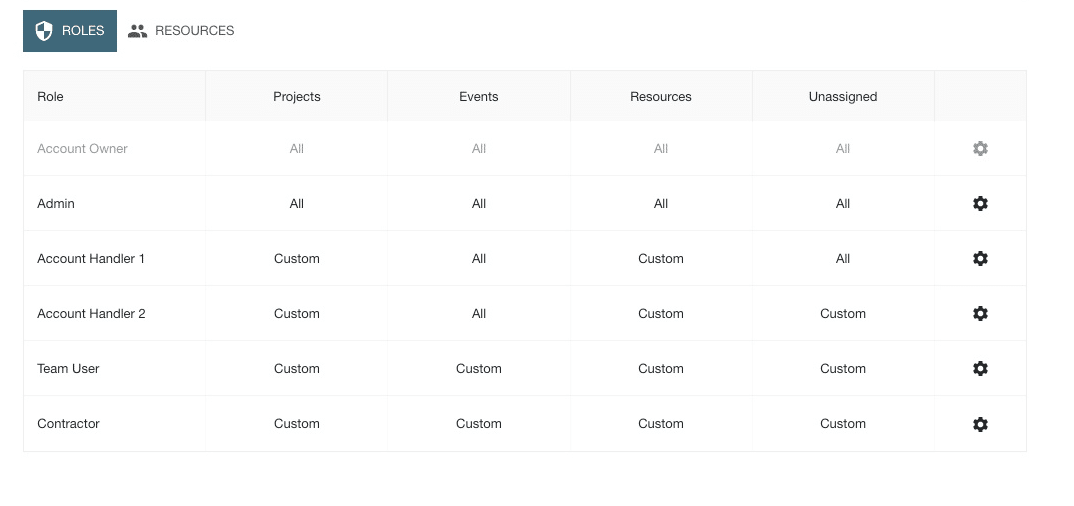
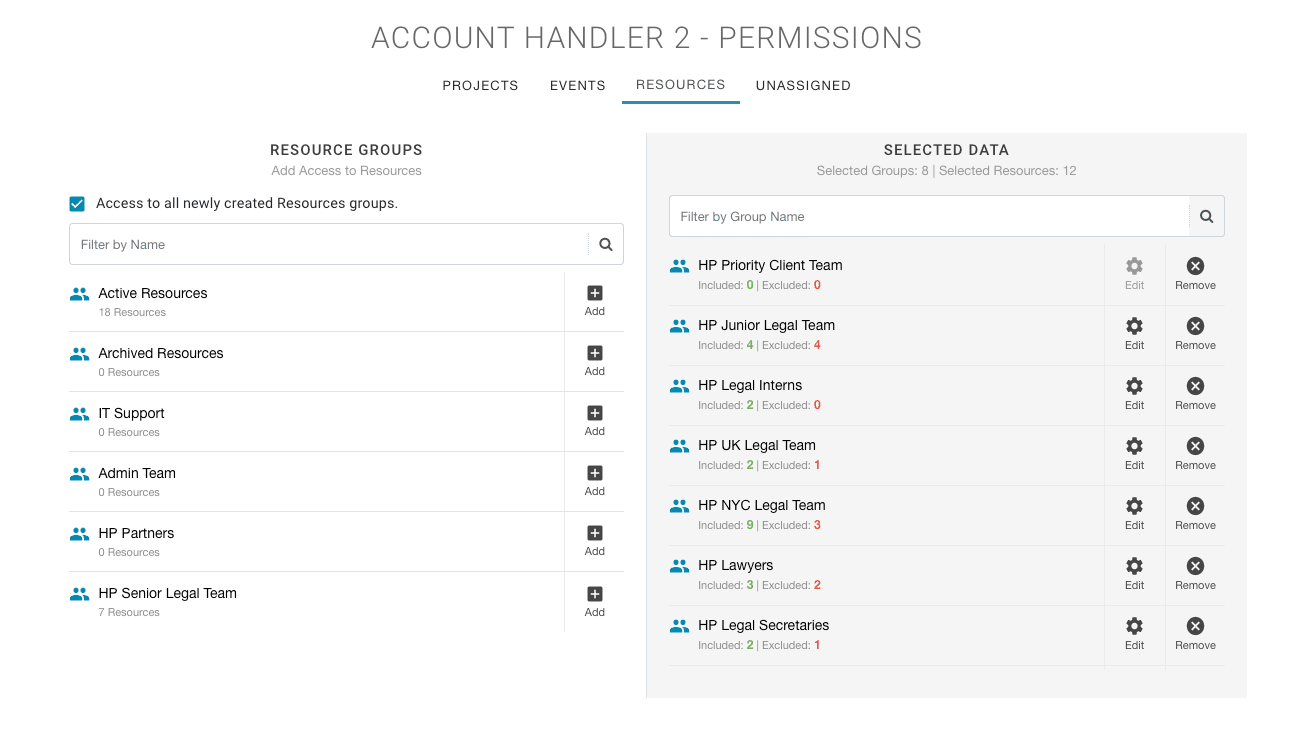
Resource Manager: Role based access to Resource Groups in Hub Planner?
This example will show you how to set Permissions for a Resource Manager at a Role Level instead of an Individual Resource.
- Settings
- System Settings
- Permissions
- Click Roles Tab
- Click EDIT of the Role Row
- Navigate to Resource Tab
- From Available Resource Groups, Add required Group.
- Added Resource Group will appear in Resource Selected Data column.
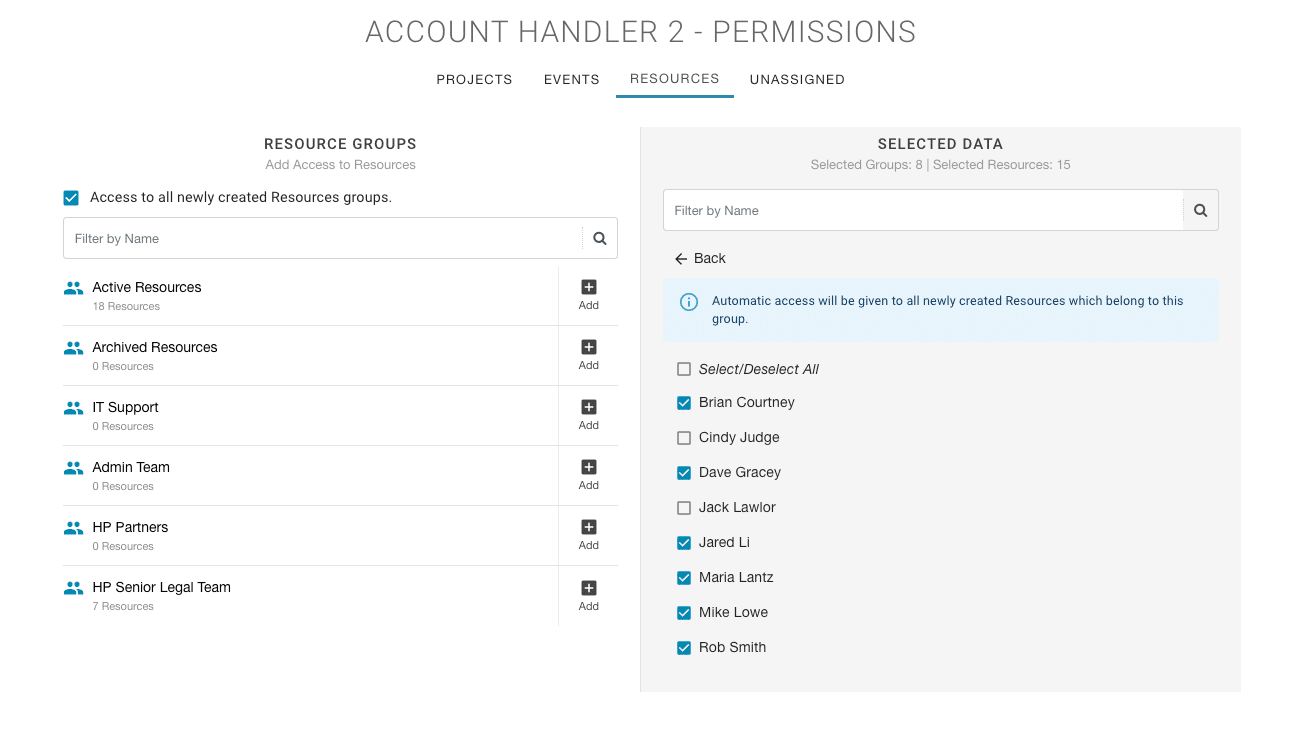
Resource Manager: Role based access to specific resources within Resource Groups in Hub Planner?
- Settings
- System Settings
- Permissions
- Click Roles Tab
- Click EDIT of the Role Row
- Navigate to Resource Tab
- From Available Resource Groups, Add required Group.
- Added Resource Group will appear in Resource Selected Data column.
- Click ‘EDIT’ of the added Resource Group to open the list of the resource names of the group.
- Select/Deselect the resources to be added to the roles permissions.
- Click Back or Save
- Click Save for changes to take effect.
Projects & Project Groups
Following the same steps for granting access to Projects, Events and Unassigned Work Categories. For more help on how to do this:
Roles v Permissions
Roles are typically defined by a user’s job function (for example, team or account handler). Role types are assigned to many users. However, a user can only be assigned to one role. Choose which role level you want to assign the Resource Manager. Subsequently, we will use Permissions to grant or restrict further access settings to users. You can assign multiple permissions to a single user. You can only assign one role to a single user.
Roles / Permissions access management
The setting in Hub Planner allows account owners to control and assign the level of access of resources of your team.
When assigning access to resources you will ask yourself:
- Who needs access?
- What level of access do they need?
Role Levels
There are 5 main role levels (outside of the Account Owner) within Hub Planner. The idea being that you can separate the levels of access that each role has.
- Contractor
- Team
- Account Handler 1
- Account Handler 2
- Admin
Does it matter what role type the Resource Manager is?
No, not necessarily they can be of any role type. However, the role type you set will determine what the resource manager will be able to do in Hub Planner. So, naturally the more role rights you provide the Resource Manager, the more user access they will have to manage.
Who has access to create a Resource Manager?
The Account Owner, and anyone who has been assigned the rights to do so. So, in fact any role type. They just need the permission to do so.
Can I create a Resource Manager with less rights?
Absolutely, perhaps you just want to be able to see the team schedule. Be able to identify availability. Perhaps have limited scheduling rights?
Let’s show you how.
- Settings
- System Settings
- Roles
- Scheduling – Select ‘Limited Scheduling Rights’.
Customizing Permissions for Users with the same Role Rights?
An example of two resources on the same team with the same role. Max, a London Designer will have access to the London Design Team but not the New York Design Team. Sam, another London Designer from the same team and role rights, will also have access to the London Design Team. But we will grant Sam permission to view the New York Design Team as well. So, in other words, each resource can be customized to what they see and what they can have access to.
There are plenty of examples we can use:
- CTO to access to the Design Team schedule.
- Human Resource Manager – Create this role to approve timesheets, manage vacation requests, capture sick leave, etc. create timesheet reports. Set user profiles.
- Legal Secretary has access to the Attorney Schedule and Junior Legal team to manage dates and keep cases on schedule.
A Resource Manager has proved to be a critical function when it comes to a Resource Management software. Hub Planner Roles and Permissions helps you manage user access levels. Who has access to see what. What they can do. Assign permissions to view resource schedules, have scheduling rights for assigned resource groups.
What is a role right in Hub Planner?
By definition, a role is typically a collection of rights. When it comes to Hub Planner, each role will have set rights – what they can do in Hub Planner. Scheduling rights, editing project bookings, assigning a billing rate etc. These are role rights. There are 6 role types within Hub Planner. Team user, Admin, Contractor, etc. Each role type will have a set role rights.
What a Permission?
A permission is the level of access a user has. Who and what the user has access to. What team schedules can they see? Can they So, in Hub Planner,
How do Roles and Permissions speak to each-other.
A role right is granted to the access the user has permission to access to.