Hub Planner Timesheets Overview & Knowledge Base
Hub Planner Timesheets is the ultimate time tracking solution for teams. With Timesheets being one of the most powerful premium extensions from the Hub Planner suite of Resource Scheduling and Project Management features. Let’s take you through an overview of Hub Planner Timesheets. We will show you how timesheets will work exactly, how to submit an entry and report time against projects. How to allocate billable and non-billable work, switch booking categories etc. This in depth overview of Hub Planner timesheets will have you up and running and reporting time in a jiffy.
The Timesheets extension module works hand in hand with the Hub Planner Scheduler and also the Hub Planner Approval workflow. This umbrella suite of functions gives you the advantage of staying within the one software for Resource Management and Project Planning.
Timesheets for Resource Managers
Resource Planners and Managers can utilize Timesheets for real time tracking of project progress. It’s imperative for the timesheet and approval workflow to be as seamless and as simple as possible. This will help with more accurate reporting to create more efficient and effective decisions.
Timesheets for Teams
It allows your resources to login and track the actual time they worked on bookings or events.
This also makes it possible for resources and admins to see and understand more clearly the context they are reporting time under. For example if you have “Display Scheduled Time” activated then you will be able to always see the booked time you are scheduled when submitting time.
Timesheet Tutorial
How to Submit a Time Entry?
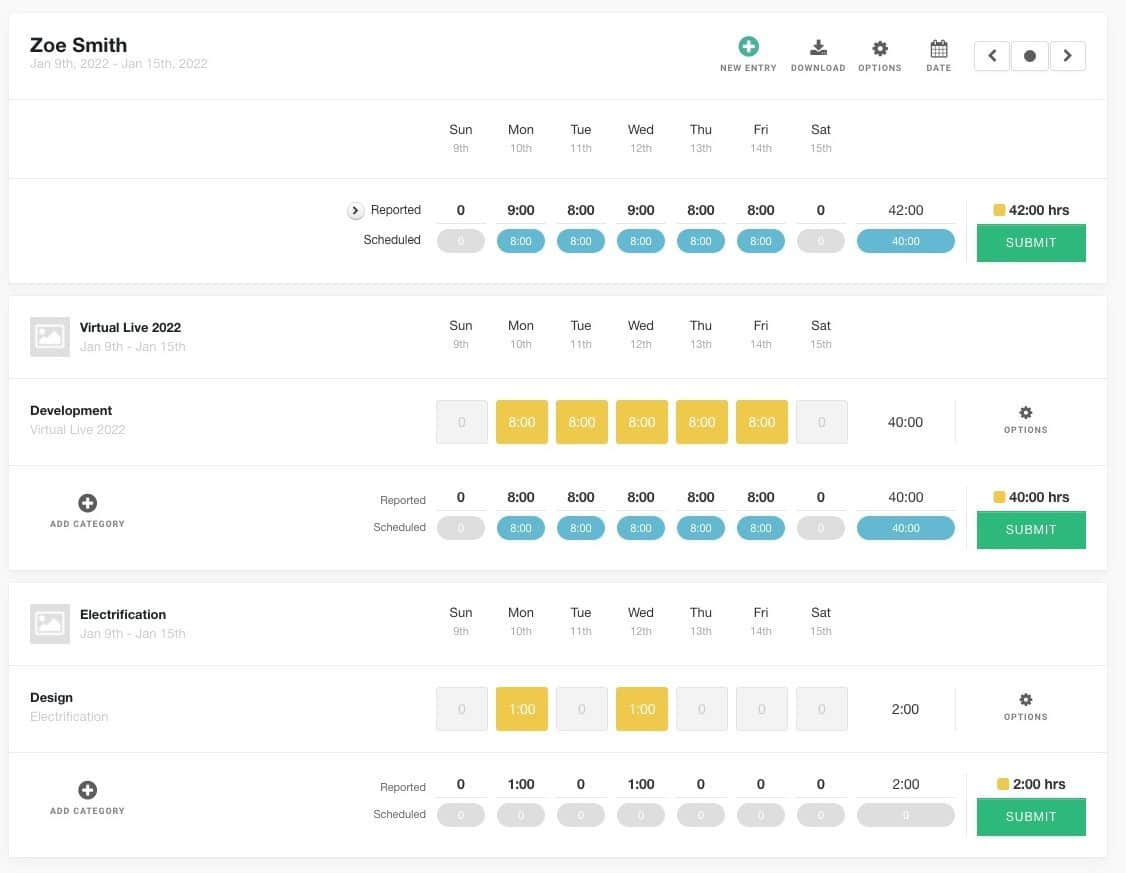
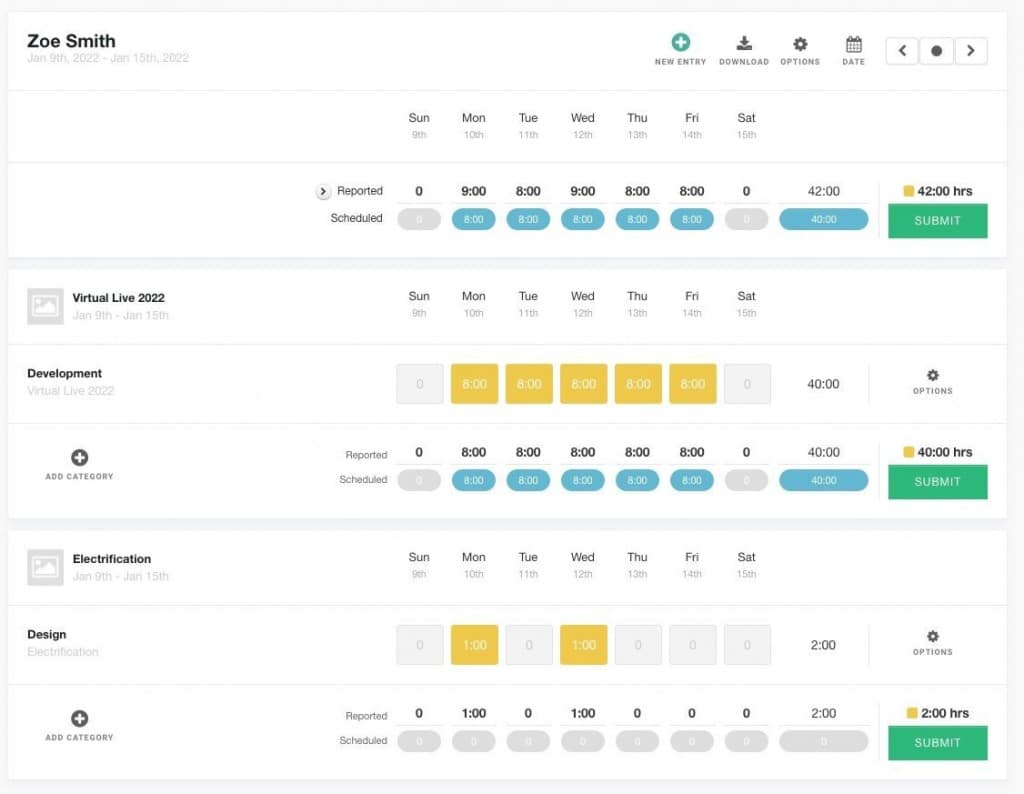
A quick step by step overview of how to submit a timesheet entry in Hub Planner. As mentioned, all scheduled time created within the Hub Planner Scheduler will pre populate in Timesheets.
- Click on the Timesheets tab
- Select the entries you wish to submit and report
- You can choose to submit time entires by column / day
- You can also opt to submit time on a project as a whole by clicking ‘Submit Project’
- Choose to submit time entires for the entire week by clicking ‘Submit’ at the top of the Timesheet.
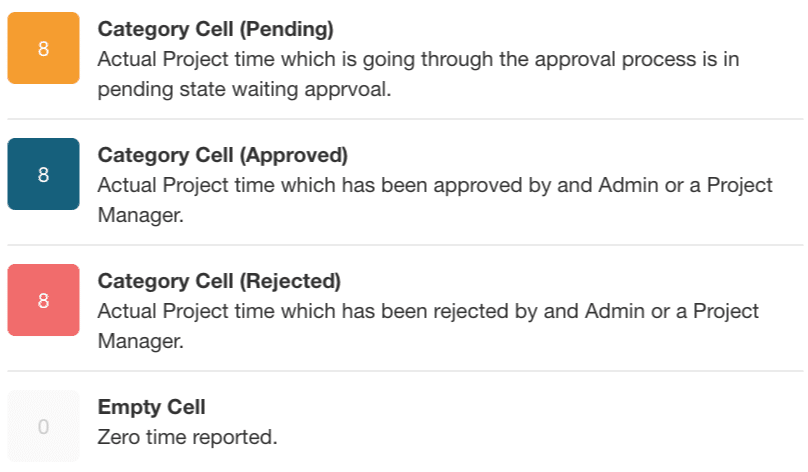
Timesheet Status Table
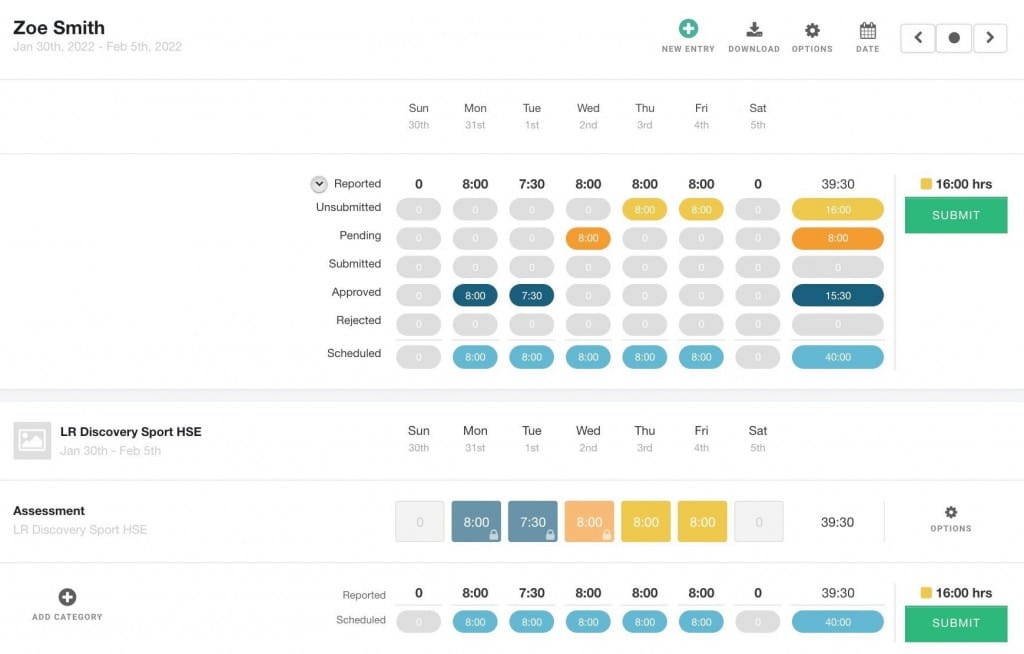
Click the arrow Reported Time (located under the first day of the week at the top of the page). This will drop down the timesheet status table. Here, you have a snapshot overview of the timesheets status for each day. Let’s take a look at their meanings next.
What are the Timesheet Status Table meanings?
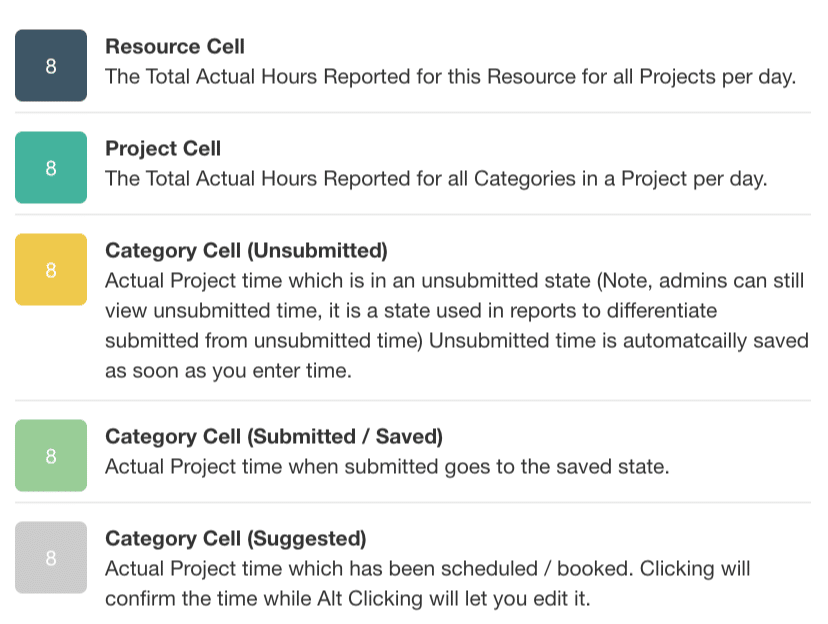
- Suggested/Scheduled time is Grey.
- Unsubmitted time is yellow.
- Pending is yellow = approval process activated.
- Submitted is green = no approval process.
- Approved is dark blue/navy.
- Rejected Time is red.
- Scheduled Time is blue.
Colors can be changed in settings. There is more details further on down the page.
Submitting a Timesheet for Approval Workflow
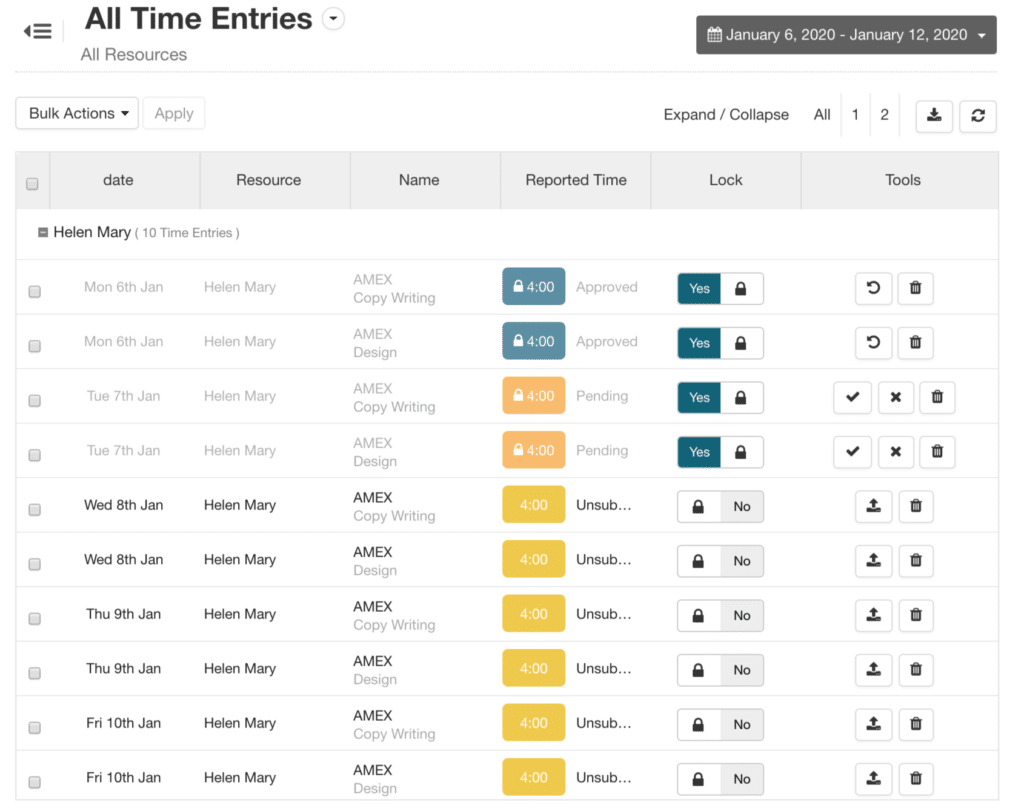
Submitting time for approval works in the same way that it would without approval activated. The difference is that once you submit the time, it will go to a Pending State and will be locked (Depending on the settings). The approval can be turned on/off on a Project level, so not every project will behave like you are submitting for approval.
Adding or Changing Booking Category Rows in Timesheets
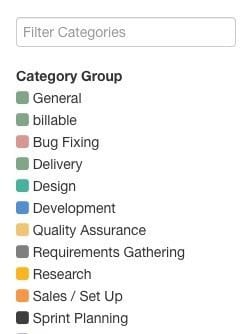
When submitting timesheets, there is a booking category assigned to the time entry. The categorisation helps to create buckets of work areas in which a resource can report time on. For example you may create categories such as ‘Development’, ‘Quality Assurance’, ‘Travel’, ‘Remote’ etc., etc. So, when a resource is scheduled on a project, the booking will have a category assigned to it (the default is ‘General’). You can also add a color to each category. This will give you a clearer vision in the scheduler. Not only that, the analytics can be truly optimized from reports where you can assess where the time was scheduled and recorded against what booking category within the project/resource. Categories can be specified in the Settings, Account Setup -> Booking Categories.
Changing a Booking Category
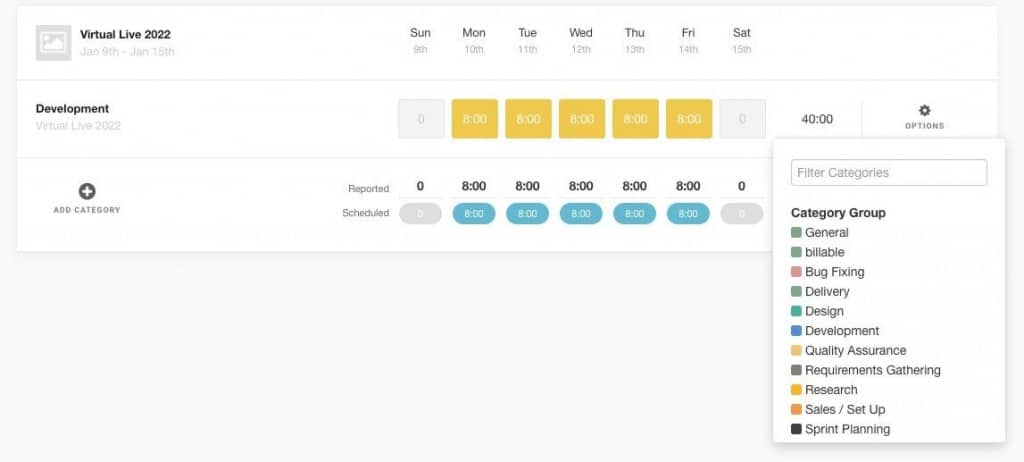
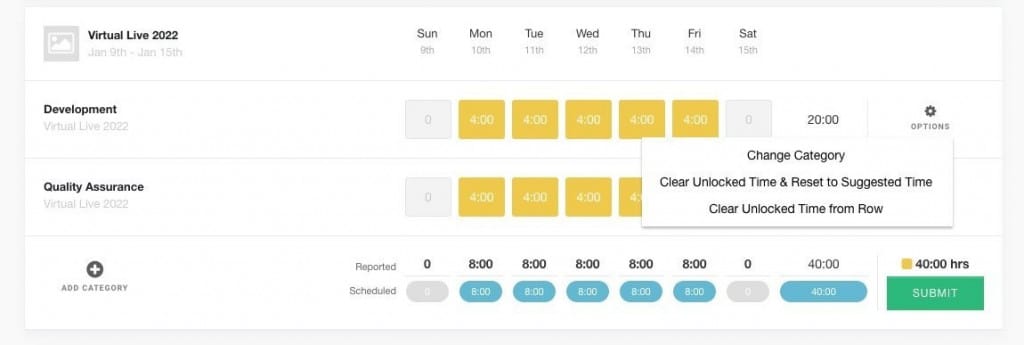
Perhaps the booking category scheduled has changed or was not right. You can change the booking category ver easily. At the end of the booking category row of time entry.
- Click on each of the time entries.
- Click ‘Options‘ at the end of the booking row.
- Select ‘Change Category‘ from the options. Note, options may vary depending on the setting rights.
- Search and select the Booking Category.
- The Booking Category will automatically change.
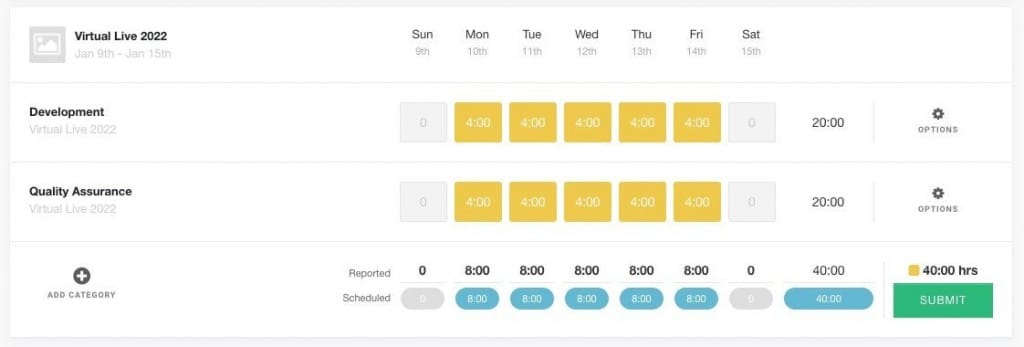
Add a Booking Category
- Select ‘Add Category‘
- Search and select the booking category ‘Quality Assurance’.
- A new row is entered into the Timesheet.
- In the ‘Quality Assurance‘ row, enter 4hours into each time entry.
- Note, it’s important to alter the previous/defaulted category ‘Development’ hours should these differer from what was scheduled
- So, in the ‘Development‘ row, change each entry from 8 to 4hours.
- Lastly, hit ‘Submit‘.
.
Resetting a Time Entry?
If you need to change the time you are reporting before you submit. Click the ‘Options‘ to the right of the timesheet row for options.
- Change the booking category
- Clear Unlocked Time (yellow) and reset to Suggested time (Grey)
- Clear Unlocked Time (yellow) from row
Navigating through different weeks
Some users will report time on a daily, weekly, monthly basis. Or whenever suits. To switch between weeks, use the calendar option to navigate to specific dates. Alternatively use the arrows navigating backwards and forwards to switch between weeks.
Timesheet Reminders
Yes there are timesheet reminders that will automatically detect if you have reported your time not. Switch on the notification via your settings -> my profile -> my notifications. Here you can customize and configure when you want to receive the notification.
You have complete flexibility to configure reminders based on your team’s needs. You can define:
- Time Period: Choose whether the reminder applies to the current, last, or next time period.
- Time Frame: Set reminders for a weekly or monthly.
- Occurrence: Select when within the time frame the reminder should be sent:
- First, second, third, fourth, fifth or last occurrence of the selected day.
- Frequency: Specify whether the reminder should be sent on a specific day.
- Cycle: Choose whether the notification cycle runs on a weekly or monthly basis.
How It Works
- Reminders are sent based on the schedule you configure.
- The email is triggered if a resource’s reported time is less than their scheduled time.
- You can fine-tune the exact day and frequency of reminders to align with your company’s reporting workflow.
Note, the global setting of notifications needs to be activated by the account owner. See example of slack message below.
Adding New Project or Event Time to a Timesheet

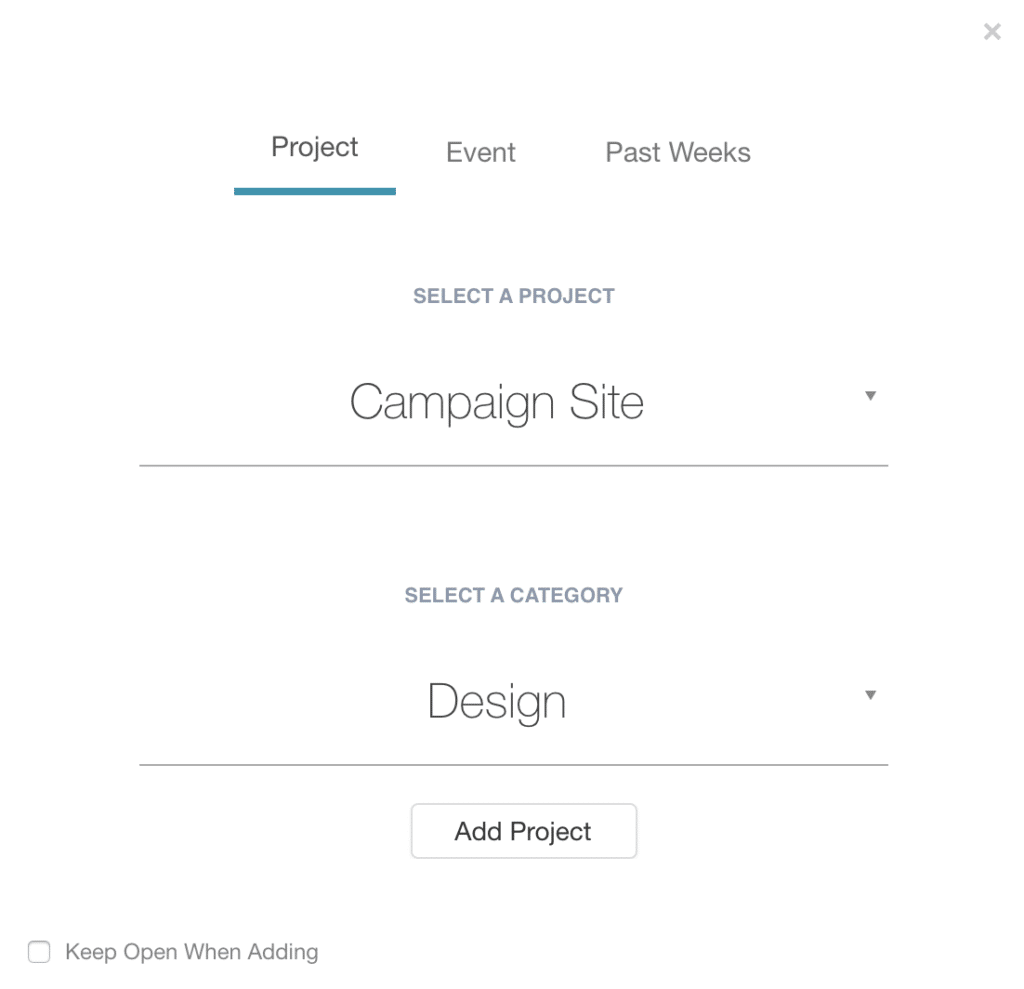
Click on the green plus sign, ‘New Time Entry’ on the top first row. A popup modal will appear where you can select the project or event as well as where you can choose your booking category rows. Once you choose the project, add it. Then it will be added under your name and you can report time on it.
Step1 – Open and Populate ‘New Time Entry’
- Click the green plus sign, ‘New Time Entry’.
- A pop up will appear on screen.
- Select the Project or Event Tab.
- From the drop down list select the Project or Event you wish to add time to.
- Add a Booking Category to the time entry by selecting from the drop down list.
- Click ‘Add Project’
- To cancel, simply click the ‘x’ at the top right of the popup.
Step 2 – Enter Hours to Timesheet
- Once added. The new project or event entry will be posted to your timesheet where you can now add the time to the project or event you worked on.
- Simply click on the grey 0 hour box alongside the booking category row.
- The field will become active to enter hours completed.
- Repeat as necessary
Step 3 – Ready to Submit Time Entry
When ready to report time you have 3 x options. Firstly, you can click on each individual time entry by clicking ‘Submit’. You can quicken the process by selecting the green icon ‘Submit’ at the end of the row. Go a step further and click ‘Submit’ at the top of the Timesheet to submit all time entries for all projects for the week in question.
Step 4 – Changes
Once submitted. You will see the total hours time update at the top of your timesheet with a breakdown of hours per each day. You will also note the Submitted icon changes to two entires.
Locked State – The feature to lock time entries on submitted can be activated via settings and the project modal. This means that once you have submitted your time, the entries are locked for editing. This also means that the approval process is activated. You cannot change the entry. Should you need to adjust. You will need to contact your approver and request the unlocking of your entry. Once unlocked you can change the booking category, change the hours or indeed add notes etc.
Allow Timesheets to Exceed Scheduled Hours
To give you more control over how time is logged, Hub Planner provides an option to allow or restrict users from exceeding their scheduled hours:
-
Go to Settings.
-
Navigate to Timesheet Settings.
-
“Allow Timesheets to Exceed Scheduled Hours” check Enable or Disable.
Enabled: Users can log time beyond their scheduled hours or availability.
Disabled: Users are restricted to logging time only within their assigned hours or availability. -
Click Save at the bottom.
This setting ensures flexibility where needed while maintaining control over time tracking accuracy.
If this setting is disabled, users will receive a warning pop-up when they attempt to log time beyond their scheduled hours.
Adding Notes to Timesheets
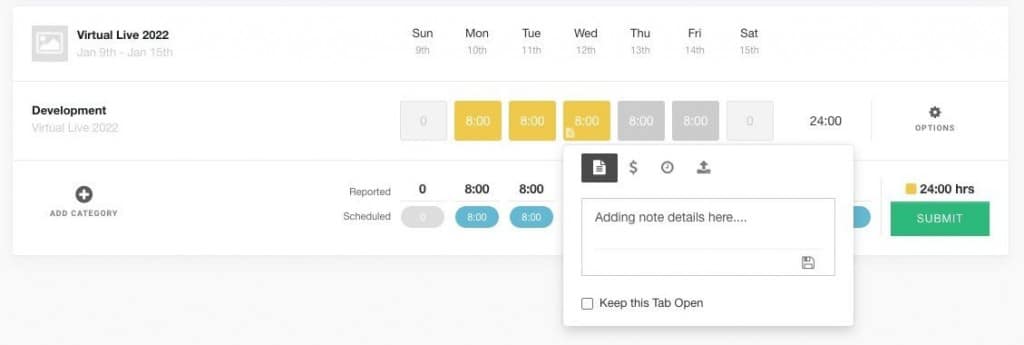
To Add Notes to Timesheet Entries is an option. To do so:
- Select a time entry for the pop up of options.
- Click the Notes icon to access the notes tab.
- Enter the time entry note details.
- You will note a note icon is saved to the bottom left of the time entry to indicate there is a note attached.
- Navigate to other time entries on your timesheet and repeat the note entry process.
- Notes are auto saved. You can edit the note further if required.
Time Entry Notes Requirement Option
A setting is available to set a requirement to add a note to each time entry submission on a Project. This setting is ideal if you want your team to add a note to the time entry as they work through their timesheets and track this way for example what tasks are more time-consuming than expected. This setting can be globally controlled for all projects or turned on / off on a project basis if that suits you better. You can set this feature via:
- Settings
- Edit Project
Here you can enable or disable “Require Notes on Timesheets”. Enabling Notes Requirement will imply to all newly created projects while checking the box “Require Notes on All Existing Projects” will relate to all, existing as well as newly created projects.
To set “Time Entry Notes Requirement Option” via Settings:
- Navigate to your Settings page in the top right header
- From the left Sidebar select Timesheets
To set “Time Entry Notes Requirement Option” via Edit Project:
- Select your project and edit
- Select Timesheets located in the left Sidebar of your Edit Modal
Adding Billable / Non-Billable Time to Timesheets
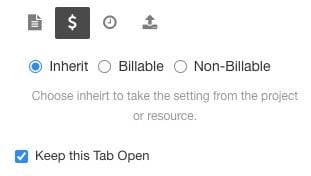
Hub Planner Timesheets also helps users to easily tag and track billable and non-billable work. To mark an entry as non-billable. Simply click the time entry for the popup, choose the $ tab and check the box for non-billable work. You can also mark a time entry as partial billable work by simply adding a new row to the timesheet. Options include the ability to select and override the inherited billable status set at a project or resource level.
Note, you need the Billing Rates extension installed to activate the Non-Billable feature. Also, you will need the role right to have the ability to set a time entry as billable/non-billable. If you do not have the role right to set a time entry, the inherited option set at a project or resource level will apply.
Adding Quick Time to a Timesheet
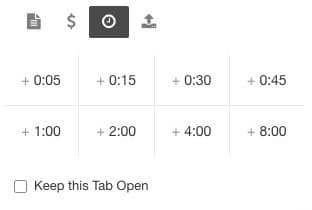
You can also quickly add time by clicking on the ‘clock’ tab located in each time entry. Add blocks of time to the individual time entry. Clicking on the quick time twice, will simply double the time you have added. For example, clicking +0:15 twice will add +0:30 minutes to the time entry.
Download / Share
You can export the timesheet data you are viewing by using the Export Button located in the timesheets toolbar. Clicking this gives you 2 options to:
- Export to CSV
- Export to Excel
The headings that will download the entries are as follows:
- Date
- Resource Name
- Project Name
- Project Status
- Category
- Booked Time
- Actual Time
- Note
 Timesheet Sidebar
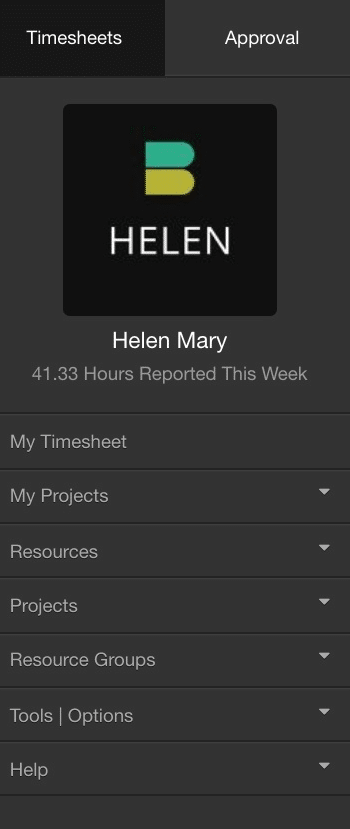
The timesheets sidebar has different permission settings. For a Team member with no manage rights they will just see their own projects. If you have the Project Manager Extension added, then any resource who is a Project Manager will also see an additional group of projects they manage.
The sidebar is broken down into groups and mainly used as a navigation piece for managers to look at a team’s time. The groups are as follows:
- Timesheets Tab
- Approval Tab (Need extension installed and role rights)
- Resource Name
- Profile Picture
- Count of Hours Reported This Week
Sidebar Groups
- My Timesheet
- My Projects
- Resources
- Projects
- Resource Groups
- Tools | Options
- Help
Sidebar – My Timesheet
This group displays your profile image, name and the amount of hours you have reported this week total. It is also used as a home button for your own timesheets page. Here you can report your time entries and see an overview of your reported time.
Sidebar – My Projects
The My Projects group lists all the projects you are part of.
Resources
This is a two level group of first resource groups and then individual resources under the ‘Active Resources’ umbrella. This allows you to view one resource at a time.
Projects
This is a two level group of first project groups and then individual projects under the ‘Active Projects’ umbrella. This allows you to view one project of resources at a time.
Resource Groups
This group list out all resource groups. You can view all resources within a group by clicking one of the groups.
Sidebar – Tools
The following configuration options are available
- Display scheduled time
- Hide resources with no booked and actual time
- Hide projects and events with no booked and actual time
Display Scheduled Time
Checking this box displays a small box to the top left of projects and resources, displaying the booked/scheduled time for that day.
Hide Resources with No Booked and Actual Time
Checking this will hide resources with no booked time for the week you are looking at. This is useful when looking at groups of resources together and filters out those not scheduled.
Hide Projects and Events with no Booked and Actual time.
This hides projects under a resource when they have no Booked And Actual time recorded on them.
Sidebar – Help
The following help options are available
- Timesheets Tour
- Color guide
- Workflow guide
- FAQ
Role Rights and Permissions on Timesheets
There are two role rights for Timesheets in which you can set against a role type or Project Manager. There are 5 Role Types are Admin, Account Handler 1, Account Handler 2, Team and Contractor. The Project Manager role is also relevant for the second role right.
To access role rights, navigate to Settings -> System Settings -> Roles
Timesheets Manage & Approval Rights
The logged in user will be able to manage and create Timesheets for all Projects and Resources they have Permissions to. With this role checked the user can select any Project or Event in the system when creating a new time entry [i.e. not filtered by permissions]. This includes the ability to approve the timesheets if you have the timesheet approval extension installed.
Timesheets Manage & Approval Rights on Managed Projects
The logged in user, who is a Project Manager, will be able to manage and create Timesheets for all Projects they are project managing and have Permissions to. This includes the ability to approve the timesheets of Projects they are project managing, if you have the timesheet approval extension installed.
Permissions determine what the user can access. What projects or resources, and events they can access. Permissions can be set either via role type or individually. To access permissions, navigate to Settings -> System Settings -> Permissions. For more information on Permissions, please navigate to the Knowledge Base.
Billing & Budget Rates – Billable / Non Billable Work
The logged in user will be able to set a time entry as billable / non-billable.
Reporting
Timesheets data is also collected in the Report section. The comparison of booked versus actual time is an interesting metric which you can generate reports from.
Structure
The Timesheets component is an open table which allows you to get the job done without an extensive clicking. Time is always booked or reported against a booking category (By default this is general)
Usability & Design
We take usability and design very seriously at Hub Planner, and that is echoed in details throughout the entire platform. The timesheets component should feel responsive and well designed. Adding time at the end of the week is supposed to be a simple painless task and that is behind the UX of the Timesheets component.
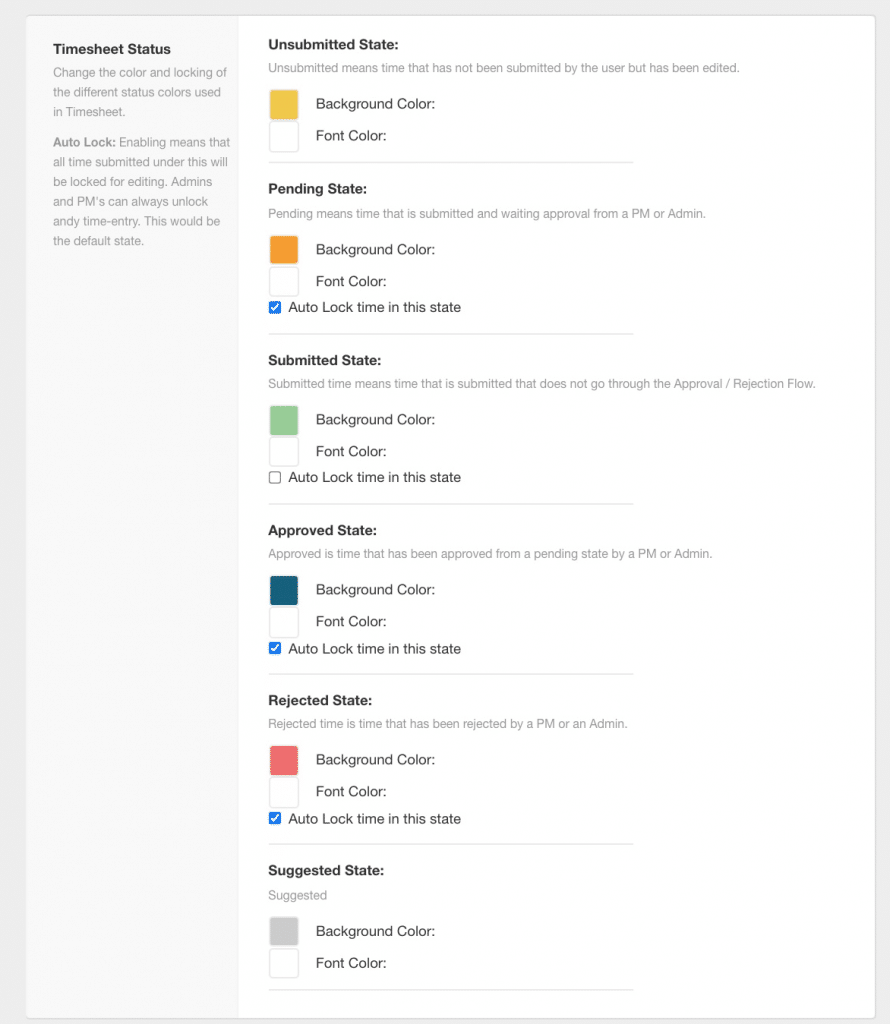
Timesheets Status Colors
A closer look to what each of the colors represent in Hub Planner Timesheets.
Timesheet Settings
Some further helpful settings for Hub Planner Timesheets. Options include the ability to activate timesheets and the approval workflow on projects. To request notes on timesheet entries as well as the settings for project selection. Account Owners and those with the specific role rights will have access to these settings. Any changes you make will require you to confirm changes by clicking save at the bottom of the page.
- Enable timesheets
- Enable the approval workflow
- Require notes when submitting timesheets by default
- Project selection from permissions option
- Allow projects with an archived status, to be chosen from selection
- Allow timesheets to exceed scheduled time / capacity
- Show / hide suggested time
Timesheet Status.
The ability to change the color of a time entry status as well as set the option to auto lock time entries. Don’t forget to save changes at the end of the page!
Approving Timesheets
How to approve Timesheets? In Hub Planner Timesheets we have added the option to install an approval workflow. This will allow teams to create an approval process for project and resource time entries. The approval workflow is a premium extension.
For more information, take a look at the Timesheets Approval Workflow Extension Knowledge Base.

