Group Builder
How to create a resource group or project group? The group builder allows users to custom configure what data and filters are set to a resource group or project group. We can also choose between a manual or a smart group. Manual groups are configured by navigating through each builder tab selecting the data and filters to be set. Whereas a smart group is based on conditions that have been set in accordance with the smart groups extension. You can create multiple groups and save and share for future access and team collaboration.


Group builder video
How to create a resource group or project group?
- Resource group – team of people
- Project group – group projects together by client for example
- Manual group – pick and choose the group
- Smart group – automatically creates the group
- Multiple groups – no limit on how many groups you create
- Save groups – for quick access in the future
How to access the Group Builder
There are a few ways in which you can access the builder. Some of which will depend on the smart schedules being installed.
1 – Add new resource group
- Scheduler
- Sidebar
- Add New
- New Resource Group
- The builder will open.
2 -Add new project group
- Scheduler
- Sidebar
- Add New
- New project group
- The builder will open.
3 – Add new schedule
- Scheduler
- Sidebar
- Add New
- New schedule (if smart schedules are installed)
- The builder will open.
4 – Pencil icon
- Scheduler

- Sidebar
- Group schedule (project or resource)
- Click the pencil icon
- This will open the builder
5 – From an existing project or resource group
- Scheduler
- Sidebar
- Group schedule (project or resource)
- Click 3 dots
- Edit group
- This will open the builder
Group Builder – tabs explained
The group builder is split into a number of tabs. Within each tab you can choose to activate and apply filters and data to your group. Let’s take a look through each tab.
- Type
- Data
- Row filters
- Booking filters
- Capacity finder
Step 1 – Group builder – Type
The first tab is where we will select the type of group to build.
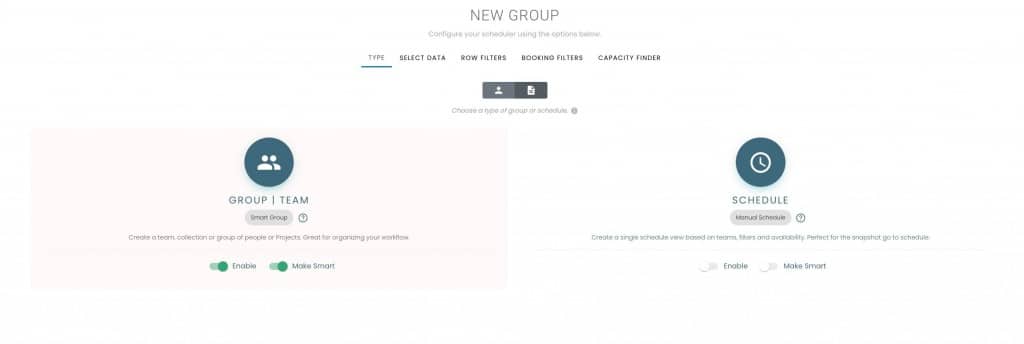
Manual or Smart
There are two types of groups we can create. Manual or Smart.
- Manual group – Select the projects and resources you want to view in your group.
- Smart group – Use filters to create a group based on conditions set. For example, designers based in New York.
Project or Resource group
You will also choose if you wish to create a Project or a Resource based group too.
- Project
- Resource
If smart schedules are installed, within this tab, we can also opt to create a schedule either. As mentioned, the builder also incorporates the ability to create project and resource schedules as well as groups. For this article we will focus on creating a group only. You can access the schedule builder article within the knowledge base.
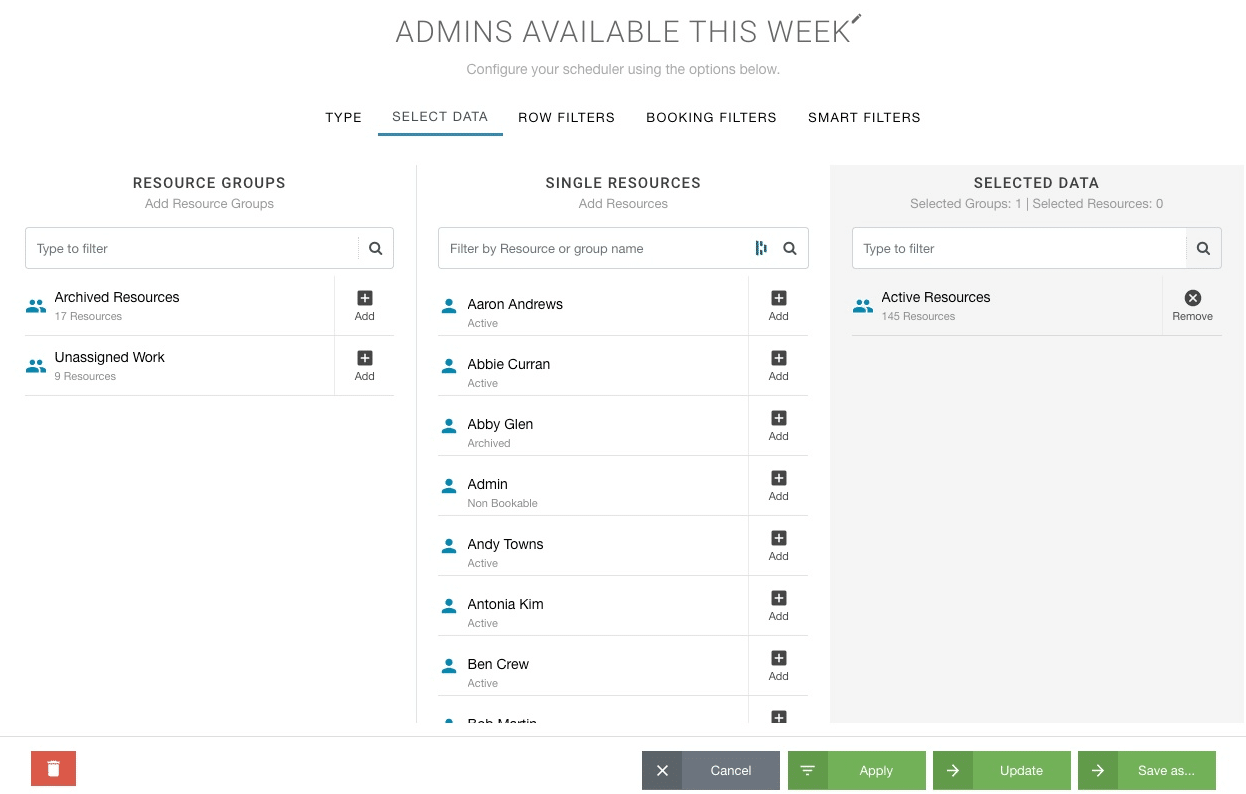
Step 2 – Group builder – Select Data (manual group)
If you have chosen a manual group. You will now have access to choose the resources or projects to appear in your group. You have 3 columns.
- Groups – add by projects group or resource group
- Single – add individual projects or resources
- Selected data – what you have chosen to apply to the group
By default, the active project or active resource groups will be selected within the Selected Data tab. You can remove this group by clicking the x remove button. Choose which resources or projects you want to include in the group. Options to include groups as well as single resources or projects are available to be selected. The Selected Data column will indicate what has been selected. Updating and adjusting what included is very easy to do by simply clicking the add / remove buttons.
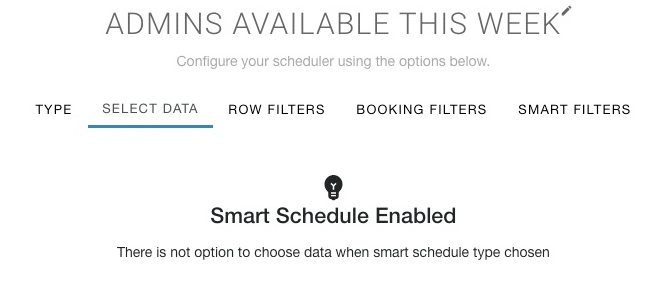
Select data – smart group chosen
Now, if you have chosen smart group type of schedule, the select data will not be available as the row filters, booking filters and potentially the capacity finder will dictate who is in the group.
Step 3 – Group builder – row filters
There are project and resource based filters that can be applied to the group builder. Activating filters will simplify and condense what the group schedule shows. We can apply row filters on both manual and smart groups.
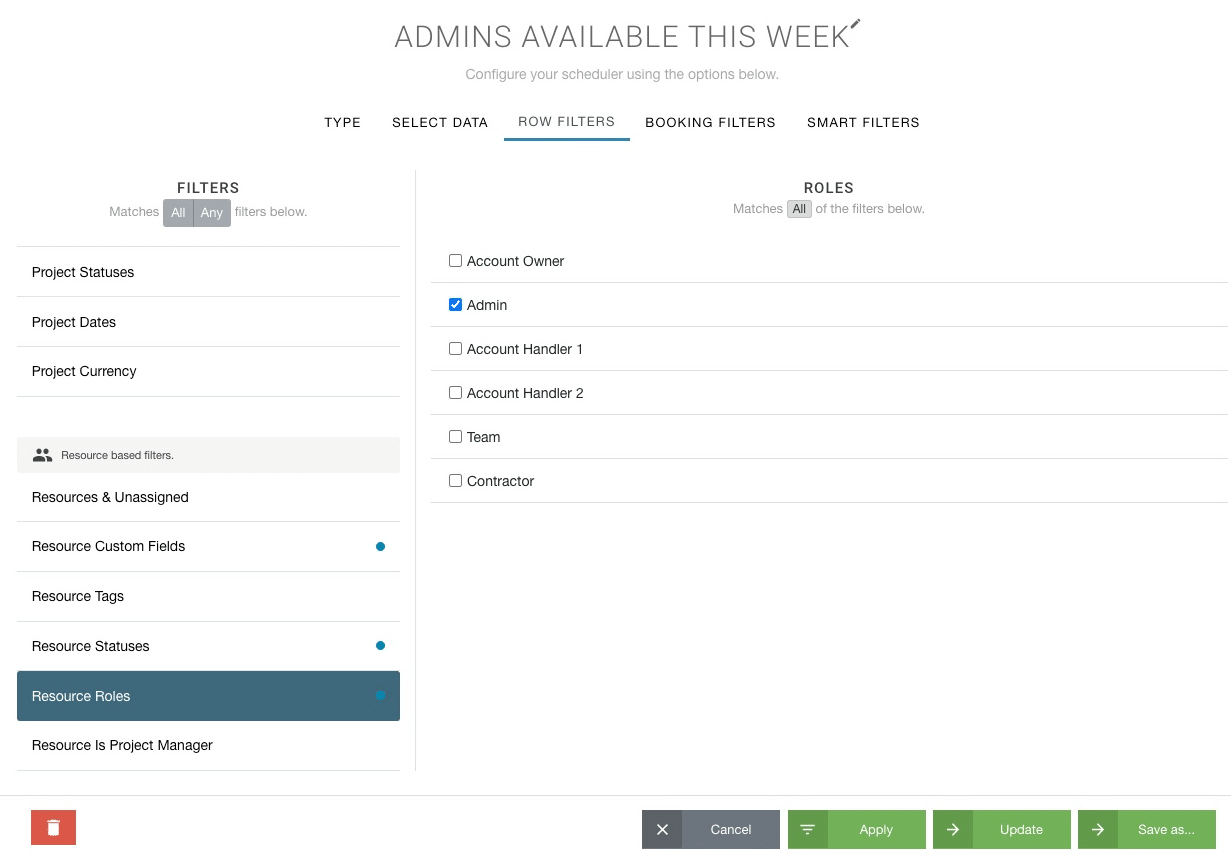
Choose from:
Project Row Filters
- Project names
- Events
- Project custom fields
- Project tags
- Clients
- Project managers
- Status of project
- Project dates
- Project currency
Resource Row Filters
- Resource names
- Unassigned work
- Resource custom fields
- Resource tags
- Status of resources
- Resource role types
- Resource is project manager
FILTER TIP: Remember, you don’t have to select everything you want to see. Choose filters to be able to segregate the data further. For example, there is no need to choose all the projects and resources in Row Filters, these will already be included in the group. Unless you wish to choose a specific resource or project then there is no need to select.
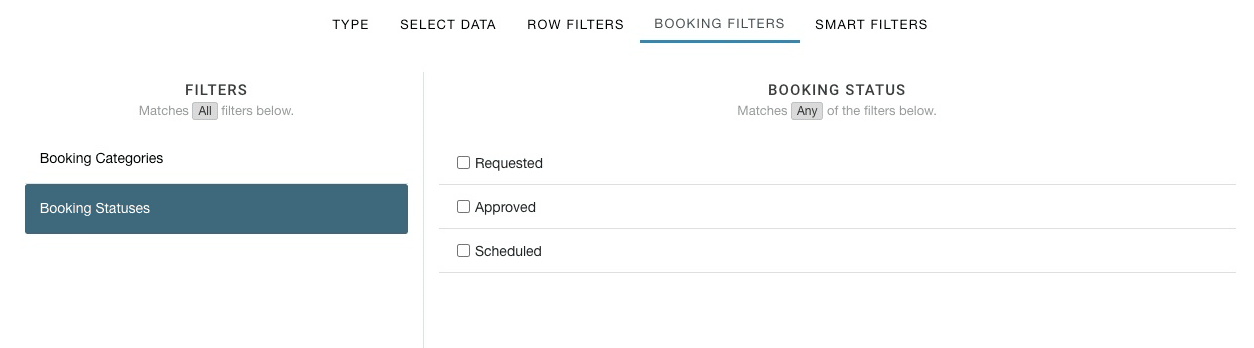
Step 4 – Group builder – booking filters
Depending on the filter options chosen, you have 2 or 3 main columns to choose from. Firstly you will select the filter, followed by the options.
- Booking Categories – Choose from category groups and specific categories within the category groups. Note, for more than one category group, you will need to activate the Booking Category Groups premium extension via settings.
- Scheduled time state – define whether the scheduler will show bookings from either requested, approved or scheduled time. Note, you will need access to the timesheets, vacation and or the request and approval workflow for the varying time states. If none of these are installed, then you will have access to scheduled time state only.
Step 5 – Group builder – capacity finder
The capacity finder is a premium extension and works excellently with smart groups. Here we can define the availability or utilization to the group schedule. Firstly, activate the capacity finder. Next take the below quick steps.
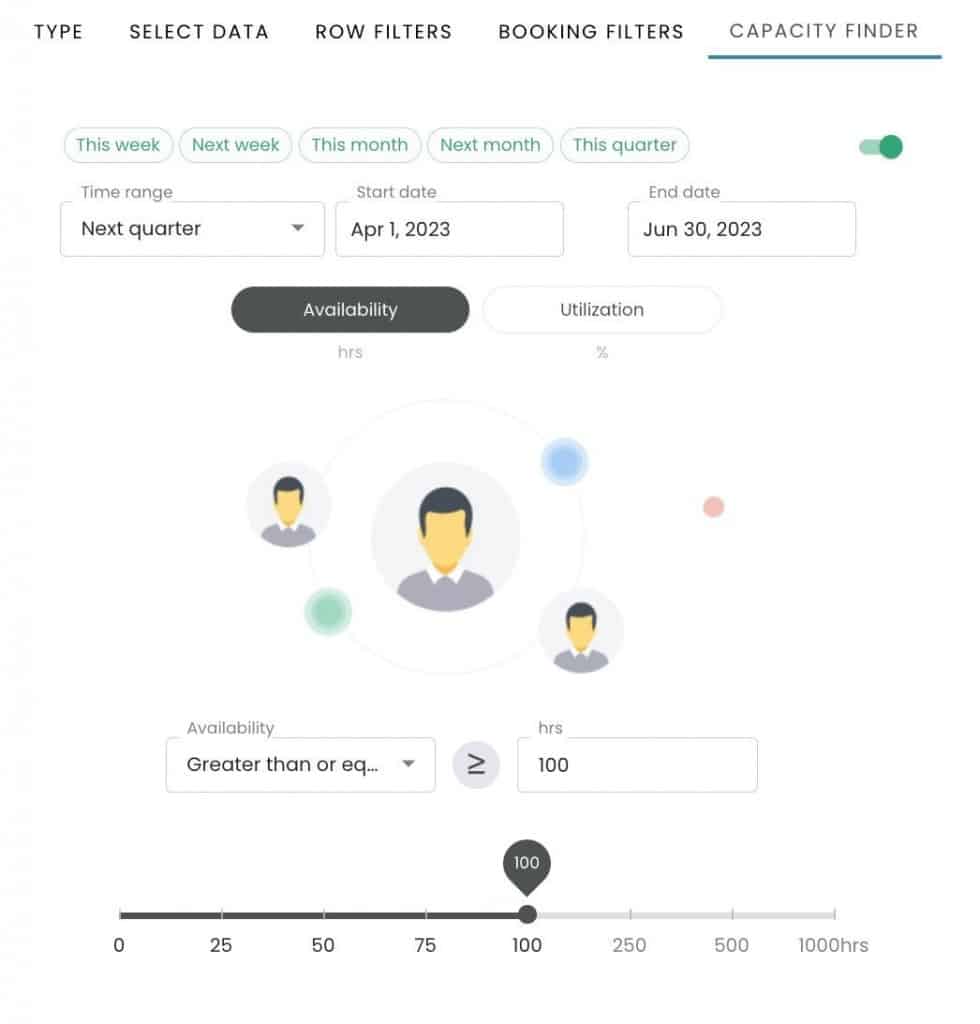
Date Range
Choose a start and end date for the scheduler to show the utilization and or availability. Select from one of the pre-formatted date range options or apply a custom range from the calendar.
Availability or utilization
Choose which option to filter the schedule by.
- Utilization – Choose to filter the utilization of resources on the scheduler. For example, show me resources whom have 50% or less utilization
- Availability – Choose to filter the availability of resources on the scheduler. For example, show the resources whom have more than 10% availability.
Select the configuration
- Equal
- Not equal
- Less than
- Greater than
- Less than or equal to
- Greater than or equal to
Select the range
Drag and drop the range using the scale. Alternatively enter the amount into the field.
- Availability in hours
- Utilization in percentage
Step 6 – Group builder – Finish….save as 
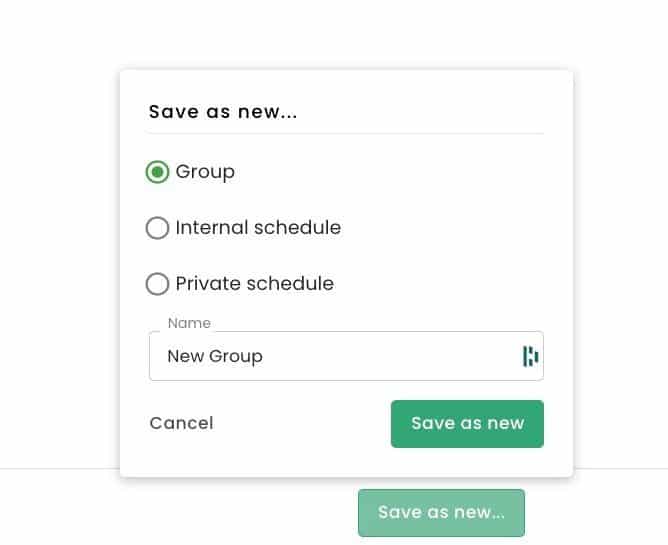
Now you’ve added all the filters you need. How does it look? You have a few options to choose from before finishing.
Click the green button ‘Save as’ where a pop up of options appear.
- Group – save as a project or resource group
- Private schedule – if smart schedules is installed – for your access only – saves to the sidebar under private schedules
- Internal schedule – if smart schedules is installed – for team access – saves to the sidebar under internal schedules
Enter the name of the group for future access.
Save
You have the option to save the filters and conditions you have set as a group. Saving will allow you to access in the future.
Edit group
Once in the view of the scheduler. To navigate back to the group builder, simply click the pencil icon on top of the search filter bar. This will open the group builder. Alternatively, click the 3 dots of the group and select edit group.
Type to Filter
Within the group schedule, you can opt to apply more filters to your group. Use the search bar to access the filter directly without having to navigate to the group builder. Once you start typing, any options from your Booking Categories, and Custom Fields. Simply select from the options showing.
Now Schedule
Once the filters have been applied, you are free to schedule resources on project bookings as required.
Saved Groups
From the sidebar, all saved groups will appear. You can opt to sort your sidebar or manually customize where each group appears. Click the 3 dots of a group and select ‘sort groups’. Options include;
- Sort A-Z
- Sort Z-A
- Manual drag and drop the order