Bulk Upload New Bookings
In order to upload new bookings you will need to follow the steps listed below:
Please note: Projects and Resource must already exist in your account before you can bulk upload bookings to Hub Planner. Please follow instructions below.
Step 1 – Download Bulk Upload Bookings Template
Download the CSV Bookings Template here – You will need this again in Step 5.
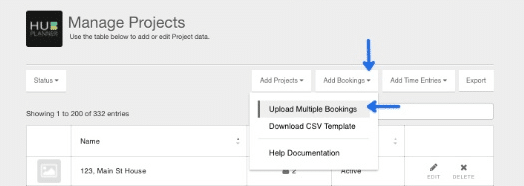
You can also download the .csv file via Settings -> Manage Projects > Add Bookings -> Download CSV Template
Step 2
Download the Resources CSV Reference file (Located in Settings / Manage Projects / Add Bookings / Upload Multiple Bookings / Download All Resources). A csv file will be downloaded to your computer.
You will use this file to reference the resource ID.
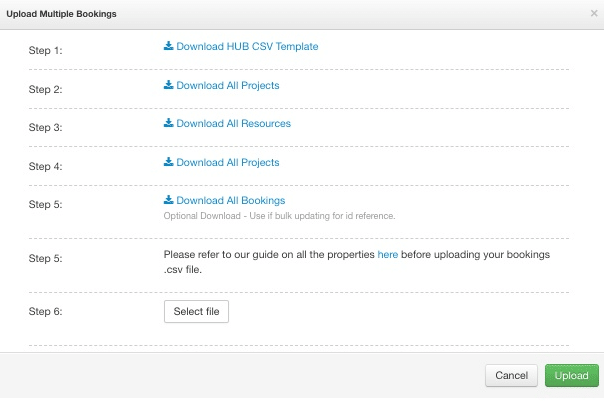
Step 3
Download the Projects CSV Reference file (Located in Settings / Manage Projects / Add Bookings / Upload Multiple Bookings / Download All Projects). A csv file will be downloaded to your computer.
You will use this file to reference the project ID.
Step 4
The 2 reference files download in step 2 and 3 are used to find the resource ID and project ID you want to add the booking to.
- First open up the file exportResources.csv (downloaded in step 2) and find the name of the resource you want to add bookings to. Once you find the resource copy or take note of the resource_id for that resource. You will need to paste this value in Step 5.

- Next open up the file exportProjects.csv (downloaded in step 3) and find the name of the project you would like to add bookings to. Once you find the project copy or take note of the project_id for that project. You will need to paste this value in Step 5

Step 5 – Populate Bulk Upload Bookings template
Open the CSV_Booking_Template.csv file (downloaded in Step 1) and copy and paste the corresponding resource and project id’s to the correct columns.

- event_resource – add your resource_id here
- event_project – add your project_id here
Repeat a row for each booking you want to create. Additional options can be seen below for updating bookings and some optional paramaters.
CSV Options
The following options are valid for uploading bookings via our CSV template which can be downloaded here:
event_id – (optional)
- Empty (default creates a new booking)
- Id to update an existing booking
event_start – (required)
- Start Date (Format mm/dd/yyyy)
event_end – (required)
- End Date (Format mm/dd/yyyy)
event_resource – (required)
- Id to associate a resource with the booking
event_project – (required)
- Id to associate a project with the booking
event_state – (required)
- HOURS_DAY
- TOTAL_HOURS
- PERCENTAGE
event_state_value – (optional)
- Empty (defaults to a full day)
- if state = HOURS_DAY then stateValue is the minutes per day for the booking
- state = TOTAL_HOURS then stateValue should be the total minutes for the booking from start to end
- if state = PERCENTAGE then stateValue should be the percentage of the daily commitment for the duration of this booking
event_note – (optional)
- Empty (defaults to blank)
- Option to type any details/notes you may wish to associate with the booking here
- You can also edit/delete any notes here
Bulk Edit Existing Bookings
The first column of the CSV_Booking_Template.csv template can be filled in with an existing booking ID if you want to modify or update it. In order to find the booking ID you need to Download the Bookings CSV Reference file (Located in Settings / Manage Projects / Add Bookings / Download All Bookings).
Open this file and find the booking ID you wish to update and use that in the first column of the CSV you will upload.
Related Articles
Bulk Upload Time Entries to Hub Planner