Can I disable the Booking Tool Tip Display on the Scheduler?
Yes, click the gear icon within the top right of the scheduler to open the ‘Scheduler Customization’. Scroll to ‘Booking Tool Tip Display.’ From the drop down list select ‘Disabled’. X out of the Scheduler Customization and refresh the page for the feature to be removed.
How to move a Scheduler Booking via ‘drag and drop’?
Using your mouse or keypad, click the booking you wish to move and drag to the resource or date you require. Simply let go / unclick. The booking will have successfully moved. You can also use the right click ‘Booking Menu’ to reassign to another resource or move the dates.
What’s Smart Moving?
Smart Moving is when moving / dragging a booking, it will jump over the non working days that are displayed. Booking duration is maintained.
How do I enable Smart Moving?
First you need to activate displaying non working days in settings. Settings -> System Settings -> Customization -> Display: 
Next. Within the Scheduler: Click the gear icon within the top right of the scheduler to open the Scheduler Customization’. Scroll as far as ‘Smart Moving’. Select Yes/No. X out of the ‘Scheduler Customization’ and refresh the page for the feature to be removed.
How to create a Booking within the Scheduler?
Select/highlight cells within the scheduler. Right click to activate the Booking Menu. Choose the project you wish to make a booking on. From there you can navigate back into the right click menu to reassign the dates, allocation of the booking, booking category etc.
Check out the video tutorial of how to create a booking within the Hub Planner Scheduler – Introduction to the Hub Planner Scheduler & How to Create a Booking
How do I edit a booking in the Hub Planner Scheduler?
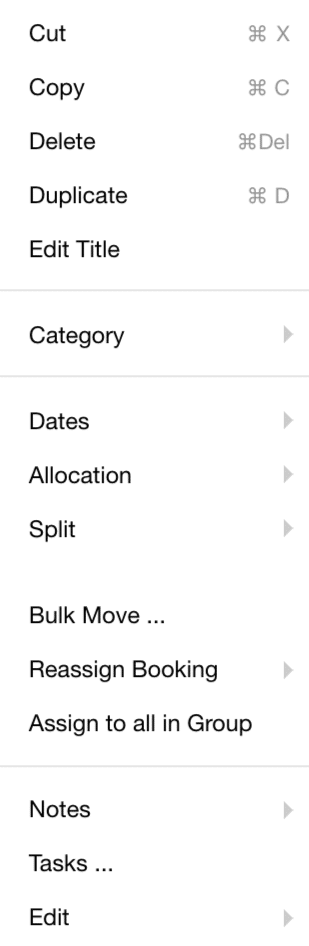
Once a booking is made, you can simply click the 3 vertical dots of the booking. This will open the booking menu. Here you can do the following:
 Cut / Copy / Delete / Duplicate
- Category – Change the booking category
- Dates – Switch the dates of the booking. Note the dates that appear are calculated by the highlighted booking on the scheduler
- Allocation – 3 options. Choose between percentage, hours per day or total hours.
- Split – opt to split the booking in two. This helps with reallocating a partial booking to another date or resource.
- Bulk Move – this option opens up the bulk move modal. Multiple options are available allowing you to move bookings along the timeline or to another resource etc.
- Reassign the booking – choose from the expanded drop down list.
- Assign to all in Group.
- Notes – Edit/Add access the booking notes
- Tasks – opens up the task centre
- Edit – options to open the booking modal, as well as access to the Resource or Project modal.
 Cut / Copy / Delete / Duplicate
Don’t forget to use the drag and drop function to move bookings to other resources or alternative dates. Expand or condense the booking by clicking and dragging.
Check out the video tutorial of how to create a booking within the Hub Planner Scheduler – Introduction to the Hub Planner Scheduler & How to Create a Booking
Can I alter the Booking Category?
Absolutely. Simply click the 3 dots of the booking you wish to change. This will open the ‘Booking Menu’. From here, scroll to ‘Booking Category’. Choose the ‘Booking Category’ you wish to change to. The booking will now automatically change to the new ‘Booking Category’.
From the ‘Booking Menu’, you can also click ‘Edit Booking’ to open the ‘Booking Modal’. Here you can change the dates as well as any other changes you might wish to make at the same time.
I need to change the dates of a Scheduler Booking
Sure. There are 3 different ways within the Scheduler. You can either use the drag and drop feature by extending / shortening or moving to other dates. Alternatively, click the 3 dots for the booking menu. From here click the Start Date, select the date. Click the End Date, select the date. Now you booking will have updated with the new dates. From the booking menu, you can also click ‘Edit Booking’ to open the Booking Modal. Here you can change the dates as well as any other changes you might wish to make at the same time.
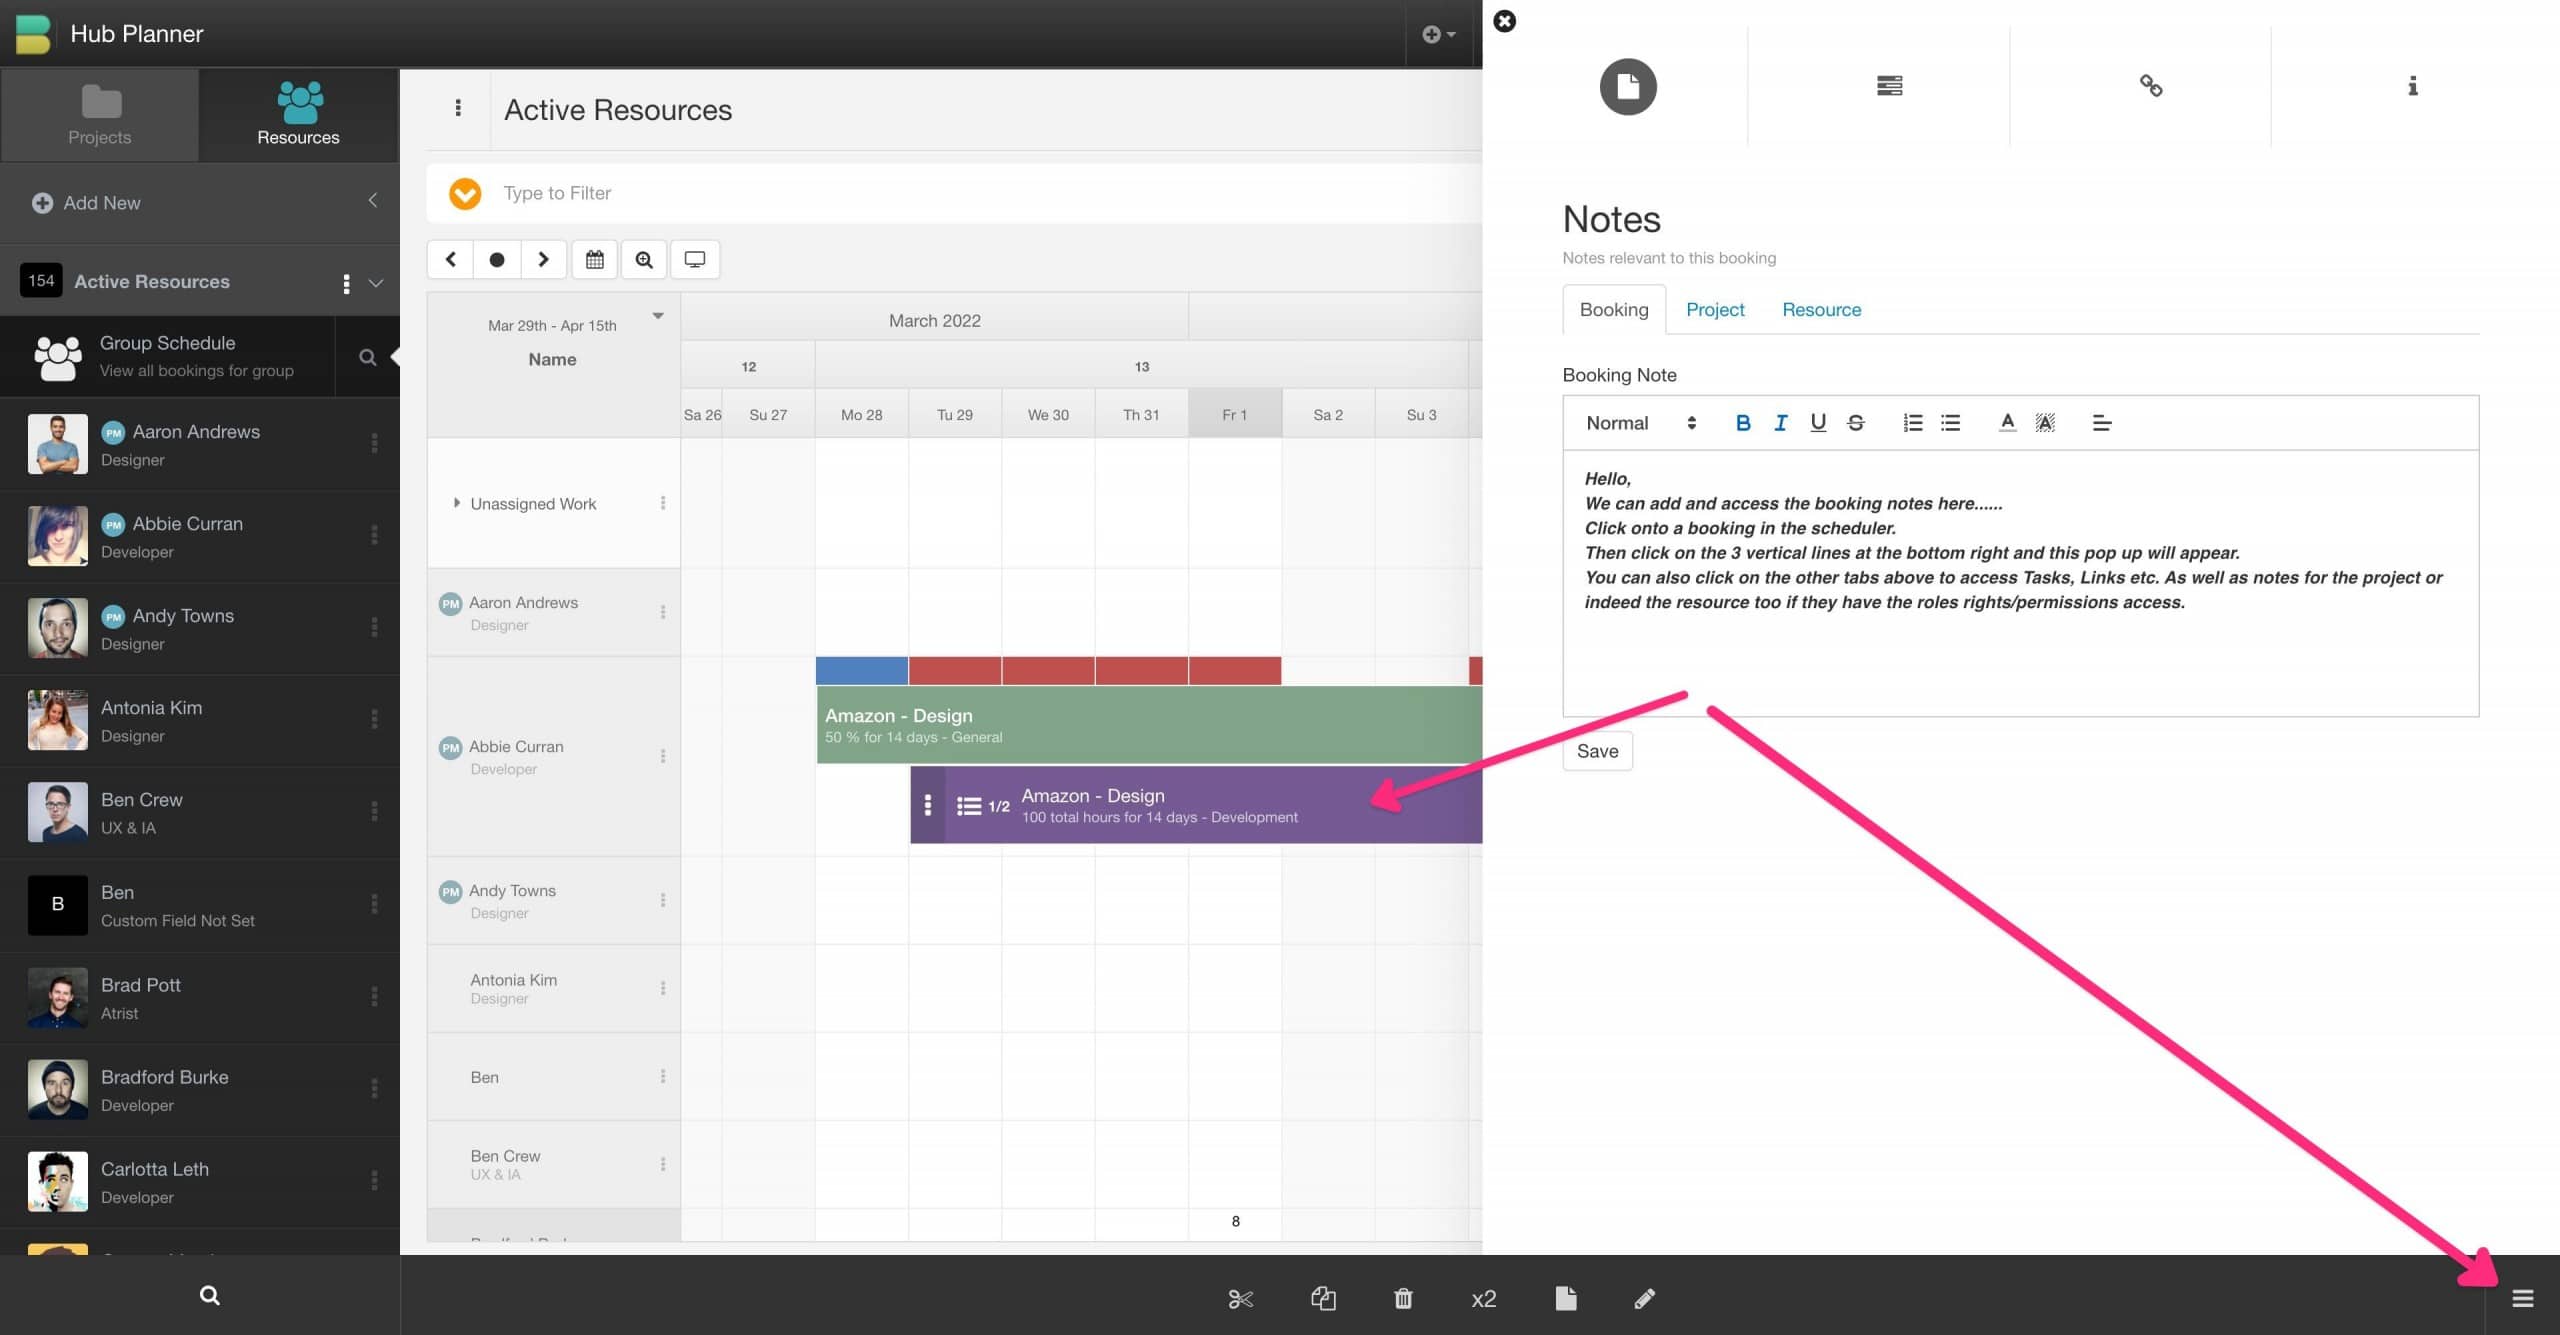
How do I access the Booking notes?
If you don’t have access lets say to edit the booking but you do have access to view the notes. How do I view the notes if I can’t access the booking modal? All you need to do is click on the booking within the scheduler, then click the 3 horizontal lines at the bottom right of the page. This will open a pop up to the right hand side of the page. Here you can access the booking notes. There are also tabs to access Tasks, Links etc. Not only that, you also have tabs to access the Project Notes, and the Resource notes if you have the roles rights/permissions to do so.
How do I split a Scheduler Booking between two Resources?
Click the 3 dots of the booking you wish to split. From the booking menu, select ‘Split’. Choose the date that you wish to split the booking by. Now, click and drag that split portion of the booking to the new resource. Alternatively use the booking menu to reallocate to another resource.
Can I reassign a Booking to another Resource from the Scheduler?
Yes. Use either the drag and drop feature to move the booking. Or alternatively, use the booking menu to reallocate the booking to another resource.
Can I edit the Booking from the Scheduler?
Yes indeed you can. Click the 3 dots to open the booking menu. Click ‘Edit Booking’ to open the Booking Modal. Edit the booking as required. Click ‘Update’.
What’s a Bulk Move?
You can bulk move bookings within the scheduler. You have options to bulk move the following:
- All Selected Project Bookings for selected Resource to another date
- All Selected Project Bookings for all Resources to another date
- Move All Project Bookings for selected Resource to another date
- All Selected Project Bookings from selected Resource to another Resource
- All Project Bookings for selected Resource to another Resource
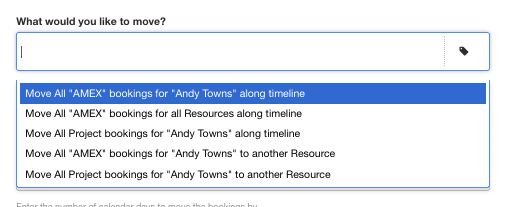
Opt to move bookings by a number of days Forwards or Backwards. You can also choose to start from a particular date. Lastly, click ‘Bulk Update’.

How do I add red, amber, green (RAG) status to my Bookings?
Using Booking Categories, you can set these up via Settings. To apply them to bookings, simply use the Booking Menu to apply the required color. There is a very useful article within the Hub Planner Blog on how to ‘Best Practice to Color Code Projects’.
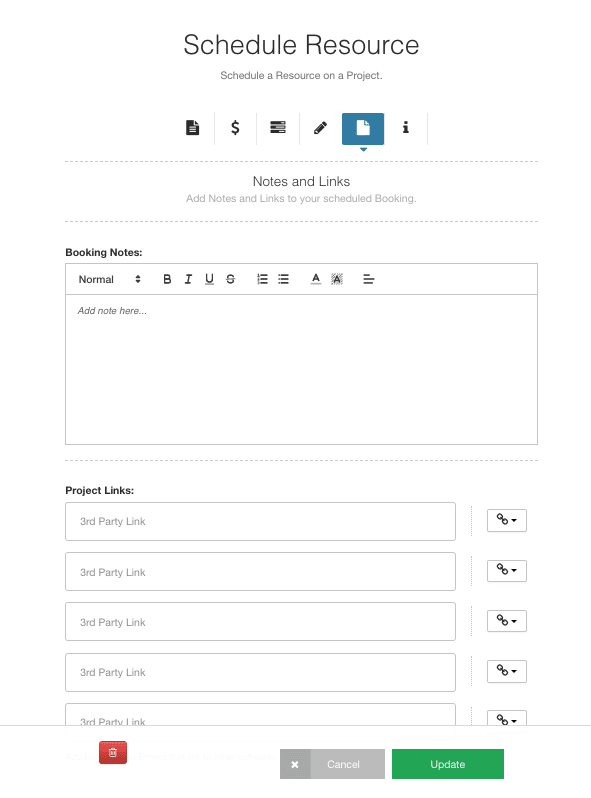
How do I add URL links to my Projects or Bookings?
Click Edit Project or Edit Booking. Navigate to the ‘Notes & Links’ tab. Enter the Links. Click ‘Update’.
Scheduler Bookings Tips & Tricks?
If you found the above helpful, and want to find out more? Here is an article well worth reading. Scheduler Bookings Tips & Tricks