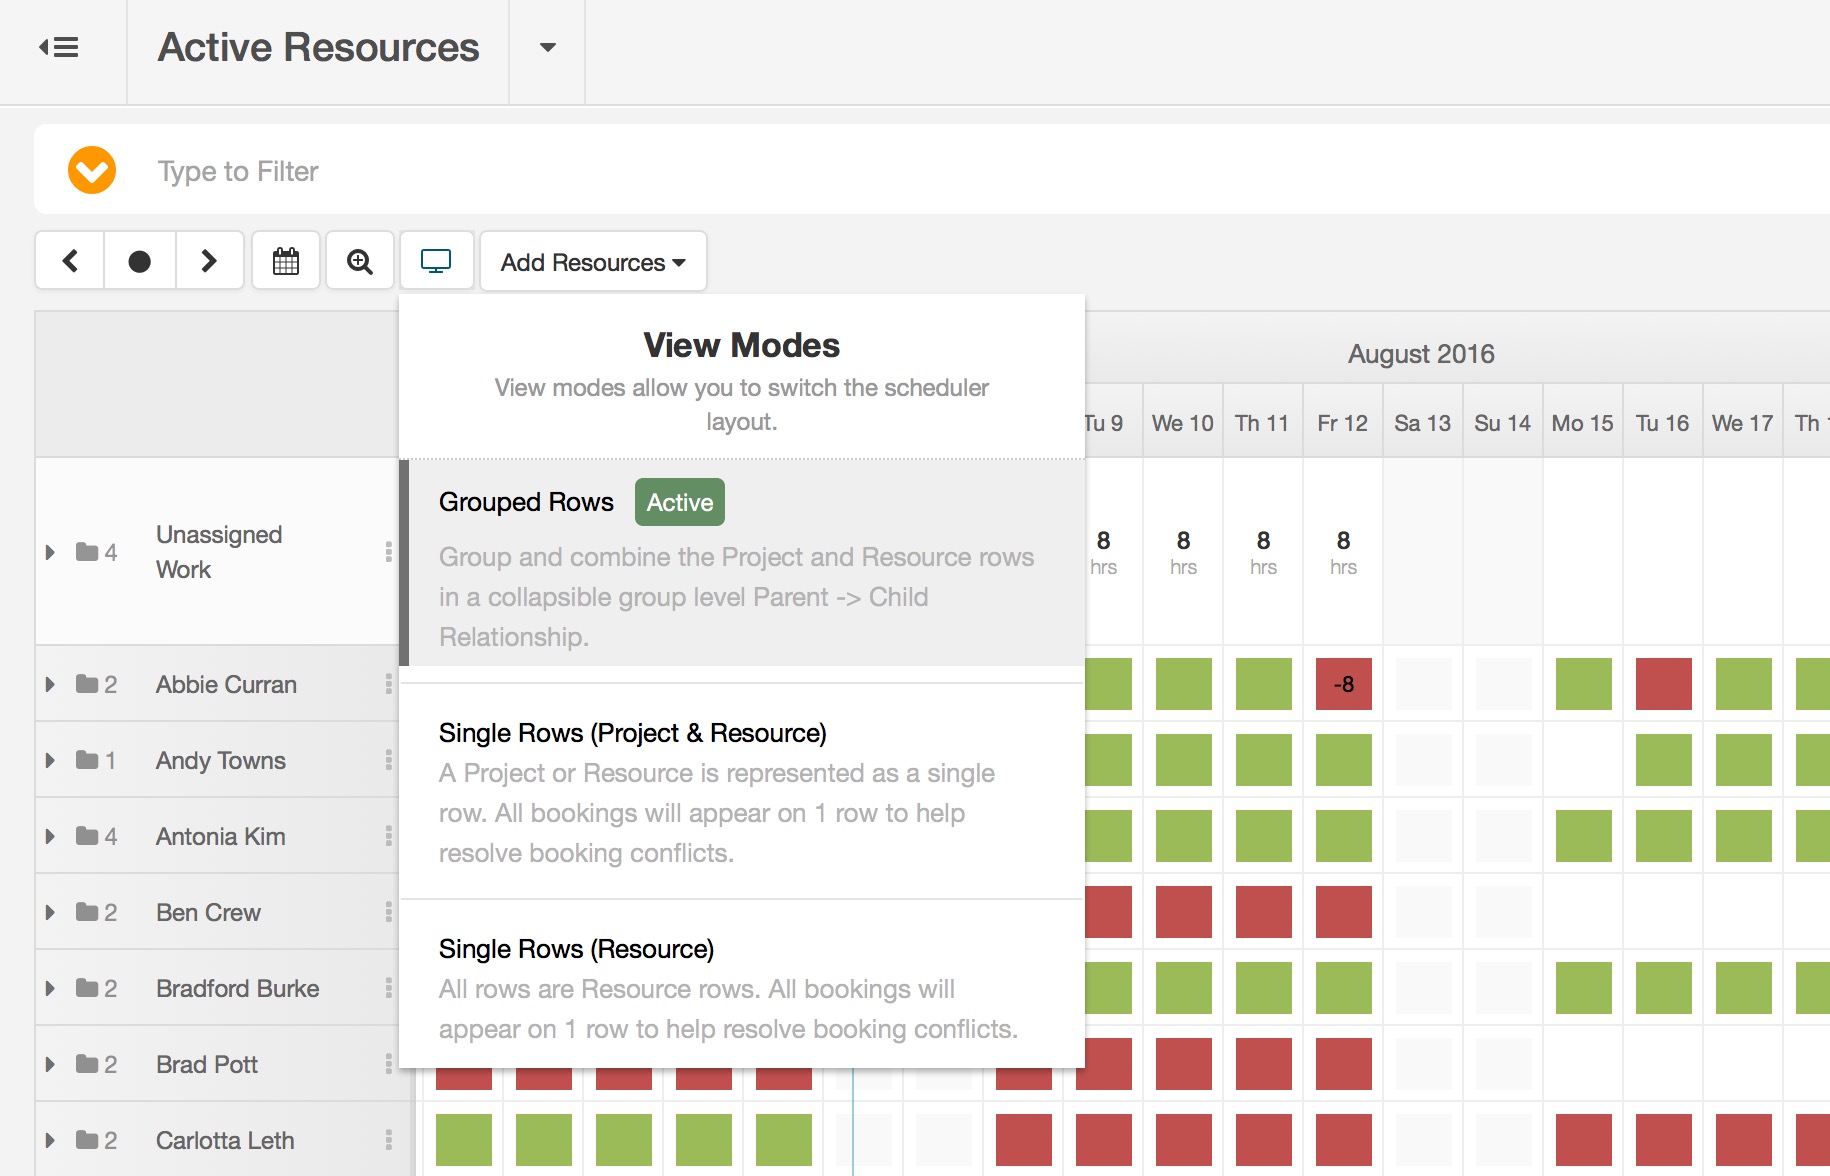
The new Scheduler View Modes give the biggest impact in the new Hub Planner revamped resource planning scheduler. With 3 new viewing options to choose from, you can now flip the legacy scheduler from Resources to Projects and create a grouped layout of the rows. Let’s take a look at the different views and where they may be useful.
Single Rows (Resource)
This is the original resource planning mode that has been provided through the Hub Planner Scheduler for many years. This view is extremely well balanced as it always shows Projects or Resource in context of the resource (row). That is, the resources are always the row and the bookings you make are always the project. This view can be particularly useful when looking at a single project or a project group and you want to see the resources as single row items. It is also a valuable mode when resolving conflicts, which some of the other views cannot provide.
When viewing single projects in this view, you have access to all resource bookings. This means that all resource bookings load in on 1 row and not separate rows. Identifying where a resource has taken on more work in another project outside of the individual project you are focused on becomes a much easier task. Thus making over scheduling that resource less likely.
Single Rows (Project / Resource)
This view supports the same layout as Single Resource mode, but when viewing resources it will highlight the projects as rows and not the resource like the Single Resource View. This means that that bookings on the scheduler are actually resources you can directly schedule and plan. This is particularly useful when planning people around a project in a single row and you can move them around a project very easily.
Group Mode
Group mode allows you to create parent-child groups from projects and resource and resource and projects. The parent row is collapsible and will contain all of the child rows. For example if you have a project called MTV, then all resources on the MTV project will be listed under that project in the one view. This makes it really easy to see the scope of work and the teams involved in a particular project. On the flip side you can open up 1 resource and quickly see all of the projects they are currently involved with. Group mode also will help to make it easy to plan milestones and phases very easily. When using group mode it is important to remember that the grouping will act as a filter, and only the bookings for the parent project or resource will be loaded in. Resolving booking conflicts may be easier in one of the other view modes.
Which scheduler view is best?
Well, that is really up to how you want to schedule your workforce and teams. The single resource rows has always been a powerful view and is the legacy Hub Planner scheduler view. This view always represents the resources as rows and in a resource-centric planning environment, this view will work best for most. The Single Rows can be really useful for planning individuals around a project, an inverse of what the other layout does but achieving the same goal. The group modes strength is in giving you a lot of information about a resource or a project in the scheduler in one spot. The Resource mode has a heat map like availability view which allows you to visually identify the capacity and availability as you plan.
Most project managers will probably rely on a combination of the views to plan effectively and present their teams schedules.
Repeating / Recurring Bookings
Creating a recurring or repeat booking, phase or milestone is really simple in Hub Planner. Repeat bookings are useful when you need to plan a booking over time which has the same day, week or month. That Monday morning meeting with the team, that once a month work for a client or sprint planning with phases. All of these can be repeatedly scheduled in Hub Planner.
Project Phases
Project Phases can be planned on a project. Project phases are visual indicators which represent a phase or stage in a project. You could do sprint planning with these if you like or simple project phase planning. Phases are a great way to bring a visual reminder of where the planning is supposed to start and stop.
Project Parent Row
The project parent row is now a home for Project Milestones, Project Phases and Project Start and End Dates. You will need to switch to Group mode to see this row. Within this row are special events which surround a project. You can move these events as you like and add them via the right click menu or the tools menu.
Project Milestones
Project Milestones can be planned inline on a project and are now introduced to the new project group parent row.
Project Start and End Dates
Project Start and End Dates can be planned inline on a project.
Multi Move
You can multi select different events and move them together. This is done by holding down the CTRL or Command Key and selecting the events you want to move. Once you have selected them all, you can drag the bookings along the scheduler.
Toolbar
The toolbar has been cleaned up with better grouping and categorization of the menu items. All the features are still there with some additions to help planning easier.
Re-Engineerd Context Menus
The menus are have been re-engineered to allow you to quickly edit or add information directly from the context menu. An accordion style layout allows you to quickly set dates, edit colors, allocation and repeat options.
The menus are always available from using the right click menu, the left click menu where you see the 3 dots, or the scheduler toolbar.
The right click context menus are always relevant to the scheduler cell or booking you click.
For example, if you click on a parent row in the group mode layout, you will be presented with options to add milestones, phases and start and end dates for the project. The child rows will have a completely different set of options.
Filtering
You can now filter in the scheduler by project custom fields and project fields. This only works when viewing projects as rows.
Resource and Project Data
You have the option to associate a custom field with the resource or project. This appears under the resource or project name in the scheduler sidebar.
There have been a lot of smaller fixes, updates and enhancements in this release that we hope enrich the experience and usability of the platform.